
In Part I of this series, R and necessary libraries/packages together with a Lambda function handler are packaged and saved to Amazon S3. Then, in Part II, the package is deployed at AWS Lambda after creating and assigning a role to the Lambda function. Although the Lambda function can be called via the Invoke API, it’ll be much more useful if the function can be called as a web service (or API). In this post, it is discussed how to expose the Lambda function via Amazon API Gateway. After creating an API by integrating the Lambda function, it is protected with an API key. Finally a custom domain name is used as an alternative URL of the API.
- Backend
- Frontend
[EDIT 2017-04-17] The Lambda function hander (handler.py) has been modified to resolve an issue of Cross-Origin Resource Sharing (CORS). See Part IV for further details.
Create API
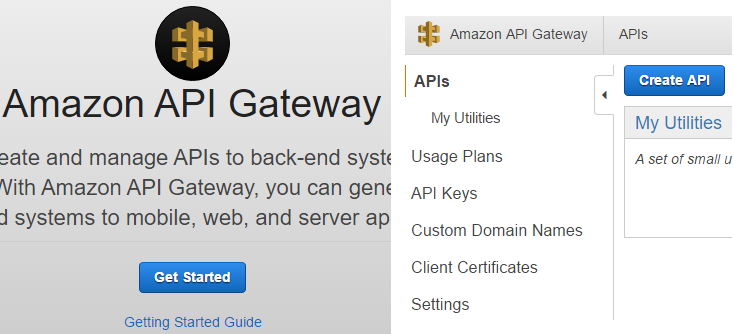
It can be started by clicking the Get Started button if there’s no existing API or the Create API button if there is an existing one.
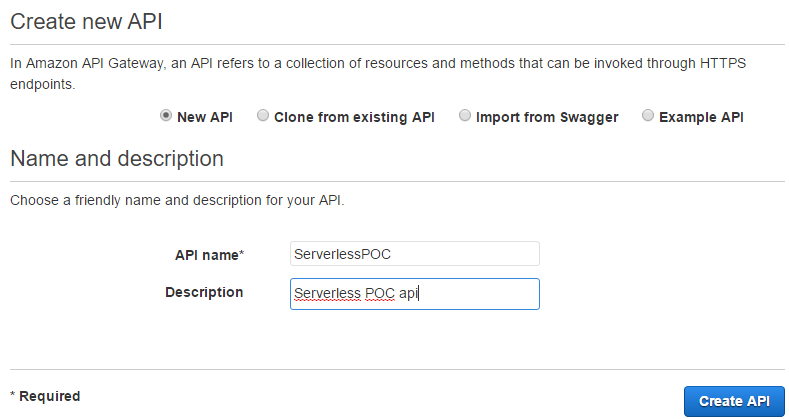
Amazon API Gageway provides several options to create an API. New API is selected for the API of the POC application and the name of the API (ServerlessPOC) and description are entered.
Create resource and method
According to Thoughts on RESTful API Design,
In any RESTful API, a resource is an object with a type, associated data, relationships to other resources, and a set of methods that operate on it.
A resource is represented in the URL and, if the resource is named as admit, the resource URL becomes /admit (eg http://example.com/admit) and a client application can make a request to the URL.
As can be seen below, the Lambda function hander requires that the event object has 3 elements: gre, gpa and rank.
 1def lambda_handler(event, context):
 2    try:
 3        gre = event["gre"]
 4        gpa = event["gpa"]
 5        rnk = event["rank"]
 6        can_be_admitted = pred_admit(gre, gpa, rnk)
 7        res = {"result": can_be_admitted}
 8        return res
 9    except Exception as e:
10        logging.error('Payload: {0}'.format(event))
11        logging.error('Error: {0}'.format(e.message))
12        err = {
13            'errorType': type(e).__name__,
14            'httpStatus': 400,
15            'request_id': context.aws_request_id,
16            'message': e.message.replace('\n', ' ')
17            }
18        raise Exception(json.dumps(err))
In Amazon API Gateway, there are two ways to create the resource for the Lambda function of the POC application.
Query string
- It is possible to create only a resource and the 3 elements can be added in query string. Then a request with the 3 elements can be made to
/admit?gre=800&gpa=4&rank=1.
1/
2  /admit
Proxy resource
- Proxy resources can be created by covering path parameters by brackets. Then the equivalent request can be made to
/800/4/1/admit.
1/
2  /{gre}
3    /{gpa}
4      /{rank}
5        /admit
For the API of the POC application, the way with query string is used. First it is necessary to create a resource.
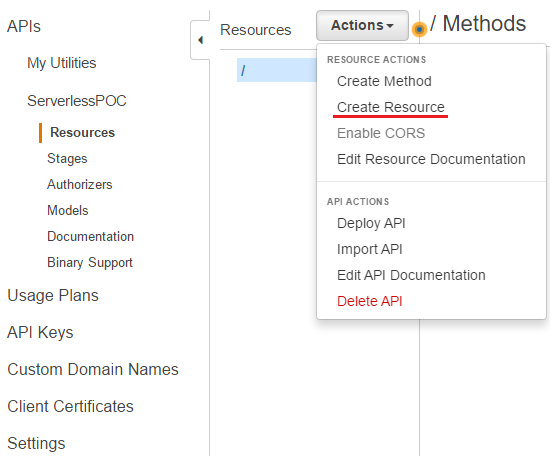
Then the resource is named as Admit.

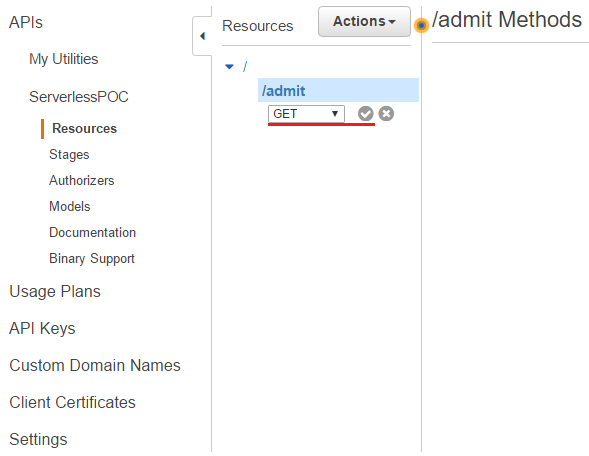
After creating the resource, it is necessary to create one or more HTTP methods on it.

Only the GET method is created for this API.
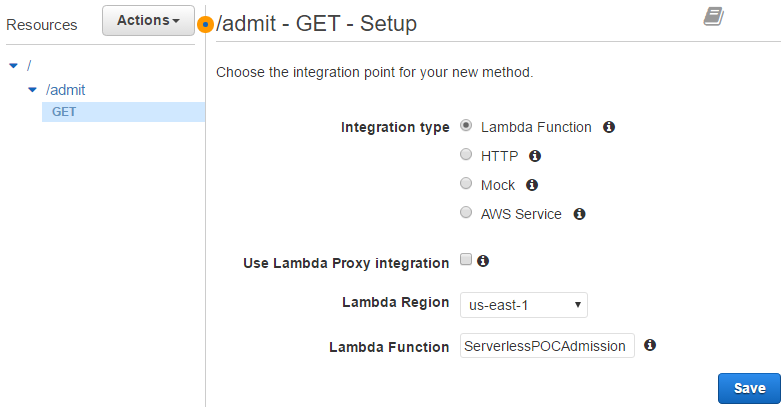
Now it is time to integrate the method with the Lambda function. Lambda Function is selected as the interation type and ServerlessPOCAdmission is selected - note that the region where the Lambda function is deployed should be selected first.
Configure method execution
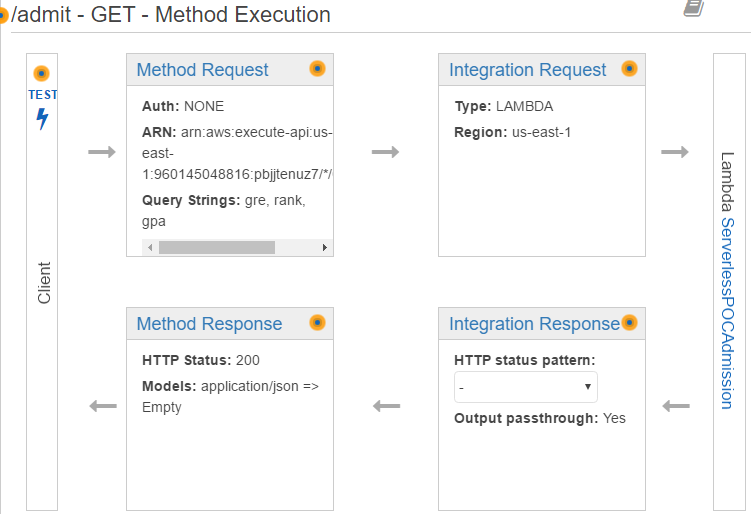
The lifecycle of a Lambda function is shown below. A Lambda function is called after Method Request and Integration Request. Also there are two steps until the result is returned back to the client: Method Response and Integration Response.
Method request
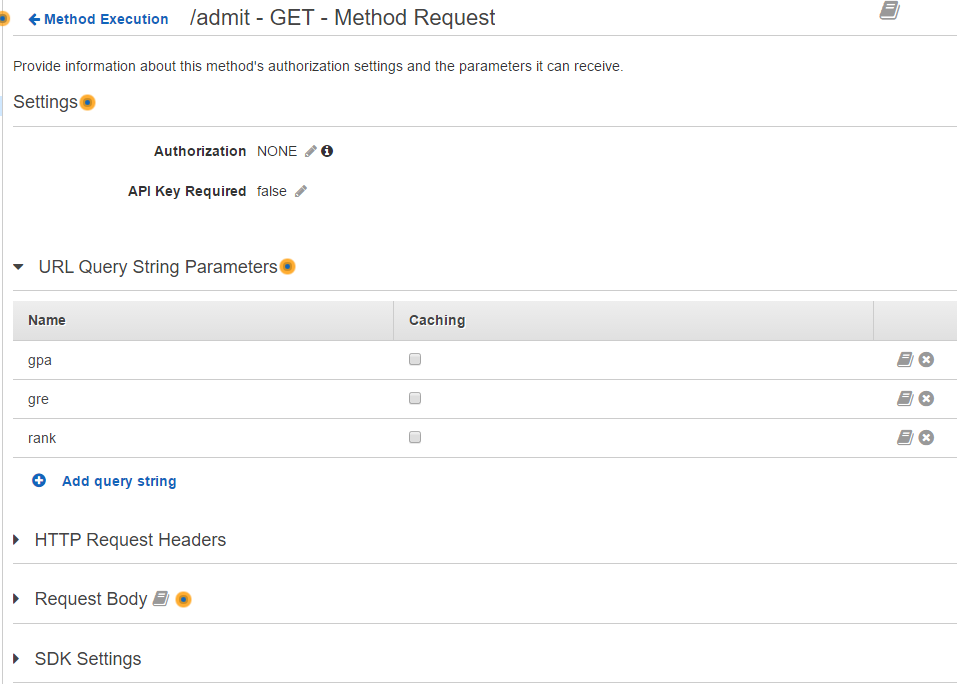
As discussed earlier, only a single resource is created so that a request is made with query string. Therefore the 3 event elements (gre, gpa and rank) should be created in URL Query String Parameters. Note that API Key Required is set to be false and it is necessary to change it to be true if the API needs to be protected with an API key - it’ll be discussed further below. The other sections (HTTP Request Header, Request Body, …) are not touched for this API.
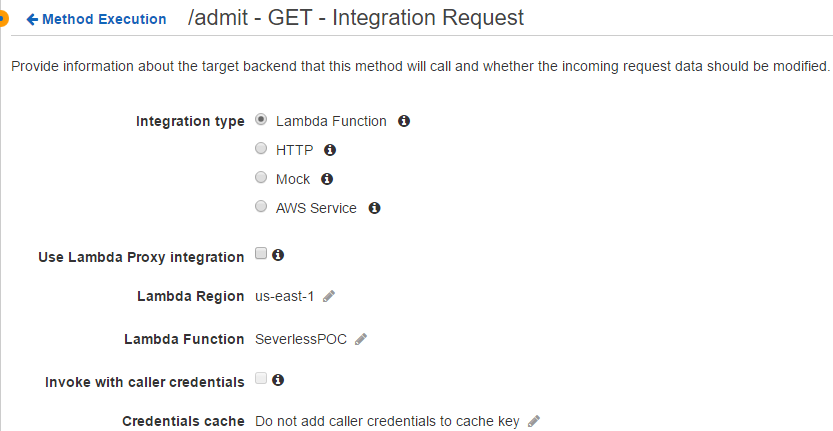
Integration request
It is possible to update the target backend or to modify data from the incoming request. It is not necessary to change the target backend as it is already set appropriately.
Among the 3 event elements (gre, gpa and rank), rank is a factor or, at least, it should be a string while the others can be either numbers or numeric strings. Therefore the Lambda function will complain if a numeric rank value is included in a query string (eg rank=1). Although it is possible to modify the Lambda function handler, an easier way is to modify data from the incoming request.
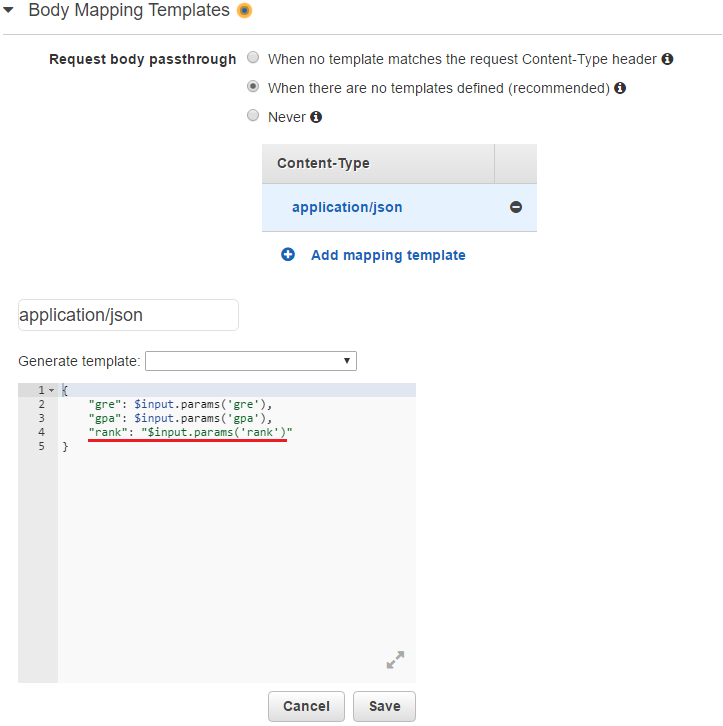
In Body Mapping Templates, the recommended option of When there are no templates defined (recommended) is selected in request body passthrough and application/json is added to Content-Type. Data from incoming request can be updated in the template that is shown by clicking the added content type (application/json). As shown below, rank is changed into a string before the Lambda function is called. Note Velocity Template Engine is used in Amazon API Gateway.
1{
2    "gre": $input.params('gre'),
3    "gpa": $input.params('gpa'),
4    "rank": "$input.params('rank')"
5}
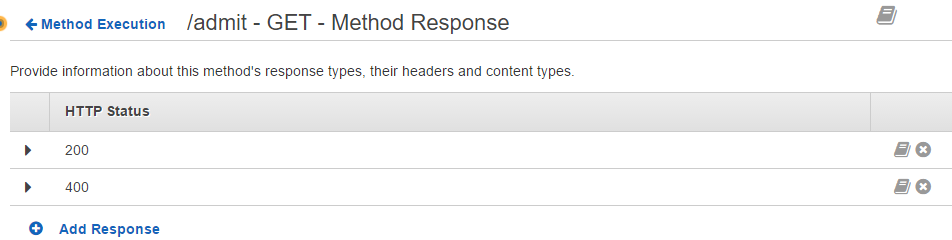
Method response
If a request is successful, the HTTP status code of 200 is returned. As can be seen in the code of the Lambda function handler above, the status code of 400 is planned to be returned if there is an error. Therefore it is necessary to add 400 response so that it is mapped in Integration Response.
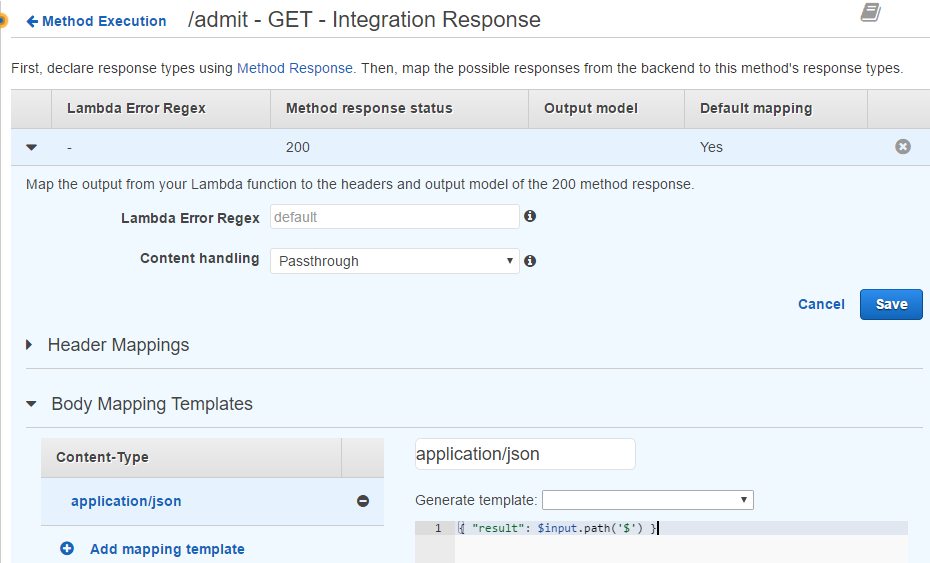
Integration response
The output of a response can be mapped in Body Mapping Templates. The body of the default 200 response doesn’t need modification as the Lambda function already returns a JSON string - {"result": true} or {"result": false}. If the function returns only True or False, however, the response can be modified as shown below. (Note that this is only for illustration and nothing is added to the content type.)
1{
2    "result": $input.path('$')
3}
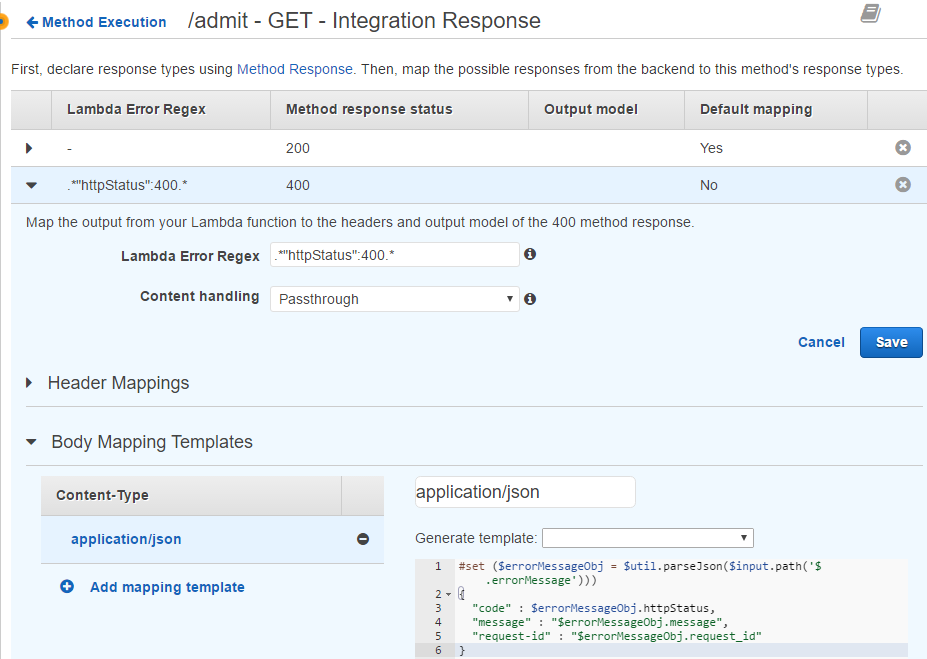
For 400 response, the HTTP status is identified by .*"httpStatus":400.* and the body is mapped as following.
1#set ($errorMessageObj = $util.parseJson($input.path('$.errorMessage')))
2{
3  "code" : $errorMessageObj.httpStatus,
4  "message" : "$errorMessageObj.message",
5  "request-id" : "$errorMessageObj.request_id"
6}
Test API
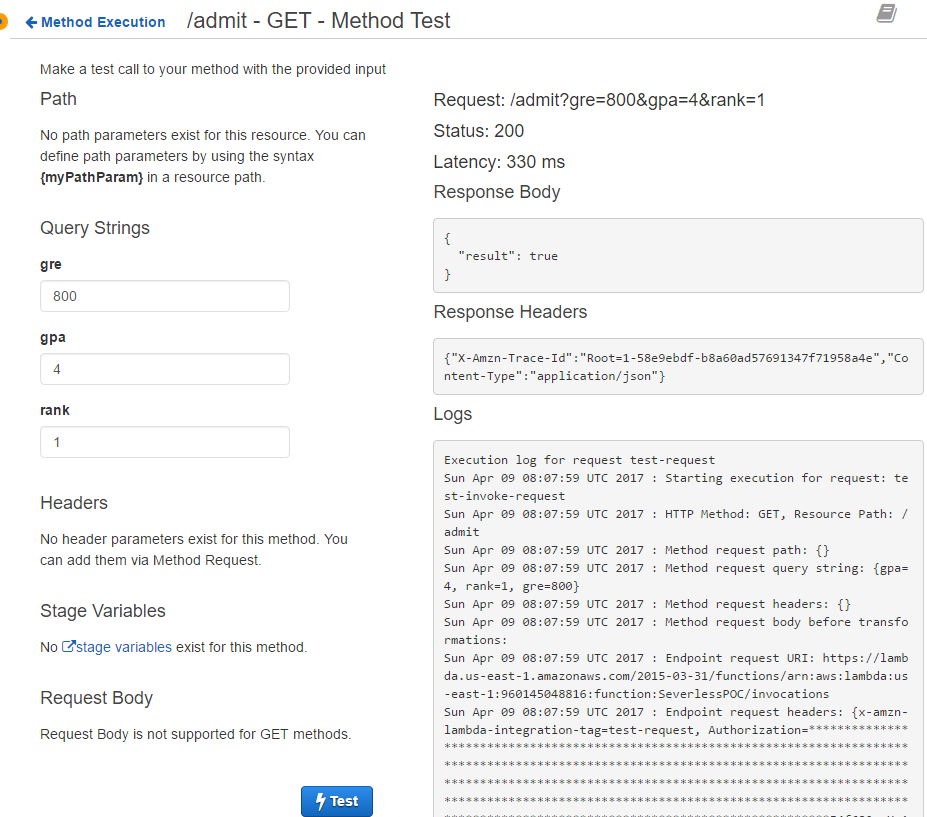
The API can be tested by adding the 3 elements in query string. As expected, the response returns {"result": true} with the HTTP status code of 200.
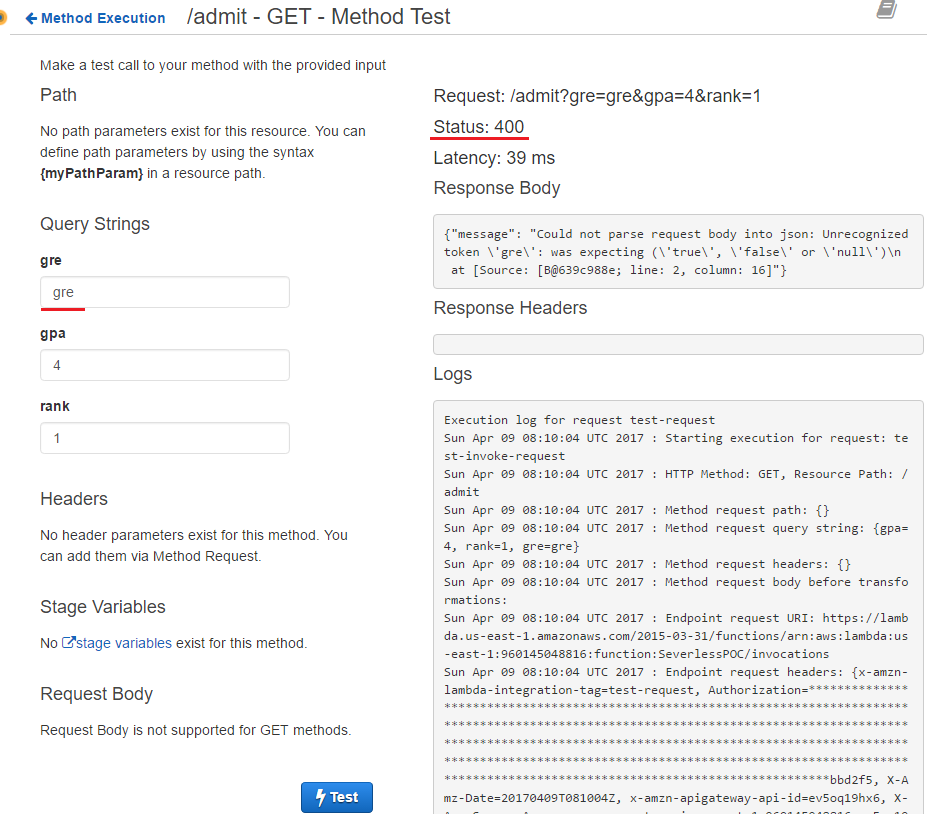
In order to test 400 response, the value of gre is set to be a string (gre). The status code of 400 is returned as expected but it fails to parse the message of the error into JSON. It is necessary to modify the message, referring to Error Handling Patterns in Amazon API Gateway and AWS Lambda.
1        ...
2
3        err = {
4            'errorType': type(e).__name__,
5            'httpStatus': 400,
6            'request_id': context.aws_request_id,
7            'message': e.message.replace('\n', ' ')
8            }
9        ...
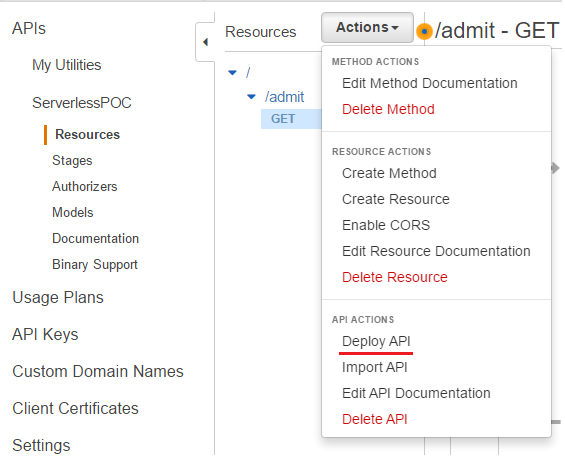
Deploy API
Once testing is done, it is ready to deploy the API.
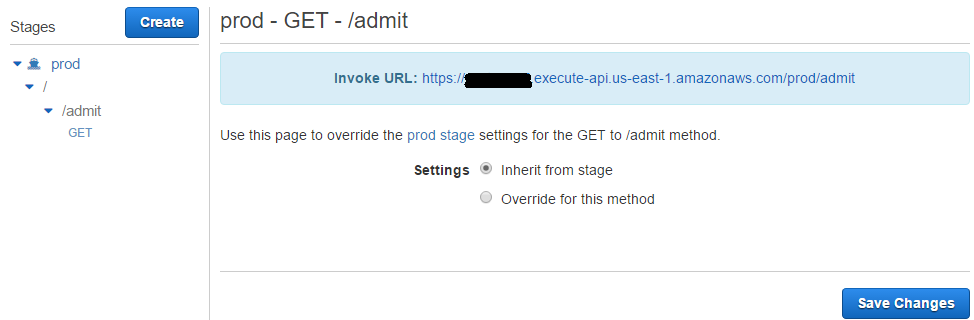
It is possible to create a new stage by selecting [New Stage] or to update an existing one by selecting its name in deployment stage. Although it is recommended to create at least 2 stages (eg development and production stage), only a singe production stage is created for the POC application.

Once created, the invoke URL can be found when the relevant method (GET) is clicked. The default root URL is of the following format.
1https://api-id.execute-api.region.amazonaws.com/stage
The API has been deployed successfully and it is possible to make a request using curl and R’s httr package as following - note the API ID is hidden.
 1## no API Key
 2#curl 'https://xxxxxxxxxx.execute-api.us-east-1.amazonaws.com/prod/admit?gre=800&gpa=4&rank=1'
 3r <- GET("https://xxxxxxxxxx.execute-api.us-east-1.amazonaws.com/prod/admit",
 4         query = list(gre = 800, gpa = 4, rank = 1))
 5
 6status_code(r)
 7[1] 200
 8
 9content(r)
10$result
11[1] TRUE
Protecting by API key
Enable API key
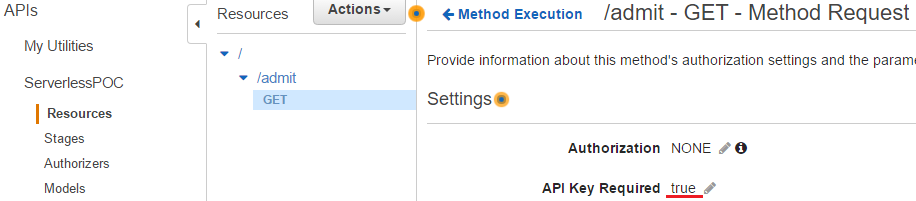
It is on individual methods whether to enable an API key or not. In order to enable an API key, select the GET method in the resources section and change API Key Required to true in Method Request. Note that the API has to be deployed again in order to have the change in effect.
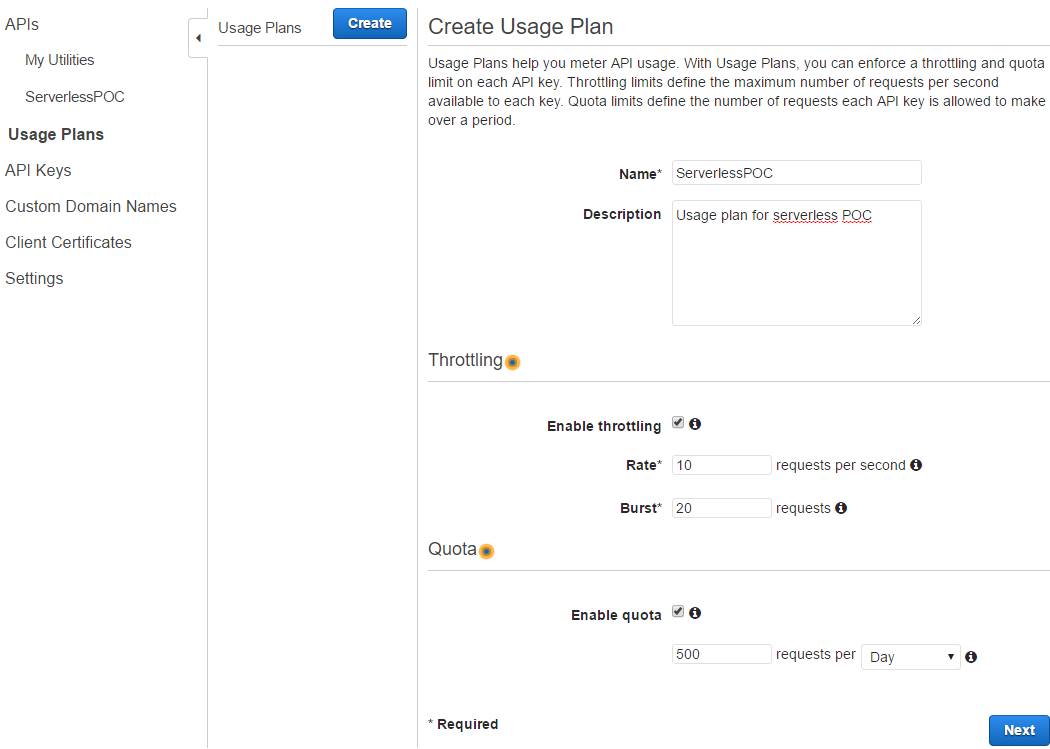
Create usage plan
A usage plan enforces Throttling (Rate and Burst) and Quota of an API and it associates API stages and keys. Since its launch on August 11, 2016, it is enabled in a region where API Gateway is used for the first time. The meaning of the throttling and quota values are as following.
- Rate is the rate at which tokens are added to the Token Bucket and this value indicates the average number of requests per second over an extended period of time.
- Burst is the capacity of the Token Bucket.
- Quota is the total number of requests in a given time period.
For further details, see Manage API Request Throttling and Token Bucket vs Leaky Bucket.
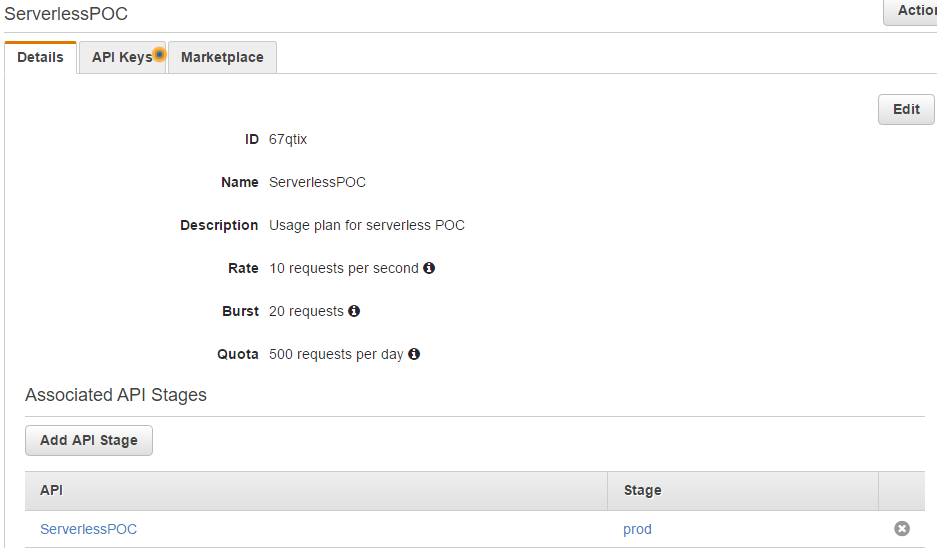
A usage plan named ServerlessPOC is created where the rate, burst and quote are 10 requests per second, 20 requests and 500 requests per day respectively.
Then the production stage (prod) of ServerlessPOC API is added to the plan.
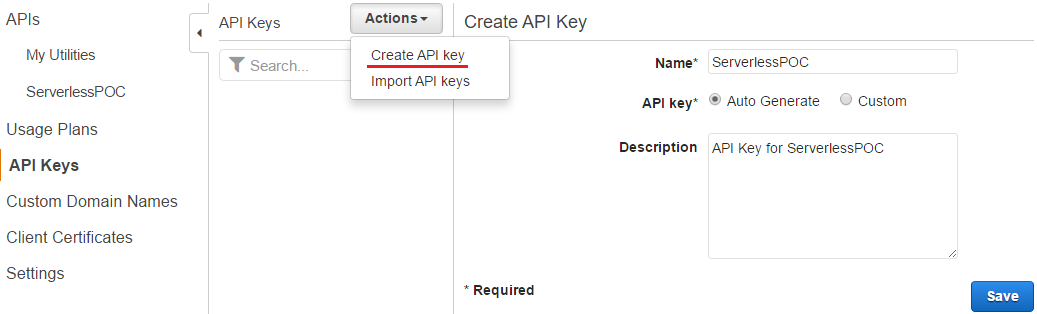
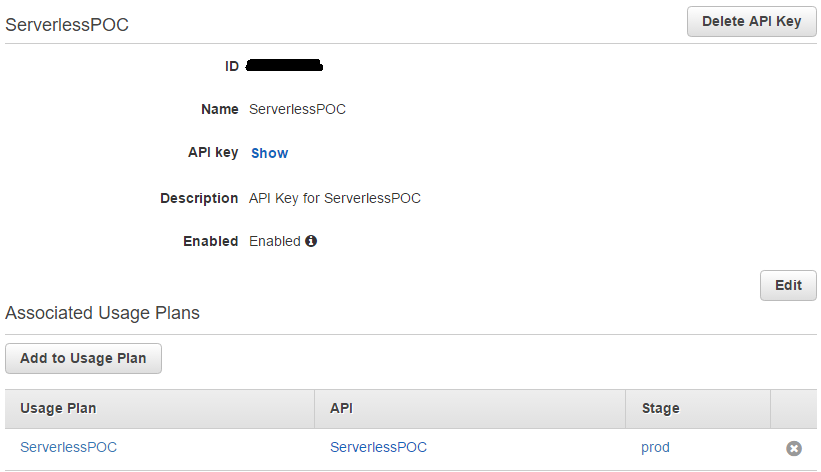
Create API key
An API key can be created in API Keys section of the Console. The key is named as ServerlessPOC and it is set to be auto-generated.
The usage plan created earlier is added to the API key.
Now the API has been protected with an API key and it is possible to make a request using curl and R’s httr package as following. Note that the API key should be added with the key named x-api-key. Without the API key in the header, the request returns 403 Forbidden error. (Note also tick marks rather than single quotations in GET())
 1## API Key
 2# 403 Forbidden without api key
 3#curl -H 'x-api-key:xxxxxxxxxxxxxxxxxxxxxxxxxxxxxxxxxxxxxxxx' \
 4#    'https://xxxxxxxxxx.execute-api.us-east-1.amazonaws.com/prod/admit?gre=800&gpa=4&rank=1'
 5r <- GET("https://xxxxxxxxxx.execute-api.us-east-1.amazonaws.com/prod/admit",
 6         add_headers(`x-api-key` = 'xxxxxxxxxxxxxxxxxxxxxxxxxxxxxxxxxxxxxxxx'),
 7         query = list(gre = 800, gpa = 4, rank = 1))
 8
 9status_code(r)
10[1] 200
11
12content(r)
13$result
14[1] TRUE
Using custom domain name
The invoke URL generated by API Gateway can be difficult to recall and not user-friendly. In order to have a more inituitive URL for the API, it is possible to set up a custom domain name as the API’s host name and choose a base path to present an alternative URL of the API. For example, instead of using xxxxxxxxxx.execute-api.us-east-1.amazonaws.com, it is possible to use api.jaehyeon.me.
The prerequisites for using a custom dome name for an API are
- Domain name
- ACM Certificate (us-east-1 only)
I registered a domain name (jaehyeon.me) in Amazon Route 53 and requested ACM Certificate through AWS Certificate Manager. It was quite quick to me and it took less than 1 day. See the following articles for how-to.
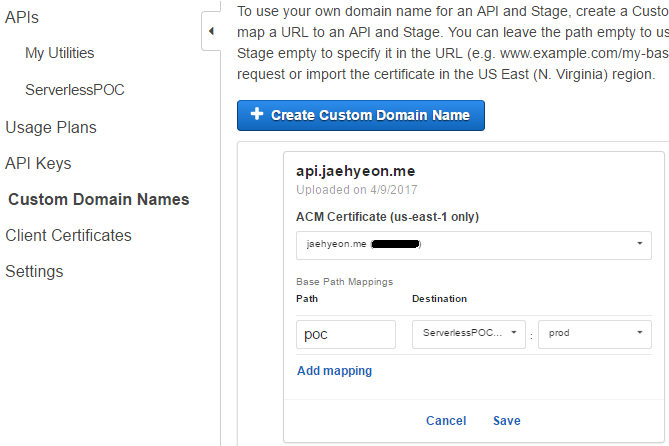
The domain name of the API is set to be api.jaehyeon.me and the approved ACM Certificate is selected. In Base Path Mappings, poc is added to the path and the production stage of the ServerlessPOC API is selected as the destination. In this way, it is possible to change the resource URL as following.
1# default resource URL
2https://xxxxxxxxxx.execute-api.us-east-1.amazonaws.com/prod/admit
3
4# custom resource URL
5https://api.jaehyeon.me/poc/admit
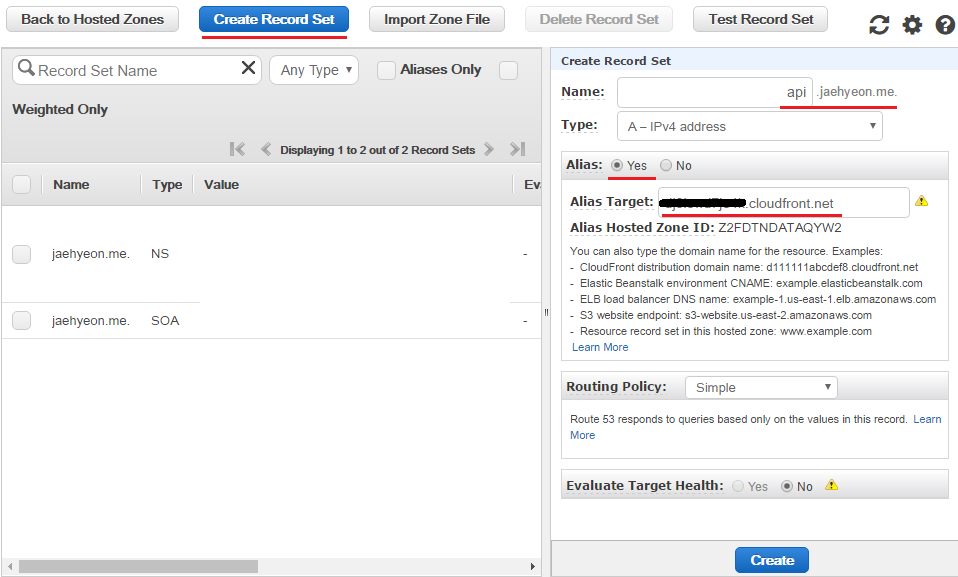
When clicking the save button above, a distribution domain name is assigned by Amazon CloudFront. This step takes up to 40 minutes to complete and, in the meantime, A-record alias for the API domain name is set up so that it can be mapped to the associated distribution domain name.

In Route 53, a new record set is created and api.jaehyeon.me is entered in the name field, followed by selecting A - IPv4 address as the type. Alias is set to be yes and the distribution domain name is entered as the alias target.
Once it is ready, the custom domain name can be used as an alternative domain name of the API and it is possible to make a request using curl and R’s httr package as following.
 1## custom domain name
 2#curl -H 'x-api-key:xxxxxxxxxxxxxxxxxxxxxxxxxxxxxxxxxxxxxxxx' \
 3#    'https://api.jaehyeon.me/poc/admit?gre=800&gpa=4&rank=1'
 4r <- GET("https://api.jaehyeon.me/poc/admit",
 5         add_headers(`x-api-key` = 'xxxxxxxxxxxxxxxxxxxxxxxxxxxxxxxxxxxxxxxx'),
 6         query = list(gre = 800, gpa = 4, rank = 1))
 7
 8status_code(r)
 9[1] 200
10
11content(r)
12$result
13[1] TRUE
That’s it! This is all that I was planning to discuss with regard to exposing a Lambda function backed by a prediction model in R via an API. I hope this series of posts are useful to productionize your analysis.


Comments