
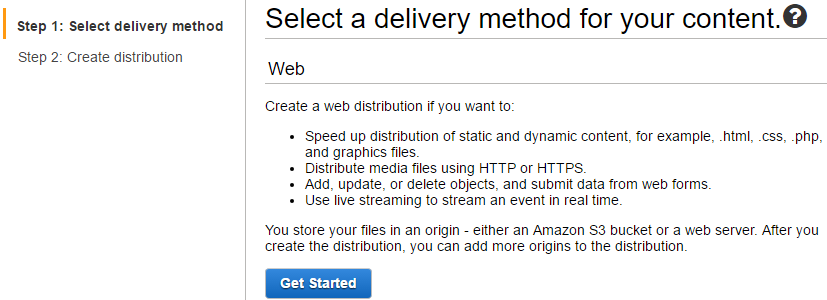
In the previous posts, it is discussed how to package/deploy an R model with AWS Lambda and to expose the Lambda function via Amazon API Gateway. Main benefits of serverless architecture is cost-effectiveness and being hassle-free from provisioning/managing servers. While the API returns a predicted admission status value given GRE, GPA and Rank, there is an issue if it is served within a web application: Cross-Origin Resource Sharing (CORS). This post discusses how to resolve this issue by updating API configuration and the Lambda function handler with a simple web application. Also it is illustrated how to host the application in a serverless environment.
- Backend
- Frontend
- Part IV - Serving R ML Model via S3 - this post
Frontend
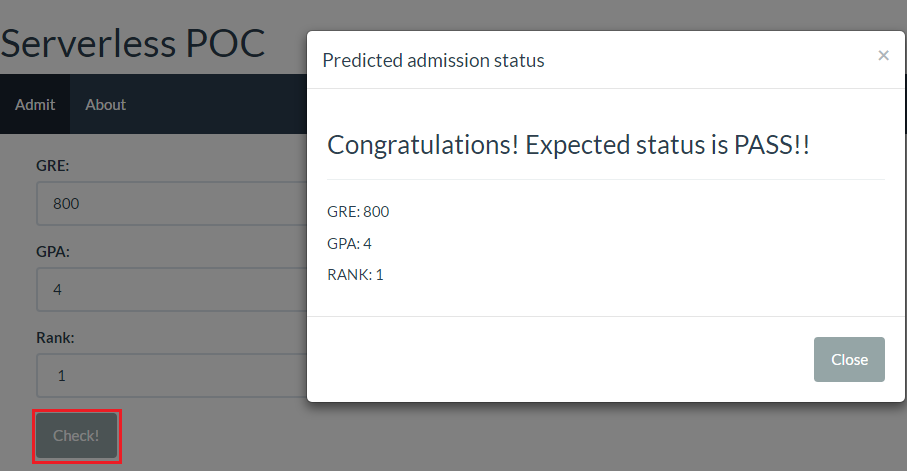
A simple single page application is created using React. By clicking the Check! button after entering the GRE, GPA and Rank values, information of the expected admimission status pops up in a modal. The status value is fetched from the API of the POC application that is discussed in Part III. The code of this application can be found here.
Update Lambda function hander
CORS
According to Wikipedia,
Cross-origin resource sharing (CORS) is a mechanism that allows restricted resources (e.g. fonts) on a web page to be requested from another domain outside the domain from which the first resource was served. A web page may freely embed cross-origin images, stylesheets, scripts, iframes, and videos. Certain “cross-domain” requests, notably Ajax requests, however are forbidden by default by the same-origin security policy.
Here is an example from a Stack Overflow answer why it can be important to prevent CORS.
- You go to website X and the author of website X has written an evil script which gets sent to your browser.
- That script running on your browser logs onto your bank website and does evil stuff and because it’s running as you in your browser it has permission to do so.
- Therefore your bank’s website needs some way to tell your browser if scripts on website X should be trusted to access pages at your bank.
The domain name of the API is api.jaehyeon.me so that requests fail within the application. An example of the error is shown below.
1Fetch API cannot load ...
2No 'Access-Control-Allow-Origin' header is present on the requested resource.
3Origin 'http://localhost:9090' is therefore not allowed access. The response had HTTP status code 403.
Cofigure API
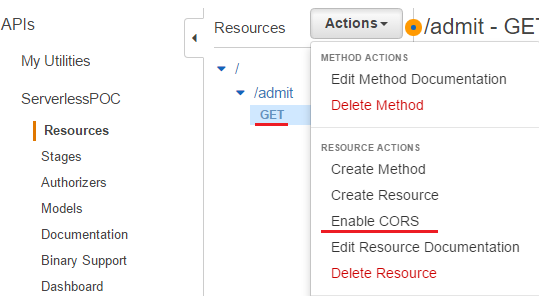
API Gateway allows to enable CORS and it can be either on a resource or a method within a resource. The GET method is selected and Enable CORS is clicked after pulling down actions.
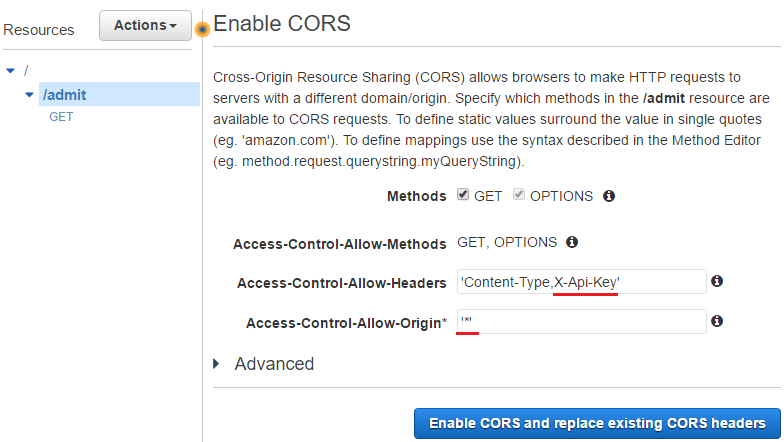
Simply put, another method of OPTIONS is created and the following response headers are added to the GET and OPTIONS methods.
- Access-Control-Allow-Methods: Added to OPTIONS only
- Access-Control-Allow-Headers: Added to OPTIONS only, X-API-Key is allowed
- Access-Control-Allow-Origin: Added to both GET and OPTIONS
Here is all the steps that enables CORS in API Gateway. Note that the necessary headers are added to 200 response only, not to 400 response so that the above error can’t be eliminated for 400 response unless the headers are set separately.

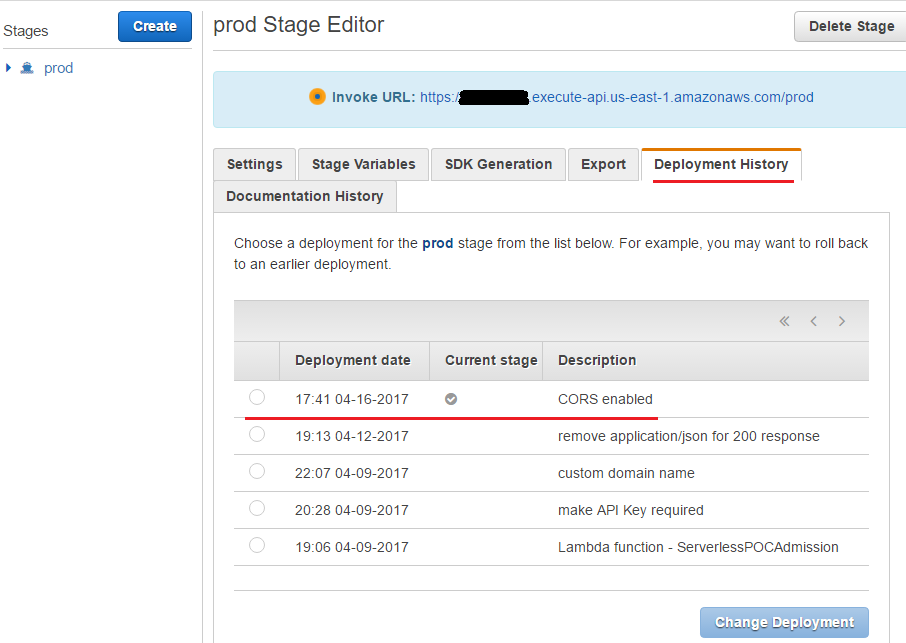
After that, the API needs to be deployed again and, as can be seen in the deployment history, the latest deployment is selected as the current stage.
Update handler
Despite enabling CORS, it was not possilbe to resolve the issue. After some search, a way is found in a Stack Overflow answer. It requires to update the Lambda function handler (handler.py) that extends the 200 response with headers elements - one for CORS support to work and the other for cookies, authorization headers with HTTPS. The original response is added to the body element of the new response. Note it’d be necessary to modify the case of 400 response in order to reduce the risk of encountering the error although it is not covered here.
 1def lambda_handler(event, context):
 2    try:
 3        gre = event["gre"]
 4        gpa = event["gpa"]
 5        rnk = event["rank"]
 6        can_be_admitted = pred_admit(gre, gpa, rnk)
 7        res = {
 8            "httpStatus": 200,
 9            "headers": {
10                # Required for CORS support to work
11                "Access-Control-Allow-Origin" : "*",
12                # Required for cookies, authorization headers with HTTPS
13                "Access-Control-Allow-Credentials" : True
14            },
15            "body": {"result": can_be_admitted}
16        }
17        return res
18    except Exception as e:
19        logging.error('Payload: {0}'.format(event))
20        logging.error('Error: {0}'.format(e.message))
21        err = {
22            'errorType': type(e).__name__,
23            'httpStatus': 400,
24            'request_id': context.aws_request_id,
25            'message': e.message.replace('\n', ' ')
26            }
27        raise Exception(json.dumps(err))
The updated handler is packaged again and copied to S3.
 1# pull git repo
 2cd serverless-poc/
 3git pull origin master
 4
 5# copy handler.py and create admission.zip
 6cd ..
 7export HANDLER=handler
 8
 9cp -v serverless-poc/poc-logit-handler/*.py $HOME/$HANDLER
10cd $HOME/$HANDLER
11zip -r9 $HOME/admission.zip *
12
13# copy to S3
14aws s3 cp $HOME/admission.zip s3://serverless-poc-handlers
The AWS web console doesn’t have an option to update a Lambda function where the deployment package is in S3 so that aws cli is used instead.
1#http://docs.aws.amazon.com/cli/latest/reference/lambda/update-function-code.html
2aws lambda update-function-code --function-name ServerlessPOCAdmission \
3	--s3-bucket serverless-poc-handlers --s3-key admission.zip
The test result shown below indicates the updated handler is executed correctly.
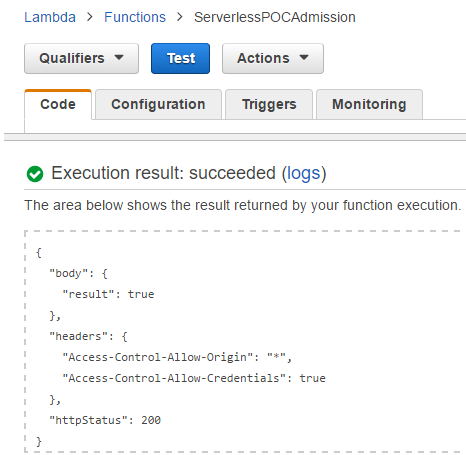
It can also be checked by the API and now the API can be served in a web application.
 1# updated response
 2#curl -H 'x-api-key:xxxxxxxxxxxxxxxxxxxxxxxxxxxxxxxxxxxxxxxx' \
 3#    'https://api.jaehyeon.me/poc/admit?gre=800&gpa=4&rank=1'
 4r <- GET("https://api.jaehyeon.me/poc/admit",
 5         add_headers(`x-api-key` = 'xxxxxxxxxxxxxxxxxxxxxxxxxxxxxxxxxxxxxxxx'),
 6         query = list(gre = 800, gpa = 4, rank = 1))
 7status_code(r)
 8[1] 200
 9
10content(r)
11$body
12$body$result
13[1] TRUE
14
15$headers
16$headers$`Access-Control-Allow-Origin`
17[1] "*"
18
19$headers$`Access-Control-Allow-Credentials`
20[1] TRUE
21
22$httpStatus
23[1] 200
Hosting
Amazon S3 is one of the popular ways to store static web contents and it can be used as a way to host a static web site. The React application can be hosted on S3 as the backend logic of calling the API is bundled and accessible. 2 ways are illustrated in this section. The former is via the Static website hosting property of Amazon S3 Buckets while the latter is through Amazon CloudFront, which is a content delivery network (CDN) service. Note that only HTTP is avaialble if the application is hosted without CloudFront.
Separate S3 buckets are created to store the application as shown below.
poc.jaehyeon.me- For hosting Static website hosting propertyweb.jaehyeon.me- For hosting through CloudFront
In AWS console, two folders are created: app and css. Then the application files are saved to each of the buckets as following.
1app
2    bundle.js
3css
4    bootstrap.css
5    style.css
6index.html
Static website hosting
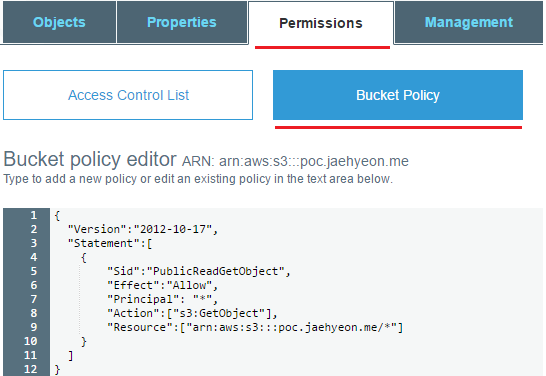
First read-access is given to all objects in the bucket (poc.jaehyeon.me). It is set in Bucket Policy of the permissions tab - Policy is discussed in Part II.
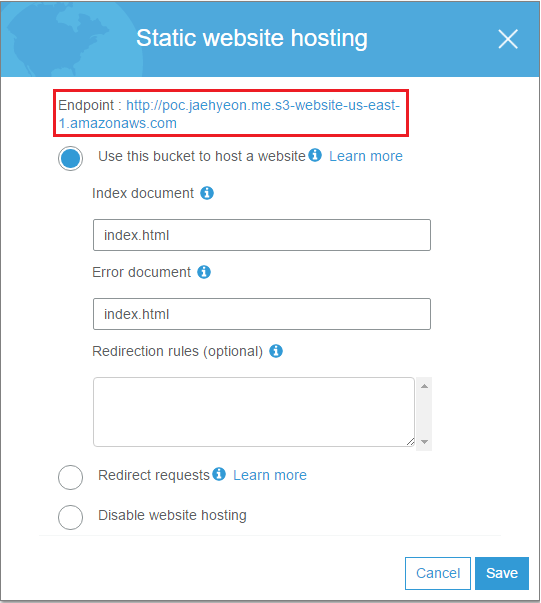
Then, in the properties tab, static website hosting is enabled where index.html is set to be rendered for both the default and error document. Now it is possible to have access to the application by the endpoint.
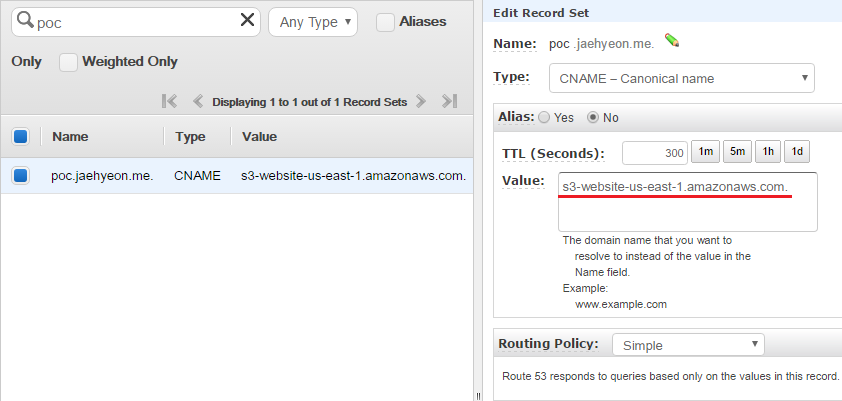
In order to replace the endpoint with a custom domain name, a Canonical name (CNAME) record is created in Amazon Route 53. Note that the CNAME record (poc.jaehyeon.me) has to be the same to the bucket name. s3-website-us-east-1.amazonaws.com. is entered in Value, which is used to define the host name as an alias for the Amazon S3 bucket. Note the period at the end is necessary as it signifies the DNS root and, if it is not specified, a DNS resolver could append it’s default domain to the domain you provided. (See Customizing Amazon S3 URLs with CNAMEs for further details.) Now the application can be accessed using http://poc.jaehyeon.me.
CloudFront
It is possible to host the application using Amazon CloudFront which is a global content delivery network (CDN) service that accelerates delivery of websites, APIs, video content or other web assets.
Web is taken as the delivery method.
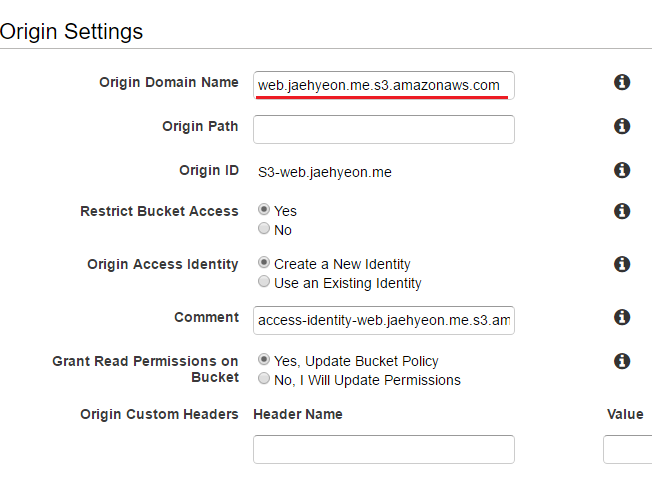
The S3 bucket (web.jaehyeon.me) is selected as the origin domain name. Note, unlike relying on the static website hosting property where all objects in the bucket are given read-access, in this way, access to the bucket is restricted only to CloudFront with a newly created identity. The updated bucket policy is shown below. (See Using an Origin Access Identity to Restrict Access to Your Amazon S3 Content for further details.)
 1{
 2    "Version": "2008-10-17",
 3    "Id": "PolicyForCloudFrontPrivateContent",
 4    "Statement": [
 5        {
 6            "Sid": "1",
 7            "Effect": "Allow",
 8            "Principal": {
 9                "AWS": "arn:aws:iam::cloudfront:user/CloudFront Origin Access Identity xxxxxxxxxxxxxx"
10            },
11            "Action": "s3:GetObject",
12            "Resource": "arn:aws:s3:::web.jaehyeon.me/*"
13        }
14    ]
15}
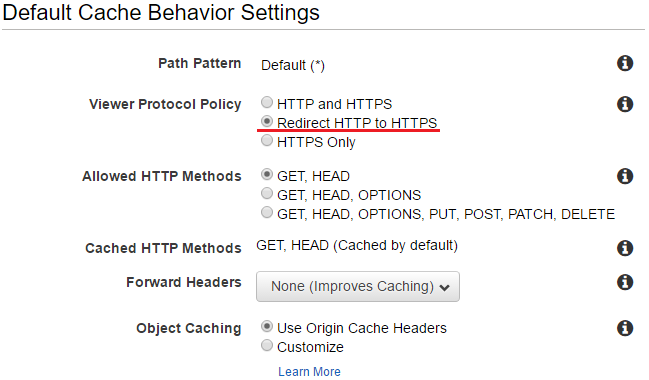
In default cache behavior settings, Redirect HTTP to HTTPS is selected for the viewer protocol policy. All other options are left untouched - they are not shown.
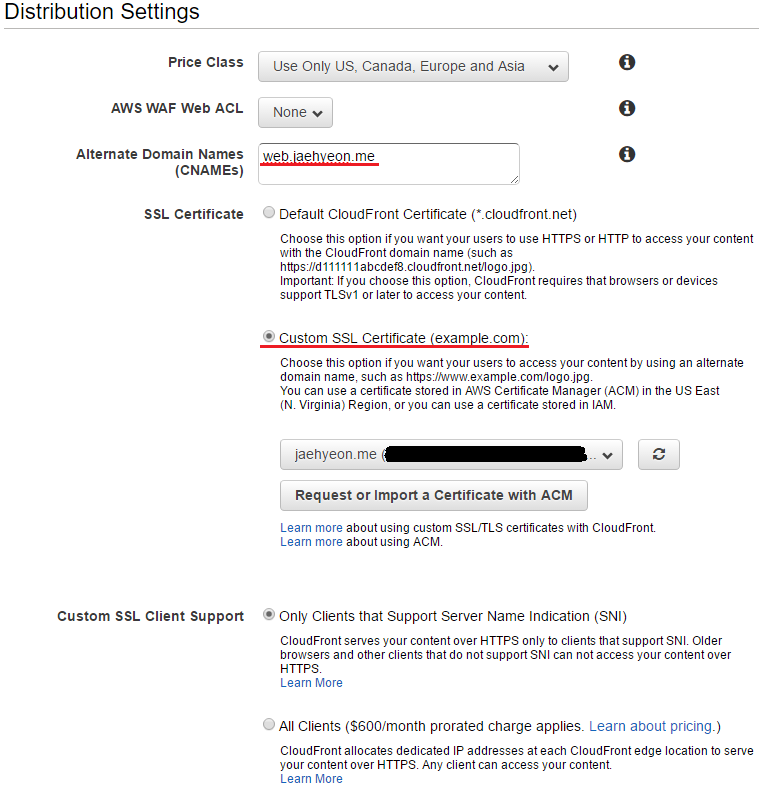
In distribution settings, a CNAME record (web.jaehyeon.me) is created to be the same to the bucket name. The custom SSL certificate that is obtained from AWS Certificate Manager is chosen rather than the default CloudFront certificate - see Part III. Finally it is selected to support only clients that support server name indication (SNI). Note all the other options are left untouched - they are not shown.
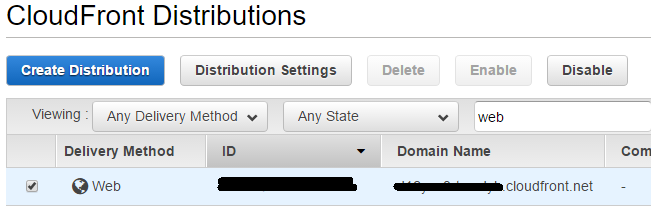
Once the distribution is created, the distribution’s CloudFront domain name is created and it is possible to use it to create a custom domain.
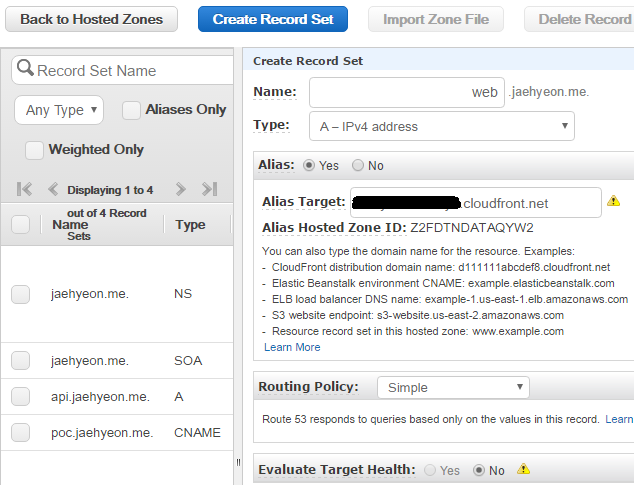
In Route 53, a new record set is created and web.jaehyeon.me is entered in the name field, followed by selecting A - IPv4 address as the type. Alias is set to be yes and the distribution domain name is entered as the alias target.
Once it is ready, the application can be accessed using either http://web.jaehyeon.me or https://web.jaehyeon.me where HTTP is redirected to HTTPS.
Final thoughts
This is the end of the Serverless Data Product POC series. I consider a good amount of information is shared in relation to serverless data product development and I hope you find the posts useful. For demonstration, I used the AWS web console but it wouldn’t be suitable in a production environment as it involves a lot of manual jobs as well as those jobs are not reproducible. There are a number of notable frameworks that help develop applications in serverless environment: Serverless Framework, Apex, Chalice and Zappa. I hope there will be another series that cover one of these frameworks.


Comments