
In the last post, the async feature of Shiny was discussed. Although it is a remarkable step forward to web development in R, it is not to the full extent that a Javascript application can bring. In fact, (long running) requests of a user (or session) are not impacted by those of other users (or sessions) but, for a given user, all requests are handled sequentially. On the other hand, it is not the case for a Javascript-backed app where all requests are processed asynchronously.
Although Javascript helps develop a more performant web app, for a Shiny developer, the downside is that key features that Shiny provides are no longer available. Some of them are built-in data binding, event handling and state management. For example, think about what reactive*() and observe*() do in a Shiny app. Although it is possible to implement those with plain Javascript or JQuery, it can be problemsome due to the aysnc nature of Javascript (eg Callback Hell) or it may be ending up with a slow app (eg Why do developers think the DOM is slow?).
Javascript frameworks (Angular, React and Vue) support such key features effectively. Also they help avoid those development issues, together with the recent Javascript standard. In this post, it’ll be demonstrated how to render htmlwidgets in a Vue application as well as replacing htmlwidgets with native JavaScript libraries.
What is Vue?
According to the project website,
Vue (pronounced /vjuː/, like view) is a progressive framework for building user interfaces. Unlike other monolithic frameworks, Vue is designed from the ground up to be incrementally adoptable. The core library is focused on the view layer only, and is easy to pick up and integrate with other libraries or existing projects. On the other hand, Vue is also perfectly capable of powering sophisticated Single-Page Applications when used in combination with modern tooling and supporting libraries.
Some of the key features mentioned earlier are supported in the core library.
And the other by an official library.
And even more
Vue is taken here among the popular Javascript frameworks because it is simpler to get jobs done and easier to learn. See this article for a quick comparison.
Building Vue Apps
Vue Setup
Prerequisites of building a vue app are
- Node.js
- Javascript runtime built on Chrome’s V8 JavaScript engine
- version >=6.x or 8.x (preferred)
- npm
- package manager for Javascript and software registry
- version 3+
- installed with Node.js
- Git
- vue-cli
- a simple CLI for scaffolding Vue.js projects
- provides templates and webpack-simple is used for the apps of this post
- install globally -
npm install -g vue-cli
- Yarn
- fast, reliable and secure dependency management tool
- used instead of npm
- install globally -
npm install -g yarn
The apps can be found in vue-htmlwidgets and vue-native folders of this GitHub repository. They are built with webpack and can be started as following.
1cd path-to-folder
2yarn install
3npm run dev
Libraries for the Apps
Common libraries
- User Interface
- Vuetify - Although Bootstrap is popular for user interface, I find most UI libraries that rely on Bootstrap also depend on JQuery. And it is possible the JQuery for htmlwidgets is incompatible with those for the UI libraries. Therefore Vuetify is used instead, which is inspired by Material Design.
- HTTP request
- axios - Promise based HTTP client for the browser and node.js
For vue-native
- state management
- Vuex - Vuex is a state management pattern + library for Vue.js applications. It serves as a centralized store for all the components in an application, with rules ensuring that the state can only be mutated in a predictable fashion.
- data table
- Vuetify - The built-in data table component of Vuetify is used.
- plotly
- plotly - official library
- @statnett/vue-plotly - plotly as a vue component
- ify-loader and transform-loader - for building with webpack
- highcharts
- highcharts - official library
- highcharts-vue - highcharts as vue components
Render Htmlwidgets
index.html
The entry point of the app is index.html and htmlwidgets dependencies need to be included in head followed by material fonts and icons. 3 components are created in src/components - DataTable.vue, Highchart.vue and Plotly.vue. These components are bundled into build.js and sourced by the app.
 1<!DOCTYPE html>
 2<html lang="en">
 3  <head>
 4    <meta charset="utf-8">
 5    <title>Vue - htmlwidgets</title>
 6    <meta http-equiv="X-UA-Compatible" content="IE=edge">
 7    <meta name="viewport" content="width=device-width, initial-scale=1.0">
 8    <!-- necessary to control htmlwidgets -->
 9    <script src="/public/htmlwidgets/htmlwidgets.js"></script>
10    <!-- need a shared JQuery lib -->
11    <script src="/public/shared/jquery.min.js"></script>
12    <!-- DT -->
13    <script src="/public/datatables/datatables.js"></script>
14    ... more DT dependencies
15    <!-- highchater -->
16    <script src="/public/highcharter/lib/proj4js/proj4.js"></script>
17    ... more highcharts dependencies
18    <script src="/public/highcharter/highchart.js"></script>
19    <!-- plotly -->
20    <script src="/public/plotly/plotly.js"></script>
21    ... more plotly dependencies
22    <!-- crosstalk -->
23    <script src="/public/crosstalk/js/crosstalk.min.js"></script>
24    ... more crosstalk depencencies
25    <!-- bootstrap, etc -->
26    <script src="/public/shared/bootstrap/js/bootstrap.min.js"></script>
27    ... more bootstrap, etc depencencies
28    <!-- vuetify -->
29    <link href='https://fonts.googleapis.com/css?family=Roboto:300,400,500,700|Material+Icons' rel="stylesheet" type="text/css">
30  </head>
31  <body>
32    <div id="app"></div>
33    <script src="./dist/build.js"></script>
34  </body>
35</html>
Components
The widgets are constructed as single file components.
The button (update table) listens on a button click event and it’ll trigger update() defined in the script of the component. Note v-html directive. This directive allows to render raw HTML.
Recall that the body of a htmlwidgets object is
- div - widget container and element
- script - application/json for widget data
- script - application/htmlwidget-sizing for widget size
And /widget resource of the API renders all of those if html is specified as type.
All the HTML elements is updated in this Vue application (type = html) while only the application/json script is appended/updated in the Javascript application (type = src).
 1<template>
 2    <v-layout>
 3        <v-flex xs12 sm6 offset-sm2>
 4            <v-card>
 5                <v-card-media height="350px">
 6                    <v-container>
 7                        <v-layout row wrap justify-center>
 8                            <div v-if="!isLoading" v-html="dat"></div>
 9                        </v-layout>
10                    </v-container>
11                </v-card-media>
12                <v-card-actions>
13                    <v-container>
14                        <v-layout row wrap justify-center>
15                            <v-btn
16                                @click="update"
17                                color="primary"
18                            >update table</v-btn>
19                            <div v-if="isLoading">
20                                <v-progress-circular indeterminate color="info"></v-progress-circular>
21                            </div>
22                        </v-layout>
23                    </v-container>
24                </v-card-actions>
25            </v-card>
26        </v-flex>
27    </v-layout>
28</template>
Here the HTTP request is made with axios. The element is set to null at the beginning and updated by the output of the API followed by executing window.HTMLWidgets.staticRender().
 1<script>
 2import axios from 'axios'
 3
 4export default {
 5    data: () => ({
 6        dat: null,
 7        isLoading: false
 8    }),
 9    methods: {
10        update() {
11            this.dat = null
12            this.isLoading = true
13
14            let params = { element_id: 'dt_out', type: 'html' }
15            axios.post('http://[hostname]:8000/widget', params)
16                .then(res => {
17                    this.dat = res.data.replace('width:960px;', 'width:100%')
18                    console.log(this.dat)
19                    setTimeout(function() {
20                        window.HTMLWidgets.staticRender()
21                    }, 500)
22                    this.isLoading = false
23                })
24                .catch(err => {
25                    this.isLoading = false
26                    console.log(err)
27                })
28        }
29    }
30}
31</script>
Layout
The application layout is setup in ./src/App.vue where the individual components are imported into content.
 1<template>
 2  <v-app>
 3    <v-toolbar dense color="light-blue" dark fixed app>
 4      <v-toolbar-title>
 5          Vue - htmlwidgets
 6      </v-toolbar-title>
 7    </v-toolbar>
 8    <v-content>
 9      <app-data-table></app-data-table>
10      <app-high-chart></app-high-chart>
11      <app-plotly></app-plotly>
12    </v-content>
13  </v-app>
14</template>
15
16<script>
17import DataTable from './components/DataTable.vue'
18import HighChart from './components/HighChart.vue'
19import Plotly from './components/Plotly.vue'
20
21export default {
22    components: {
23      appDataTable: DataTable,
24      appHighChart: HighChart,
25      appPlotly: Plotly
26    }
27}
28</script>
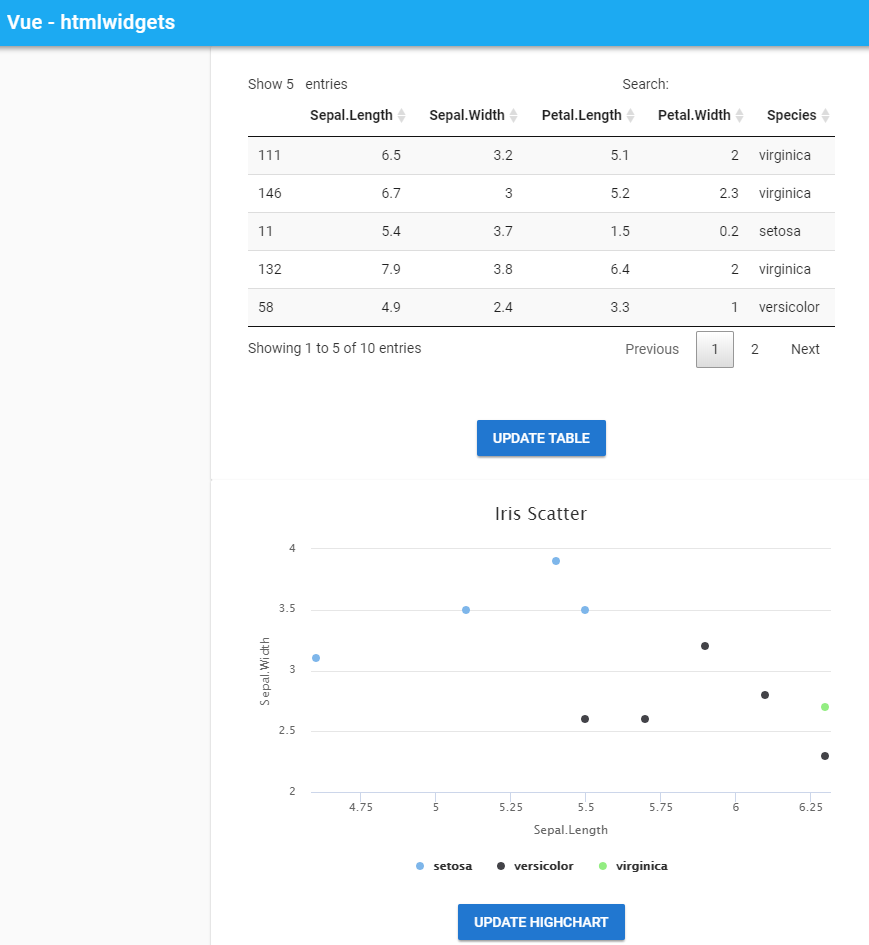
The screen shot of the app is shown below.
Native Libraries instead of Htmlwidgets
If an app doesn’t rely on htmlwidgets, it only requires data to create charts and tables. The API has /hdata resource to return the iris data. Here the scenario is the iris data will be pulled at the beginning and 10 records are selected randomly when a user clicks a button, resulting in updating components. Note one of the key benefits of this structure is that components can communicate with each other - see what crosstalk is aimed for.
index.html
The entry point of the app becomes quite simple without htmlwidgets dependency.
 1<!DOCTYPE html>
 2<html lang="en">
 3  <head>
 4    <meta charset="utf-8">
 5    <title>Vue - native</title>
 6    <meta http-equiv="X-UA-Compatible" content="IE=edge">
 7    <meta name="viewport" content="width=device-width, initial-scale=1.0">
 8    <link href='https://fonts.googleapis.com/css?family=Roboto:300,400,500,700|Material+Icons' rel="stylesheet" type="text/css">
 9  </head>
10  <body>
11    <div id="app"></div>
12    <script src="./dist/build.js"></script>
13  </body>
14</html>
State Management
Normally a Vue app has multiple components so that it is important to keep changes in sync across components. Although Vue supports custom events and event bus, I find state management with Vuex is more straightforward (and better for larger apps).
In the store (./src/store.js), there are 3 state properties.
- rawData - iris data
- vizData - randomly selected records
- isLoading - indicator if data request is completed
These state properties can be accessed by getters and modified by mutations. While mutations are synchronous, actions can be asynchronous. Therefore dispatching actions is better for something that requires some time. In this example, the HTTP request that returns the iris data is performed by dispatching getRawData() and, on success, the following mutations are commtted.
- getRawData
- updateVisData
- toggleIsLoading
 1import Vue from 'vue'
 2import Vuex from 'vuex'
 3
 4import axios from 'axios'
 5axios.defaults.baseURL = 'http://[hostname]:8000'
 6
 7Vue.use(Vuex)
 8
 9export default new Vuex.Store({
10    state: {
11        rawData: [],
12        visData: [],
13        isLoading: false
14    },
15    getters: {
16        rawData (state) {
17            return state.rawData
18        },
19        visData (state) {
20            return state.visData
21        },
22        isLoading (state) {
23            return state.isLoading
24        }
25    },
26    mutations: {
27        getRawData (state, payload) {
28            state.rawData = payload
29        },
30        updateVisData (state) {
31            state.visData = state.rawData.sort(() => .5 - Math.random()).slice(0, 10)
32        },
33        toggleIsLoading (state) {
34            state.isLoading = !state.isLoading
35        }
36    },
37    actions: {
38        getRawData ({ commit }) {
39            commit('toggleIsLoading')
40
41            axios.post('/hdata')
42                .then(res => {
43                    commit('getRawData', res.data)
44                    commit('updateVisData')
45                    commit('toggleIsLoading')
46                })
47                .catch(err => {
48                    console.log('error')
49                    commit('toggleIsLoading')
50                    console.log(err)
51                })
52        }
53    }
54})
Components
Here the source looks quite different from the DT object because it’s created by the built-in data table component of Vuetify - the other 2 compoents look rather similar. The headers of the table is predefined as data property while the records (visData) are obtained from the store - it keeps in sync as a computed property.
 1<template>
 2  <v-data-table
 3    :headers="headers"
 4    :items="visData"
 5    class="elevation-1"
 6  >
 7    <template slot="items" slot-scope="props">
 8      <td class="text-xs-right">{{ props.item.SepalLength }}</td>
 9      <td class="text-xs-right">{{ props.item.SepalWidth }}</td>
10      <td class="text-xs-right">{{ props.item.PetalLength }}</td>
11      <td class="text-xs-right">{{ props.item.PetalWidth }}</td>
12      <td class="text-xs-right">{{ props.item.Species }}</td>
13    </template>
14    <template slot="pageText" slot-scope="props">
15        Lignes {{ props.pageStart }} - {{ props.pageStop }} of {{ props.itemsLength }}
16    </template>
17  </v-data-table>
18</template>
19
20<script>
21export default {
22    data () {
23        return {
24            headers: [
25                { text: 'Sepal Length', value: 'SepalLength'},
26                { text: 'Sepal Width', value: 'SepalWidth'},
27                { text: 'Petal Length', value: 'PetalLength'},
28                { text: 'Petal Width', value: 'PetalWidth'},
29                { text: 'Species', value: 'Species'}
30            ]
31        }
32    },
33    computed: {
34        visData() {
35            return this.$store.getters['visData']
36        }
37    }
38}
39</script>
Layout
Instead of requesting individual htmlwidgets objects, charts/table are created by individual components. Also the components are updated by clicking the button. The conditional directives (v-if and v-else) controls which to render depending on the value of isLoading.
 1<template>
 2  <v-app>
 3    <v-toolbar dense color="light-blue" dark fixed app>
 4      <v-toolbar-title>
 5          Vue - native
 6      </v-toolbar-title>
 7    </v-toolbar>
 8    <v-content>
 9      <div v-if="isLoading" class="centered">
10          <v-progress-circular
11            indeterminate color="info"
12            :size="100"
13            :width="10"
14          ></v-progress-circular>
15      </div>
16      <div v-else>
17        <v-btn @click="update">update data</v-btn>
18        <v-container fluid>
19          <v-layout row wrap>
20            <v-flex xs12 sm12 md6>
21              <div style="display: inline-block;">
22                <app-data-table></app-data-table>
23              </div>
24            </v-flex>
25            <v-flex xs12 sm12 md6>
26              <div style="display: inline-block;">
27                <app-highchart></app-highchart>
28              </div>
29            </v-flex>
30            <v-flex xs12 sm12 md6>
31              <div style="display: inline-block;">
32                <app-plotly></app-plotly>
33              </div>
34            </v-flex>
35          </v-layout>
36        </v-container>
37      </div>
38    </v-content>
39  </v-app>
40</template>
Upon creation of the component (created()), getRawData() is dispatched. While the request is being processed, the computed property of isLoading remains as true, resulting in rendering the loader. Once succeeded, the compoents are updated with the initial random records. If a user click the button, it’ll commit updateVisData(), resulting in compoent updates.
 1<script>
 2import DataTable from './components/DataTable.vue'
 3import Highchart from './components/HighChart.vue'
 4import Plotly from './components/Plotly.vue'
 5
 6export default {
 7  components: {
 8    appDataTable: DataTable,
 9    appHighchart: Highchart,
10    appPlotly: Plotly
11  },
12  computed: {
13    visData() {
14      return this.$store.getters['visData']
15    },
16    isLoading() {
17      return this.$store.getters['isLoading']
18    }
19  },
20  methods: {
21    update() {
22      this.$store.commit('updateVisData')
23    }
24  },
25  created () {
26    this.$store.dispatch('getRawData')
27  }
28}
29</script>
30
31<style scoped>
32.centered {
33  position: fixed; /* or absolute */
34  top: 50%;
35  left: 50%;
36}
37</style>
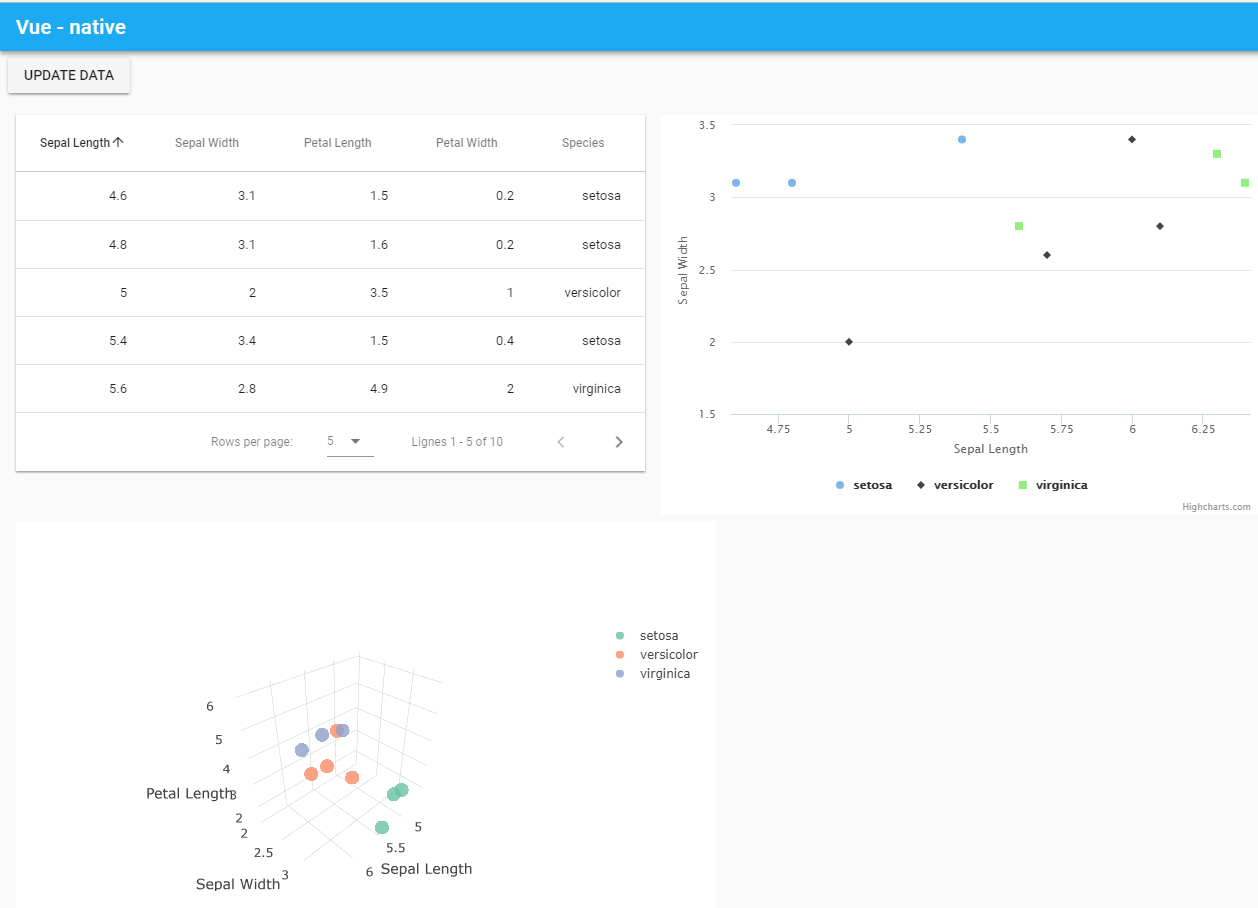
The screen shot of the app is shown below.


Comments