
I use Linux containers a lot for development. Having Windows computers at home and work, I used to use Linux VMs on VirtualBox or VMWare Workstation. It’s not a bad option but it requires a lot of resources. Recently, after my home computer was updated, I was not able to start my hypervisor anymore. Also I didn’t like huge resource consumption of it so that I began to look for a different development environment. A while ago, I played with Windows Subsystem for Linux (WSL) and it was alright. Also Visual Studio Code (VSCode), my favourite editor, now supports remote development. Initially I thought I would be able to create a new development environment with WSL and Docker for Windows. However it was until I tried a bigger app with Docker Compose that Docker for Windows has a number of issues especially when containers are started by Docker Compose in WSL. I didn’t like to spend too much time on fixing those issues as I concerned those might not be the only ones. Then I decided to install a Linux VM on Hyper-V. Luckly VSCode also supports a remote VM via SSH.
What I want was a Linux VM where Docker is installed and it should be possible to access a remote folder from the host for development. Also, as I’m getting interested in Kubernetes more and more, another VM where Minikube is installed was necessary. In this post, it’ll be illustrated how the new development environment is created. Also an example app (Rserve web service with a sidecar container) will be demonstrated. The app’s main functionality is served by Rserve while the sidecar container handles authentication and relays requests from authenticated users. The sidecar container is built by FastAPI, which is a modern, performant and developer-friendly Python web framework.
Windows Subsystem for Linux (WSL)
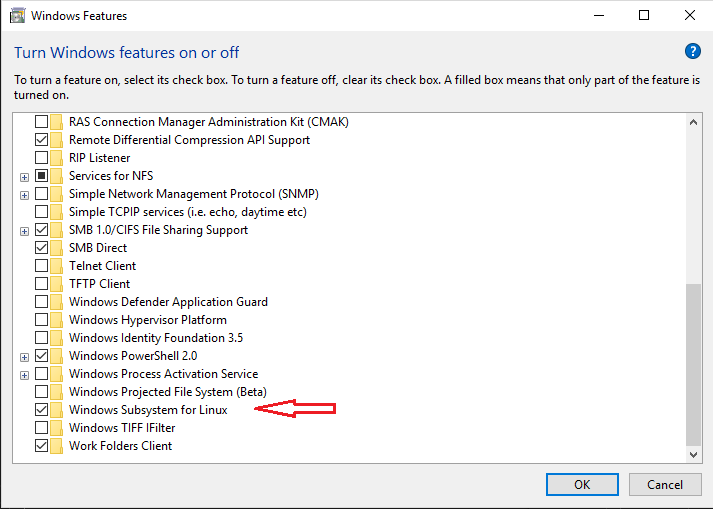
In order to use WSL, it is necessary to enable Windows Subsystem for Linux in Windows features as following.
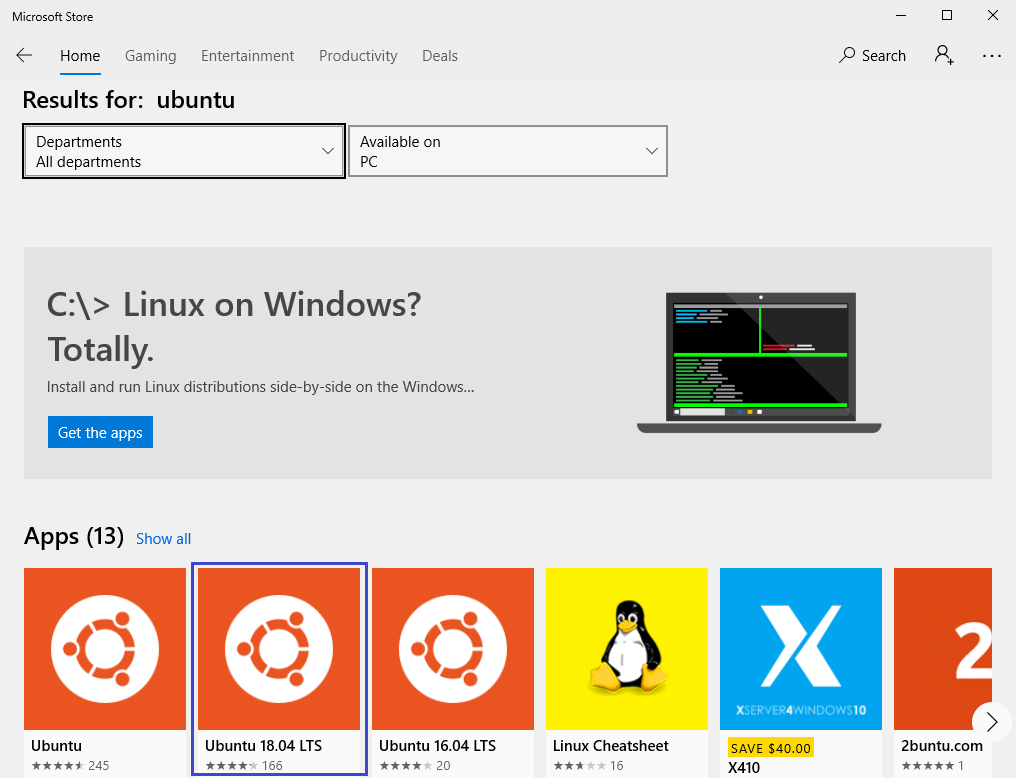
Then a Linux distribution need to be installed from Windows Store. I chose Ubuntu 18.04.
Once installed, you can hit the Launch button and a new terminal will pop up as shown below. If it’s the first launch, you’d need to create a default user account. I set the username to be jaehyeon. The default terminal is not the only way to access to WSL. For example you can enter bash to access to it on PowerShell.

Remote WSL
Having WSL alone wouldn’t be of much help for development. What’s really important is, for example, editing or debugging code seamlessly from the host. The new VSCode extension, Remote WSL makes it possible.
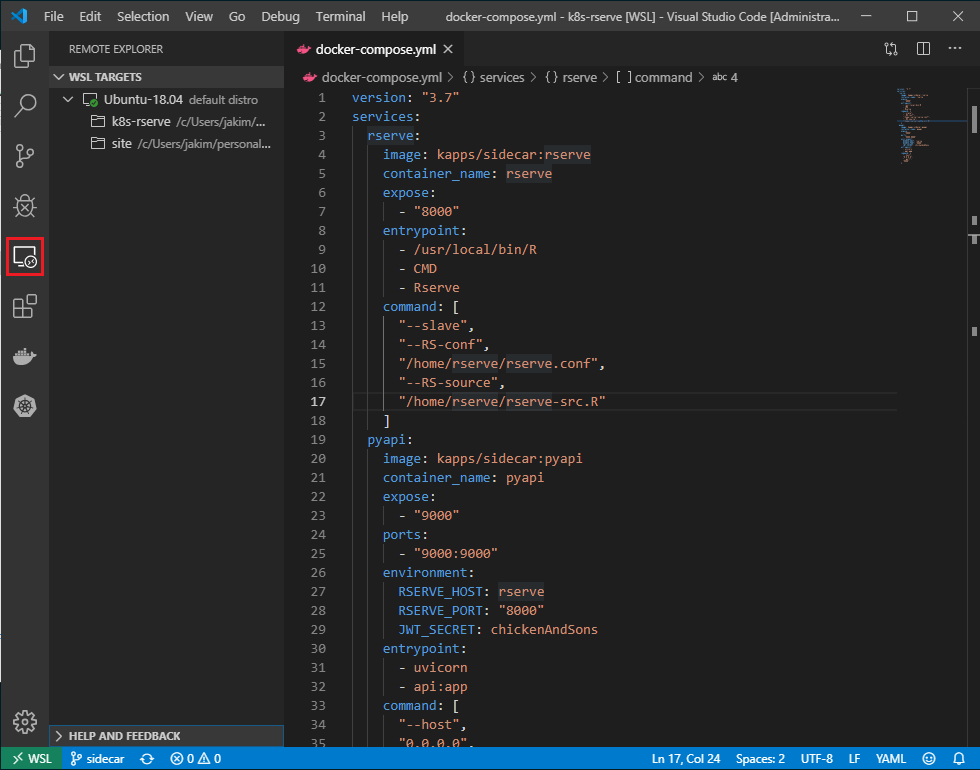
On VSCode > Extensions, search and install Remote WSL. Then Remote Explorer tab will appear in the left sidebar. There you can open a folder in WSL.
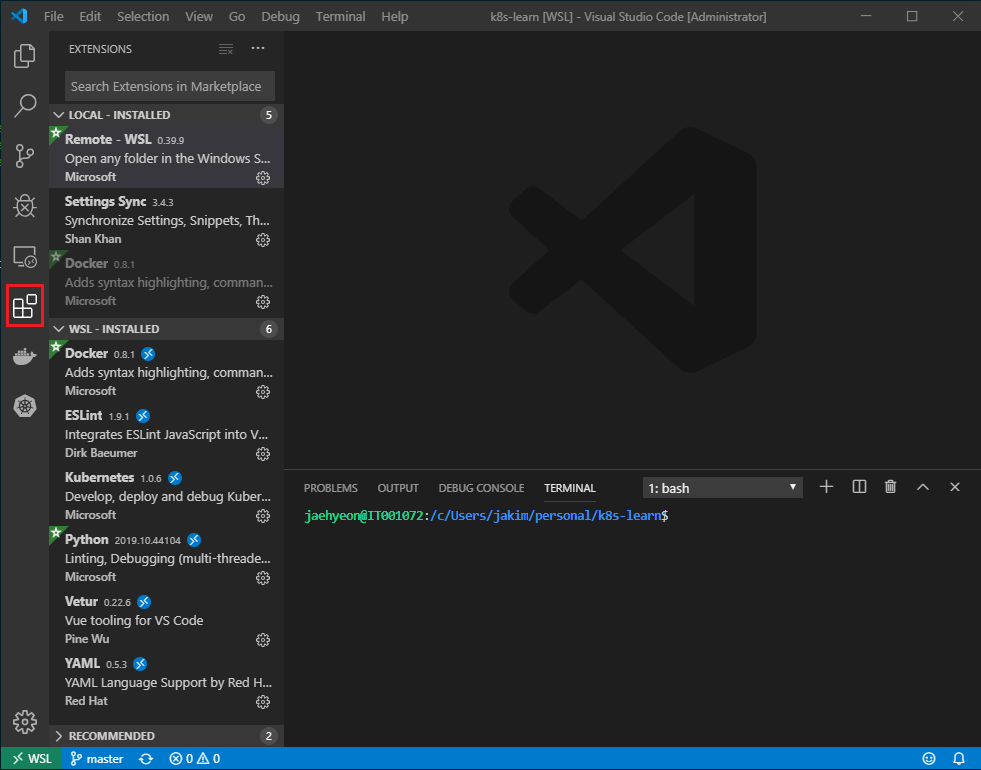
As can be seen in the Extensions tab, some extensions are installed in the host (LOCAL) and some are in WSL. For example, in order for Python syntax highlighting or autocompletion to work, the Python extension should be installed in WSL where source code exists. One of the great features of VSCode is installation of extensions and configuration is automatic and easy. For some standard extensions, it’s sufficient to open a file of a certain file extension.
You may wonder why I set up Remote WSL although I’m going to install a VM on Hyper-V. It is because not all development can be done in a separate VM easily. For example, a single node Kubernetes cluster will be created by Minikube in a VM but I’m not sure how to connect to it from another VM. On the other hand, connection from WSL can be made without a problem.
Linux Virtual Machine on Hyper-V
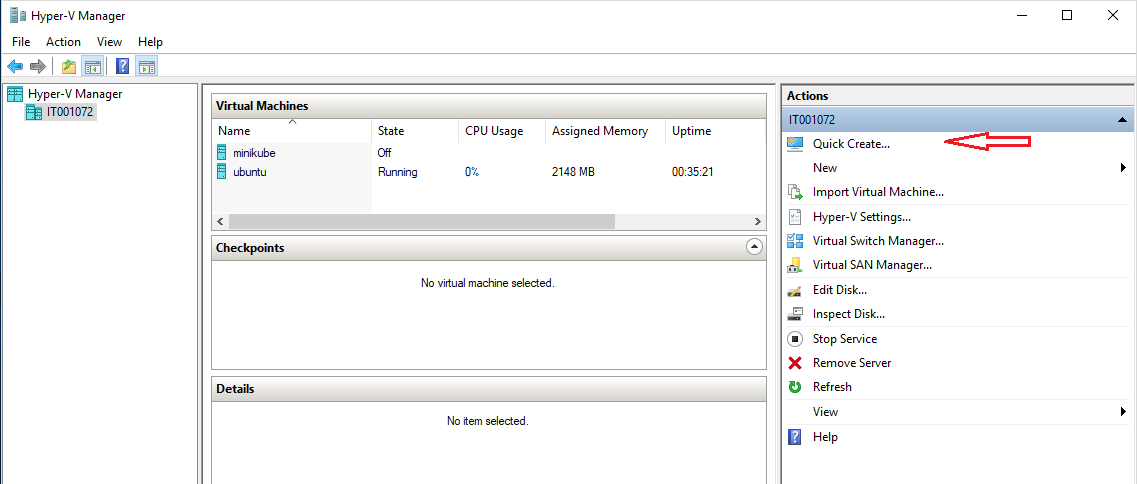
A Linux VM creation can be started by Quick Create… button in the right panel of Hyper-V Manager.
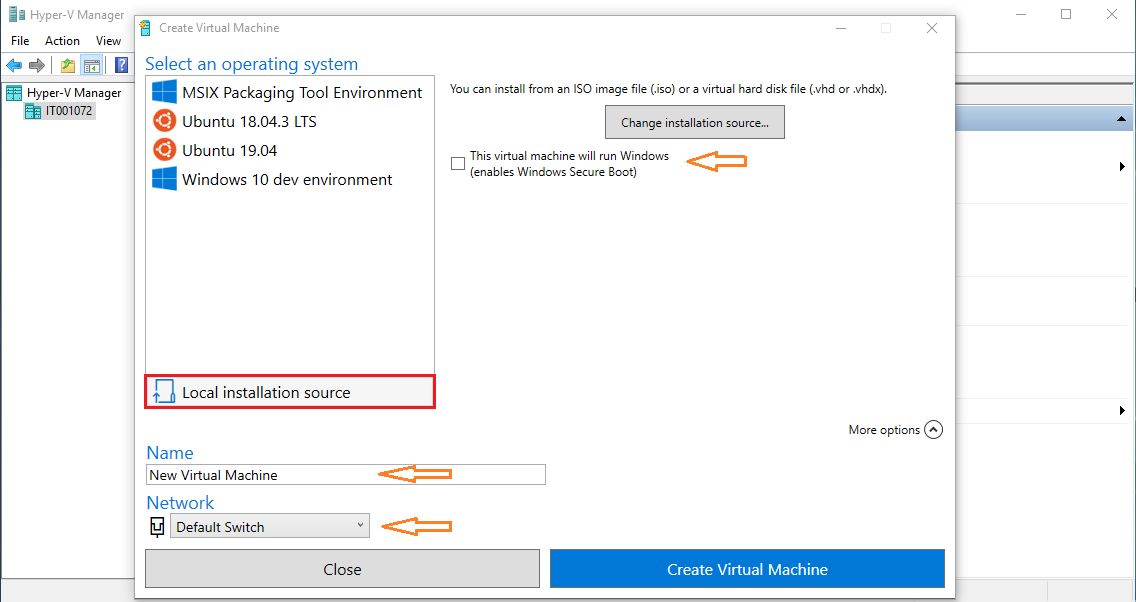
I used a Ubuntu 18.04 server ISO image rather than using the desktop version in the default list. Clicking Local installation source will allow to select an ISO or virtual hard disk file. I named it as ubuntu and left Default Switch selected for Network - it allows to connect from host to guest.
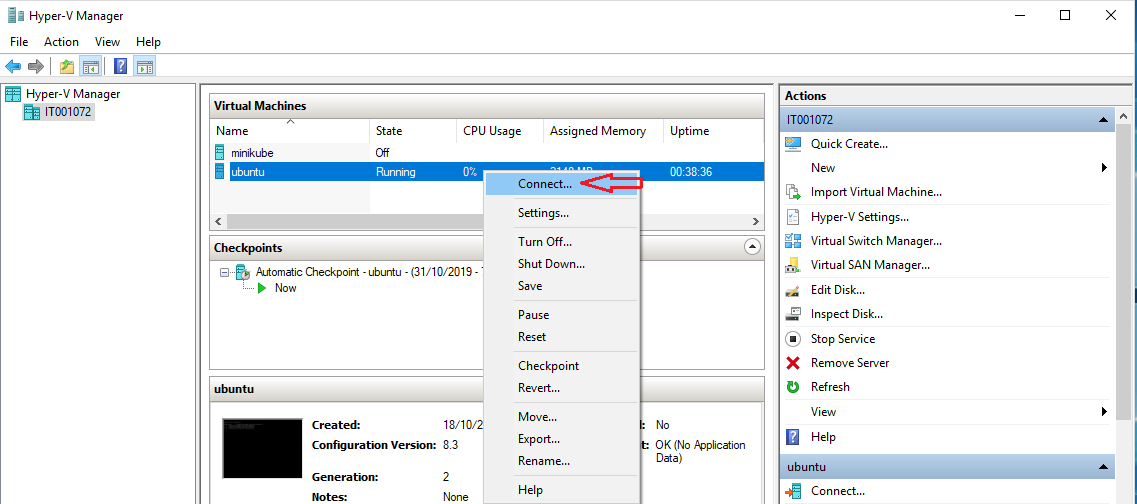
Once installed, it’s possible to connect by clicking Connect…. A separate window will pop up.
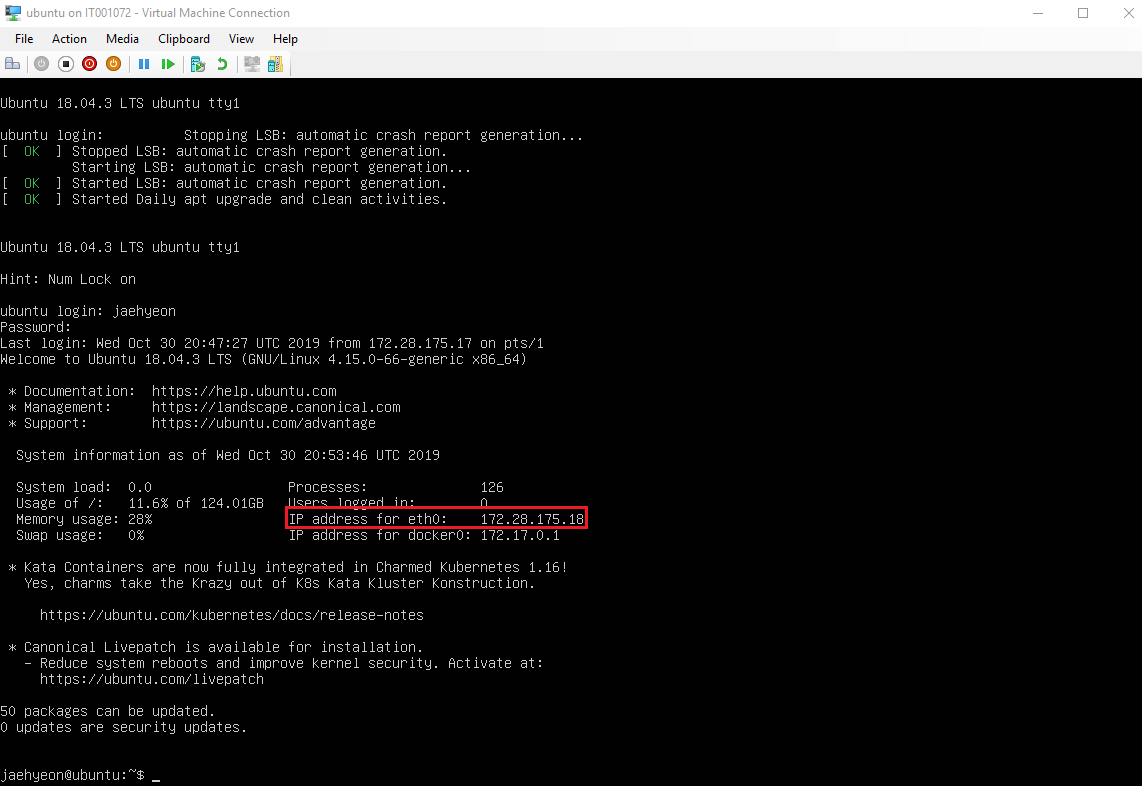
It’s possible to log in by the default username and password, which are set during installation. Once logged in, it’ll go into the user’s home directory. Keep the value of IP address for eth0 as it’ll be used for setting-up Remote SSH.
For public key authentication for SSH, check /etc/ssh/sshd_config if RSAAuthentication is enabled. You may need to add/update the following entries.
1RSAAuthentication yes
2PubkeyAuthentication yes
3AuthorizedKeysFile %h/.ssh/authorized_keys
Password authentication is enabled by default. If you don’t like it, it can be disabled as following.
1PasswordAuthentication no
Finally you need to add your RSA public key to ~/.ssh/authorized_keys followed by setting up necessary permissions to the file as well as its parent folder - see this page for further details.
Remote SSH
For Remote SSH, I installed VSCode Insiders as the guest OS is Ubuntu 18.04 - see System requirements. I’ve decided to keep both stable and insiders versions of VSCode - stable for WSL and insiders for SSH in order not to be confused. In the Remote Explorer, you can see Add New and Configure buttons.
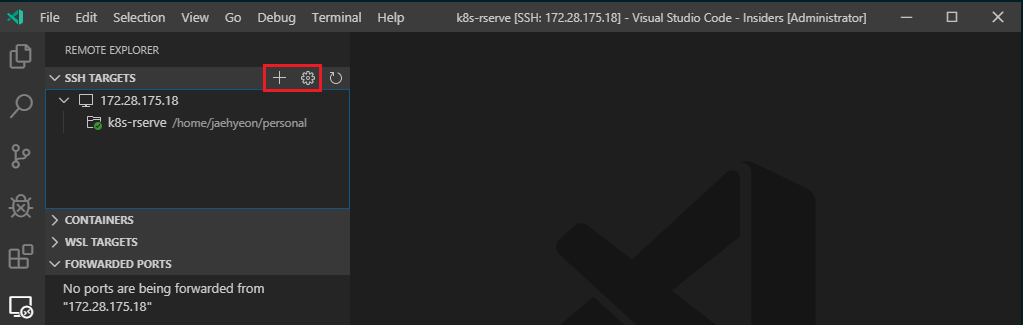
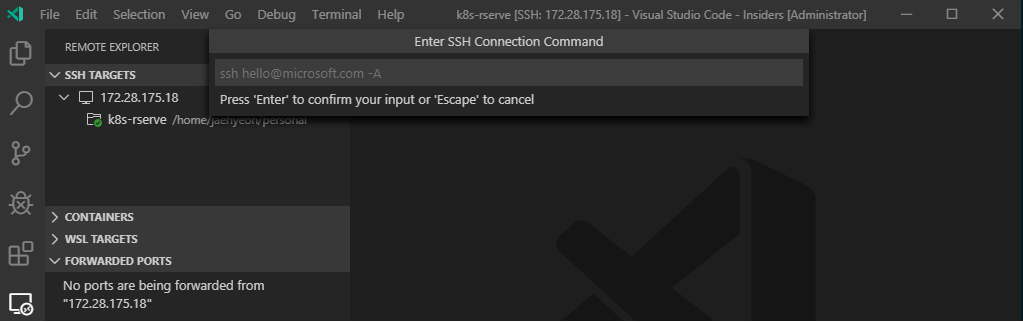
To add a new SSH target, you can click the Add New button and enter the following SSH command.
1# vm-ip-address - 'IP address for eth0'.
2ssh <username>@<vm-ip-address> -A
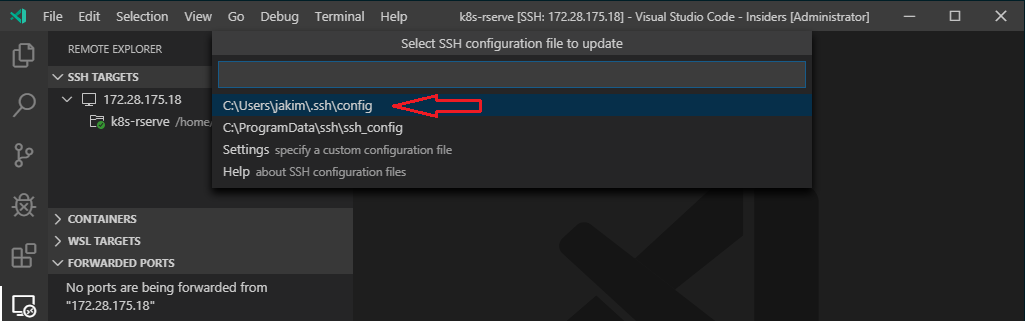
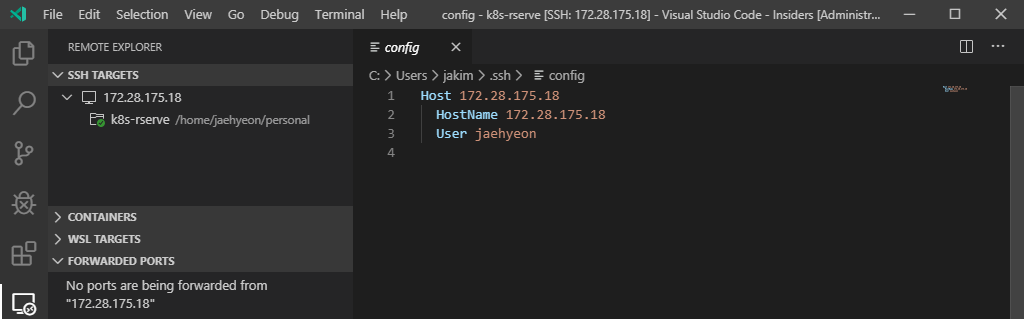
I find the VM IP address changes from time to time and a new IP address can be updated by clicking the Configure button followed by changing the IP address as shown below.
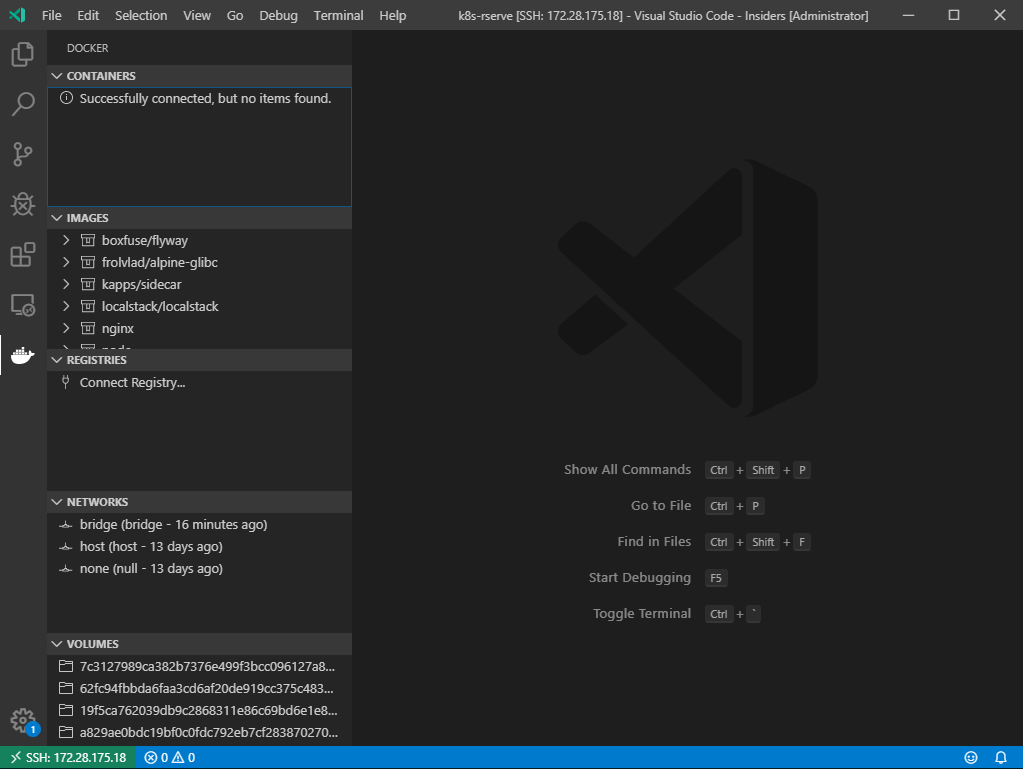
Currently R doesn’t seem to be supported well by VSCode and it may not be necessary thanks to RStudio IDE. I haven’t tried installing RStudio Server in WSL but it’ll definitely be possible to install it in a VM. Another way of accessing RStudio Server is via Docker. The Docker extension of VSCode can make it easier to run an existing image or to customize your own.
ConEmu
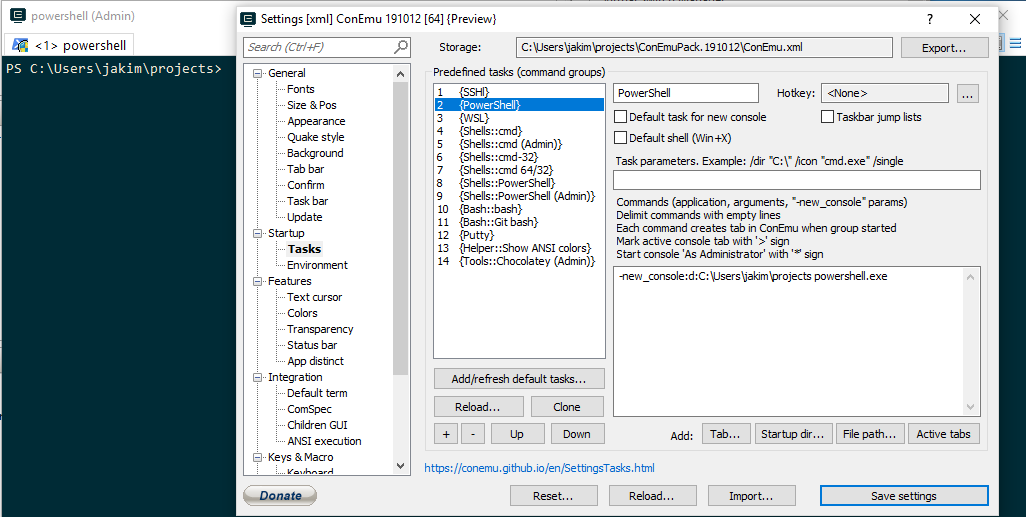
ConEmu is a handy Windows terminal tool. By default it has multiple terminals pre-configured - PowerShell, Git Bash, Putty, Chocolatey and more. Also it’s possible to set up a custom terminal eg) for SSH.

In Setup tasks…, I created 3 terminals and moved them to top for easy access.
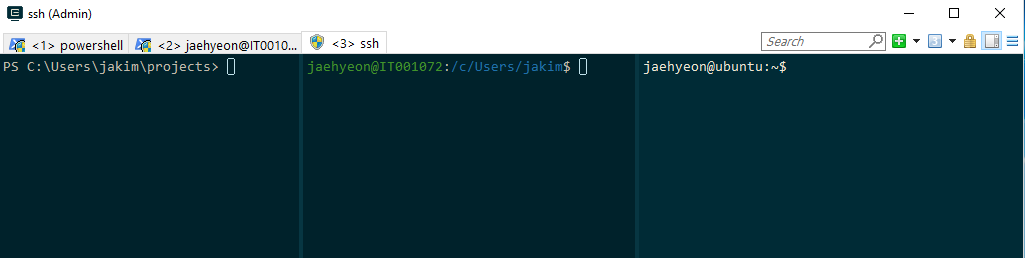
Also it supports split windows. Below shows an example of 3 terminals in a single window. They are created by New console dialog….
Minikube
Minikube is a tool that makes it easy to run Kubernetes locally. Minikube runs a single-node Kubernetes cluster inside a Virtual Machine (VM) on your laptop for users looking to try out Kubernetes or develop with it day-to-day.
Although Docer for Windows supports Kubernetes, I decided not to rely on it and Minikube supports Hyper-V as a VM driver. Using Chocolatey, a package manager for Windows, Minikube can be installed simply as following.
1PS > choco install minikube
It’ll also install Kubectl, a CLI tool for Kubenetes. ConEmu includes a Chocolatey terminal. If it’s the first time, it’ll inform what to do before executing the install command.
Once installed, a single node Kubernetes cluster can be created as following.
1PS > minikube start --vm-driver hyperv --hyperv-virtual-switch "Default Switch" --v=7 --alsologtostderr
Hyper-V is selected as the VM driver and a detailed logging option is added (--v=7 --alsologtostderr) because it takes quite some time at first for installation and configuration. For networking, I selected Default Switch. Note that many tutorials instruct to create an external Virtual Switch but it didn’t work on my computer at work. Also note that it’s not possible to create a Minikube cluster in WSL due to insufficient permission.
If it’s created successfully, you can check the status of the cluster.
1PS > minikube status
2host: Running
3kubelet: Running
4apiserver: Running
5kubectl: Correctly Configured: pointing to minikube-vm at 172.28.175.24
During installation, Kubectl is configured in C:\Users\<username>\.kube\config as shown below.
 1apiVersion: v1
 2clusters:
 3- cluster:
 4    certificate-authority: C:\Users\jakim\.minikube\ca.crt
 5    server: https://172.28.175.24:8443
 6  name: minikube
 7contexts:
 8- context:
 9    cluster: minikube
10    user: minikube
11  name: minikube
12current-context: minikube
13kind: Config
14preferences: {}
15users:
16- name: minikube
17  user:
18    client-certificate: C:\Users\jakim\.minikube\client.crt
19    client-key: C:\Users\jakim\.minikube\client.key
Although it’s possible to access the cluster with Kubectl on PowerShell, I’d like to do it on a linux terminal. I find a slight modification is enough on WSL. After installing Kubectl in WSL, I created another folder in C:\Users\<username>\.kubewsl and added a WSL version of Kubectl config file.
 1apiVersion: v1
 2clusters:
 3- cluster:
 4    certificate-authority: /c/Users/jakim/.minikube/ca.crt
 5    server: https://172.28.175.24:8443
 6  name: minikube
 7contexts:
 8- context:
 9    cluster: minikube
10    user: minikube
11  name: minikube
12current-context: minikube
13kind: Config
14preferences: {}
15users:
16- name: minikube
17  user:
18    client-certificate: /c/Users/jakim/.minikube/client.crt
19    client-key: /c/Users/jakim/.minikube/client.key
The only difference is path notation. For example, C:\Users\<username> to /c/Users/<username>. Note that your mount point is likely to be different because usually a host drive is mounted to WSL in /mnt as the root directory. In this case, it should be /mnt/c/Users/<username>. Or you may change the default mount point. After creating a /c folder in WSL, update WSL config to /etc/wsl.conf as shown below. You’d have to restart WSL afterwards.
1[automount]
2root = /
Then it’s necessary to update KUBECONFIG environment variable as following - you may add it to ~/.bashrc.
1export KUBECONFIG=$KUBECONFIG:/c/Users/jakim/.kubewsl/config
Once the setup is complete, cluser information can be checked on WSL as following.
1$ kubectl cluster-info
2Kubernetes master is running at https://172.28.175.24:8443
3KubeDNS is running at https://172.28.175.24:8443/api/v1/namespaces/kube-system/services/kube-dns:dns/proxy
4
5To further debug and diagnose cluster problems, use 'kubectl cluster-info dump'.
Rserve Sidecar Example
As demonstrated in my earlier post, Rserve is an effective tool to build a web service in R. It’ll be useful to serve an analytics model without modifying the core if it’s built in R. However equipping comprehensive features to other web frameworks may not be an easy job. Another way of utilising Rserve may be deploying it with one or more helper containers. For example, if the service should be secured by authentication but it’s not easy to implement it in R, a sidecar container may be used to handle authentication. In this setup, the sidecar container can sit before Rserve and relay requests from authenticated users. A simple example will be illustrated in this post. Another example may be using a helper container as an ambassador. For example, let say it’s required to communicate with an external system but there’s no reliable client library in R. In this case, it’s possible to set up so that the ambassador does the communication and provides outputs to R.
The example app is created by 2 containers. The main functionality is from the Rserve container while the sidecar is to handle authentication and relays requests from authentication users. The sidecar container is build with the FastAPI framework, which is a modern, performant and developer-friendly Python web framework. The source can be found in the sidecar branch of this GitHub repository.
With Docker Compose, it can be started as following. The compose file can be found here.
1git clone https://github.com/jaehyeon-kim/k8s-rserve.git
2cd k8s-rserve
3git fetch && git checkout sidecar
4docker-compose up -d
The swagger document created by the sidecar web service can be visited via http://localhost:9000/docs or http://<vm-ip-address>:9000 if it’s started in a VM. It basically has a main POST method in /rserve/test.
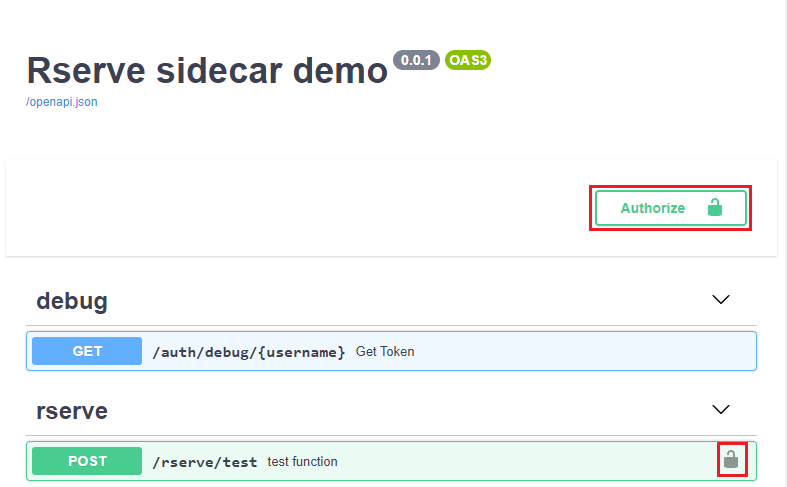
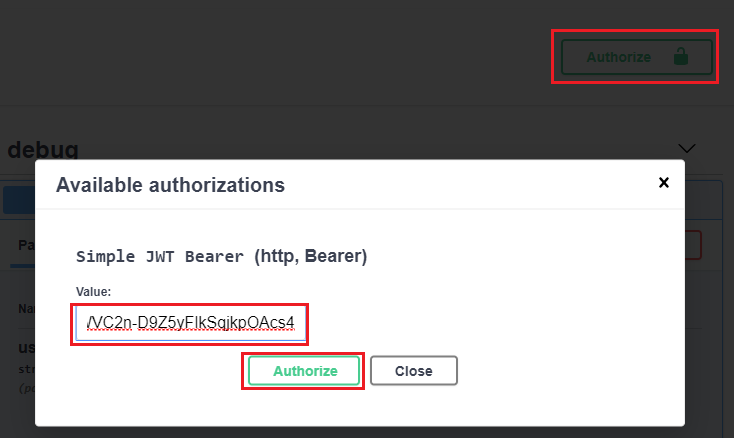
The web service is secured by Bearer Authentication so that a JWT token needs to be added to requests. A token can be obtained in the /auth/debug/{username} endpoint and it can also be tried out in the swagger document as shown below.

The token can be added to the Authrization section.
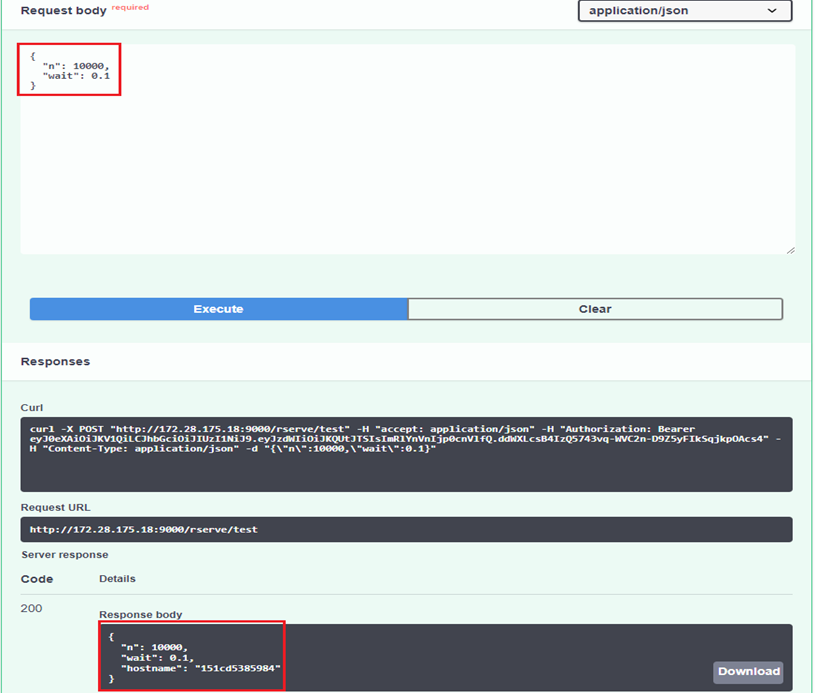
After that, a request to /rserve/test can be made as an authenticated user. It returns a JSON object that has 3 properties: n, wait and hostname. The first 2 is just returning values from the request while the last shows the hostname where Rserve container is hosted.
Containerization makes development easier. When it comes to deployment and management of potentially a large number of containers, a container orchestration engin is quite important. Kubernetes, among other engins, does such jobs well. Developers and administrator can define what it should be and then Kubernetes achieves it. This declarative nature can make complicated jobs to be tractable.
In Kubernetes, Pod is one or more containers that work together - eg) Rserve with sidecar. Deployment handles a replica of Pod, update strategy and so on. And Service allows to connect to a replica of Pod from within and outside a Kubernetes Cluster. The following Kubernetes manifest creates 2 Kubernetes resources where the Rserve with sidecar web service can be managed (by Deployment) and accessed (by Service). The manifest file can be found here.
 1apiVersion: v1
 2kind: Service
 3metadata:
 4  name: rserve-sidecar-service
 5spec:
 6  selector: # Pods with this label will be served
 7    app: rserve-sidecar
 8  type: NodePort
 9  ports:
10    - protocol: TCP
11      port: 80
12      targetPort: 9000
13      nodePort: 30000 # Service will exposed at this port
14---
15apiVersion: apps/v1
16kind: Deployment
17metadata:
18  name: rserve-sidecar-deployment
19  labels:
20    app: rserve
21spec:
22  selector:
23    matchLabels: # Pods with this label will be managed by Deployment
24      app: rserve-sidecar
25  replicas: 2
26  template:
27    metadata:
28      labels:
29        app: rserve-sidecar
30    spec:
31      containers:
32        - name: rserve
33          image: kapps/sidecar:rserve
34          ports:
35            - containerPort: 8000
36        - name: pyapi
37          image: kapps/sidecar:pyapi
38          env:
39            - name: RSERVE_HOST # containers share network interface
40              value: localhost
41            - name: RSERVE_PORT
42              value: "8000"
43            - name: JWT_SECRET # it's not secure!!
44              value: chickenAndSons
45          ports:
46            - containerPort: 9000
With kubectl, it can be created as following. The --record flag is for keeping revision history, which can be particulary useful for updating the app.
1$ kubectl apply -f manifest.yml --record
2# service/rserve-sidecar-service created
3# deployment.apps/rserve-sidecar-deployment created
The resources can be listed as shown below.
1$ kubectl get deployment,svc
2NAME                                        READY   UP-TO-DATE   AVAILABLE   AGE
3deployment.apps/rserve-sidecar-deployment   2/2     2            2           21s
4
5NAME                             TYPE        CLUSTER-IP      EXTERNAL-IP   PORT(S)        AGE
6service/rserve-sidecar-service   NodePort    10.106.51.149   <none>        80:30000/TCP   21s
The service is mapped to a specific node port (30000) and, as Minikube creates a single node cluster, the web service can be accessed by http://<node-ip-address>:3000. The node IP address can be found by minikube ip on PowerShell.
For authentication, the debug method can be called and it’ll return a token.
1$ http http://172.28.175.24:30000/auth/debug/JAKIM
2
3# {
4#     "token": "eyJ0eXAiOiJKV1QiLCJhbGciOiJIUzI1NiJ9.eyJzdWIiOiJKQUtJTSIsImRlYnVnIjp0cnVlfQ.ddWXLcsB4IzQ5743vq-WVC2n-D9Z5yFIkSqjkpOAcs4"
5# }
All requests to the main method need the token in the Authorization header. If authenticated, the sidecar will make a request to Rserve and the response from it will be returned back to the client. I made 2 requests using HttPie and the responses show different hostname values. It’s because requests are load-balanced by the Service.
 1export token=eyJ0eXAiOiJKV1QiLCJhbGciOiJIUzI1NiJ9.eyJzdWIiOiJKQUtJTSIsImRlYnVnIjp0cnVlfQ.ddWXLcsB4IzQ5743vq-WVC2n-D9Z5yFIkSqjkpOAcs4
 2
 3$ echo '{"n": 100, "wait": 0.1}' \
 4    | http POST "http://172.28.175.24:30000/rserve/test" "Authorization:Bearer $token"
 5
 6# {
 7#     "hostname": "rserve-sidecar-deployment-5cbd6569f-ndjnb",
 8#     "n": 100.0,
 9#     "wait": 0.1
10# }
11
12$ echo '{"n": 100, "wait": 0.1}' \
13    | http POST "http://172.28.175.24:30000/rserve/test" "Authorization:Bearer $token"
14
15# {
16#     "hostname": "rserve-sidecar-deployment-5cbd6569f-kv599",
17#     "n": 100.0,
18#     "wait": 0.1
19# }


Comments