
As described in the product page, AWS Glue is a serverless data integration service that makes it easy to discover, prepare, and combine data for analytics, machine learning, and application development. For development, a development endpoint is recommended, but it can be costly, inconvenient or unavailable (for Glue 2.0). The AWS Glue team published a Docker image that includes the AWS Glue binaries and all the dependencies packaged together. After inspecting it, I find some modifications are necessary in order to build a development environment on it. In this post, I’ll demonstrate how to build development environments for AWS Glue 1.0 and 2.0 using the Docker image and the Visual Studio Code Remote - Containers extension.
Configuration
Although AWS Glue 1.0 and 2.0 have different dependencies and versions, the Python library (aws-glue-libs) shares the same branch (glue-1.0) and Spark version. On the other hand, AWS Glue 2.0 supports Python 3.7 and has different default python packages. Therefore, in order to set up an AWS Glue 2.0 development environment, it would be necessary to install Python 3.7 and the default packages while sharing the same Spark-related dependencies.
The Visual Studio Code Remote - Containers extension lets you use a Docker container as a full-featured development environment. It allows you to open any folder or repository inside a container and take advantage of Visual Studio Code’s full feature set. The development container configuration (devcontainer.json) and associating files can be found in the .devcontainer folder of the GitHub repository for this post. Apart from the configuration file, the folder includes a Dockerfile, files to keep Python packages to install and a custom Pytest executable for AWS Glue 2.0 (gluepytest2) - this executable will be explained later.
 1.
 2├── .devcontainer
 3│   ├── 3.6
 4│   │   └── dev.txt
 5│   ├── 3.7
 6│   │   ├── default.txt
 7│   │   └── dev.txt
 8│   ├── Dockerfile
 9│   ├── bin
10│   │   └── gluepytest2
11│   └── devcontainer.json
12├── .gitignore
13├── README.md
14├── example.py
15├── execute.sh
16├── src
17│   └── utils.py
18└── tests
19    ├── __init__.py
20    ├── conftest.py
21    └── test_utils.py
Dockerfile
The Docker image (amazon/aws-glue-libs:glue_libs_1.0.0_image_01) runs as the root user, and it is not convenient to write code with it. Therefore, a non-root user is created whose username corresponds to the logged-in user’s username - the USERNAME argument will be set accordingly in devcontainer.json. Next the sudo program is added in order to install other programs if necessary. More importantly, the Python Glue library’s executables are configured to run with the root user so that the sudo program is necessary to run those executables. Then the 3rd-party Python packages are installed for the Glue 1.0 and 2.0 development environments. Note that a virtual environment is created for the latter and the default Python packages and additional development packages are installed in it. Finally, a Pytest executable is copied to the Python Glue library’s executable path. It is because the Pytest path is hard-coded in the existing executable (gluepytest) and I just wanted to run test cases in the Glue 2.0 environment without touching existing ones - the Pytest path is set to /root/venv/bin/pytest_ in _gluepytest2.
 1## .devcontainer/Dockerfile
 2FROM amazon/aws-glue-libs:glue_libs_1.0.0_image_01
 3
 4ARG USERNAME
 5ARG USER_UID
 6ARG USER_GID
 7
 8## Create non-root user
 9RUN groupadd --gid $USER_GID $USERNAME \
10    && useradd --uid $USER_UID --gid $USER_GID -m $USERNAME
11
12## Add sudo support in case we need to install software after connecting
13## Jessie is not the latest stable Debian release - jessie-backports is not available
14RUN rm -rf /etc/apt/sources.list.d/jessie-backports.list
15
16RUN apt-get update \
17    && apt-get install -y sudo \
18    && echo $USERNAME ALL=\(root\) NOPASSWD:ALL > /etc/sudoers.d/$USERNAME \
19    && chmod 0440 /etc/sudoers.d/$USERNAME
20
21## Install extra packages for python 3.6
22COPY ./3.6 /tmp/3.6
23RUN pip install -r /tmp/3.6/dev.txt
24
25## Setup python 3.7 and install default and development packages to a virtual env
26RUN apt-get update \
27    && apt-get install -y python3.7 python3.7-venv
28
29RUN python3.7 -m venv /root/venv
30
31COPY ./3.7 /tmp/3.7
32RUN /root/venv/bin/pip install -r /tmp/3.7/dev.txt
33
34## Copy pytest execution script to /aws-glue-libs/bin
35## in order to run pytest from the virtual env
36COPY ./bin/gluepytest2 /home/aws-glue-libs/bin/gluepytest2
Container Configuration
The development container will be created by building an image from the Dockerfile illustrated above. The logged-in user’s username is provided to create a non-root user and the container is set to run as the user as well. And 2 Visual Studio Code extensions are installed - Python and Prettier. Also, the current folder is mounted to the container’s workspace folder and 2 additional folders are mounted - they are to share AWS credentials and SSH keys. Note that AWS credentials are mounted to /roo/.aws because the Python Glue library’s executables will be run as the root user. Then the port 4040 is set to be forwarded, which is used for the Spark UI. Finally, additional editor settings are added at the end.
 1// .devcontainer/devcontainer.json
 2{
 3  "name": "glue",
 4  "build": {
 5    "dockerfile": "Dockerfile",
 6    "args": {
 7      "USERNAME": "${localEnv:USER}",
 8      "USER_UID": "1000",
 9      "USER_GID": "1000"
10    }
11  },
12  "containerUser": "${localEnv:USER}",
13  "extensions": [
14    "ms-python.python",
15    "esbenp.prettier-vscode"
16  ],
17  "workspaceMount": "source=${localWorkspaceFolder},target=${localEnv:HOME}/glue-vscode,type=bind,consistency=cached",
18  "workspaceFolder": "${localEnv:HOME}/glue-vscode",
19  "forwardPorts": [4040],
20  "mounts": [
21    "source=${localEnv:HOME}/.aws,target=/root/.aws,type=bind,consistency=cached",
22    "source=${localEnv:HOME}/.ssh,target=${localEnv:HOME}/.ssh,type=bind,consistency=cached"
23  ],
24  "settings": {
25    "terminal.integrated.profiles.linux": {
26      "bash": {
27        "path": "/bin/bash"
28      }
29    },
30    "terminal.integrated.defaultProfile.linux": "bash",
31    "editor.formatOnSave": true,
32    "editor.defaultFormatter": "esbenp.prettier-vscode",
33    "editor.tabSize": 2,
34    "python.testing.pytestEnabled": true,
35    "python.linting.enabled": true,
36    "python.linting.pylintEnabled": false,
37    "python.linting.flake8Enabled": false,
38    "python.formatting.provider": "black",
39    "python.formatting.blackPath": "black",
40    "python.formatting.blackArgs": ["--line-length", "100"],
41    "[python]": {
42      "editor.tabSize": 4,
43      "editor.defaultFormatter": "ms-python.python"
44    }
45  }
46}
Launch Container
The development container can be run by executing the following command in the command palette.
- Remote-Containers: Open Folder in Container…

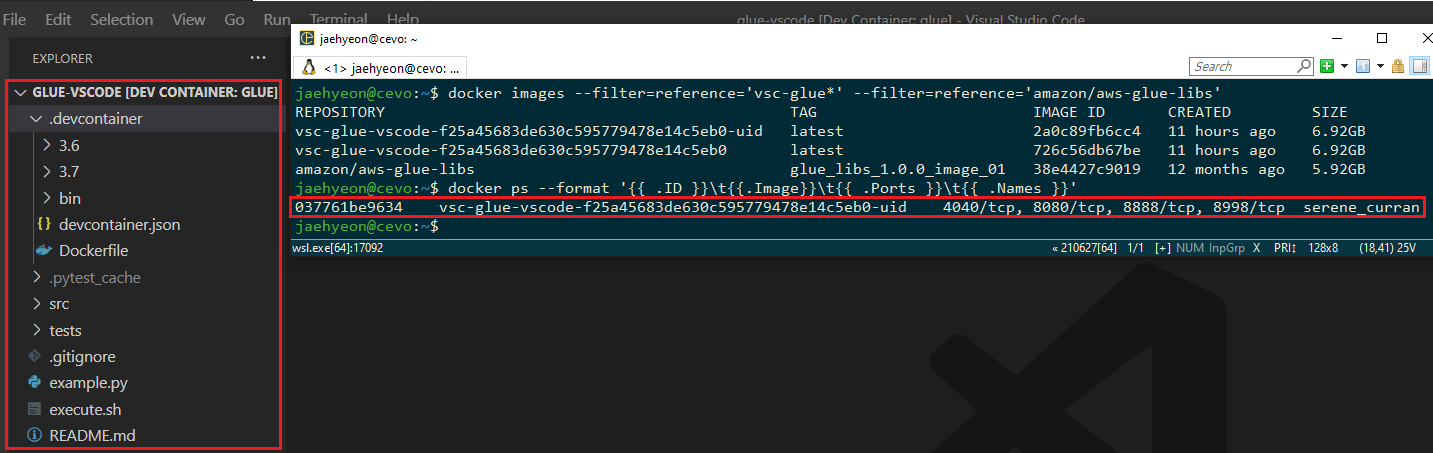
Once the development container is ready, the workspace folder will be open within the container. You will see 2 new images are created from the base Glue image and a container is run from the latest image.
Examples
I’ve created a simple script (execute.sh) to run the executables easily. The main command indicates which executable to run and possible values are pyspark, spark-submit and pytest. Note that the IPython notebook is available, but it is not added because I don’t think a notebook is good for development. However, you may try by just adding it. Below shows some example commands.
1# pyspark
2version=1 ./execute.sh pyspark OR version=2 ./execute.sh pyspark
3# spark submit
4version=1 ./execute.sh spark-submit example.py OR version=2 ./execute.sh spark-submit example.py
5# pytest
6version=1 ./execute.sh pytest -svv OR version=2 ./execute.sh pytest -svv
 1# ./execute.sh
 2#!/usr/bin/env bash
 3
 4## configure python runtime
 5if [ "$version" == "1" ]; then
 6  pyspark_python=python
 7elif [ "$version" == "2" ]; then
 8  pyspark_python=/root/venv/bin/python
 9else
10  echo "unsupported version - $version, only 1 or 2 is accepted"
11  exit 1
12fi
13echo "pyspark python - $pyspark_python"
14
15execution=$1
16echo "execution type - $execution"
17
18## remove first argument
19shift 1
20echo $@
21
22## set up command
23if [ $execution == 'pyspark' ]; then
24  sudo su -c "PYSPARK_PYTHON=$pyspark_python /home/aws-glue-libs/bin/gluepyspark"
25elif [ $execution == 'spark-submit' ]; then
26  sudo su -c "PYSPARK_PYTHON=$pyspark_python /home/aws-glue-libs/bin/gluesparksubmit $@"
27elif [ $execution == 'pytest' ]; then
28  if [ $version == "1" ]; then
29    sudo su -c "PYSPARK_PYTHON=$pyspark_python /home/aws-glue-libs/bin/gluepytest $@"
30  else
31    sudo su -c "PYSPARK_PYTHON=$pyspark_python /home/aws-glue-libs/bin/gluepytest2 $@"
32  fi
33else
34  echo "unsupported execution type - $execution"
35  exit 1
36fi
Pyspark
Using the script above, we can launch the PySpark shells for each of the environments. Python 3.6.10 is associated with the AWS Glue 1.0 while Python 3.7.3 in a virtual environment is with the AWS Glue 2.0.

Spark Submit
Below shows one of the Python samples in the Glue documentation. It pulls 3 data sets from a database called legislators. Then they are joined to create a history data set (l_history) and saved into S3.
 1# ./example.py
 2from awsglue.dynamicframe import DynamicFrame
 3from awsglue.transforms import Join
 4from awsglue.utils import getResolvedOptions
 5from pyspark.context import SparkContext
 6from awsglue.context import GlueContext
 7
 8glueContext = GlueContext(SparkContext.getOrCreate())
 9
10DATABASE = "legislators"
11OUTPUT_PATH = "s3://glue-python-samples-fbe445ee/output_dir"
12
13## create dynamic frames from data catalog
14persons: DynamicFrame = glueContext.create_dynamic_frame.from_catalog(
15    database=DATABASE, table_name="persons_json"
16)
17
18memberships: DynamicFrame = glueContext.create_dynamic_frame.from_catalog(
19    database=DATABASE, table_name="memberships_json"
20)
21
22orgs: DynamicFrame = glueContext.create_dynamic_frame.from_catalog(
23    database=DATABASE, table_name="organizations_json"
24)
25
26## manipulate data
27orgs = (
28    orgs.drop_fields(["other_names", "identifiers"])
29    .rename_field("id", "org_id")
30    .rename_field("name", "org_name")
31)
32
33l_history: DynamicFrame = Join.apply(
34    orgs, Join.apply(persons, memberships, "id", "person_id"), "org_id", "organization_id"
35)
36l_history = l_history.drop_fields(["person_id", "org_id"])
37
38l_history.printSchema()
39
40## write to s3
41glueContext.write_dynamic_frame.from_options(
42    frame=l_history,
43    connection_type="s3",
44    connection_options={"path": f"{OUTPUT_PATH}/legislator_history"},
45    format="parquet",
46)
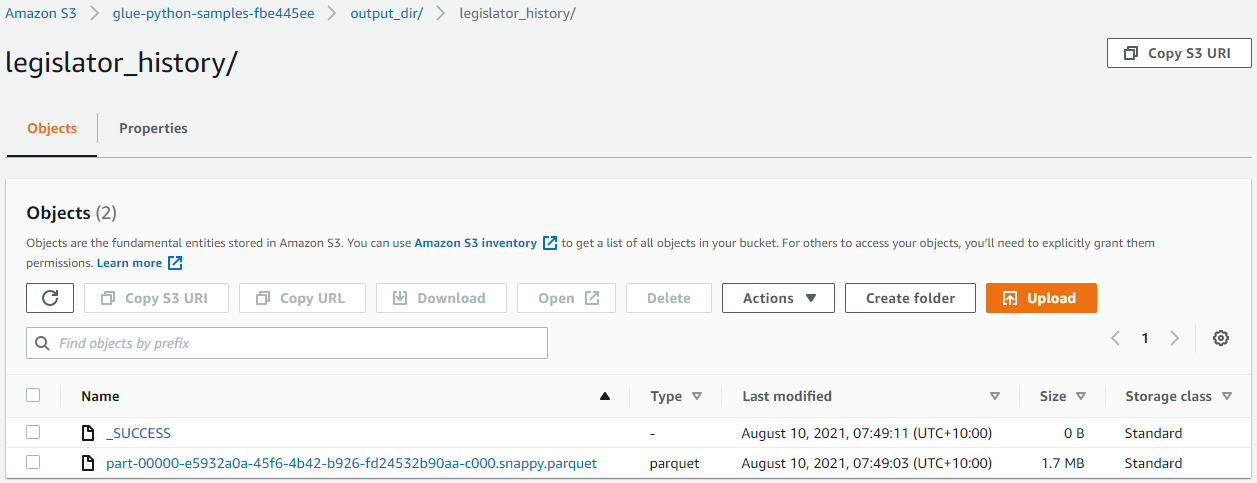
When the execution completes, we can see the joined data set is stored as a parquet file in the output S3 bucket.
Note that we can monitor and inspect Spark job executions in the Spark UI on port 4040.

Pytest
We can test a function that deals with a DynamicFrame. Below shows a test case for a simple function that filters a DynamicFrame based on a column value.
 1# ./src/utils.py
 2from awsglue.dynamicframe import DynamicFrame
 3
 4def filter_dynamic_frame(dyf: DynamicFrame, column_name: str, value: int):
 5    return dyf.filter(f=lambda x: x[column_name] > value)
 6
 7# ./tests/conftest.py
 8from pyspark.context import SparkContext
 9from awsglue.context import GlueContext
10import pytest
11
12@pytest.fixture(scope="session")
13def glueContext():
14    sparkContext = SparkContext()
15    glueContext = GlueContext(sparkContext)
16    yield glueContext
17    sparkContext.stop()
18
19
20# ./tests/test_utils.py
21from typing import List
22from awsglue.dynamicframe import DynamicFrame
23import pandas as pd
24from src.utils import filter_dynamic_frame
25
26def _get_sorted_data_frame(pdf: pd.DataFrame, columns_list: List[str] = None):
27    if columns_list is None:
28        columns_list = list(pdf.columns.values)
29    return pdf.sort_values(columns_list).reset_index(drop=True)
30
31
32def test_filter_dynamic_frame_by_value(glueContext):
33    spark = glueContext.spark_session
34
35    input = spark.createDataFrame(
36        [("charly", 15), ("fabien", 18), ("sam", 21), ("sam", 25), ("nick", 19), ("nick", 40)],
37        ["name", "age"],
38    )
39
40    expected_output = spark.createDataFrame(
41        [("sam", 25), ("sam", 21), ("nick", 40)],
42        ["name", "age"],
43    )
44
45    real_output = filter_dynamic_frame(DynamicFrame.fromDF(input, glueContext, "output"), "age", 20)
46
47    pd.testing.assert_frame_equal(
48        _get_sorted_data_frame(real_output.toDF().toPandas(), ["name", "age"]),
49        _get_sorted_data_frame(expected_output.toPandas(), ["name", "age"]),
50        check_like=True,
51    )

Conclusion
In this post, I demonstrated how to build local development environments for AWS Glue 1.0 and 2.0 using Docker and the Visual Studio Code Remote - Containers extension. Then examples of launching Pyspark shells, submitting an application and running a test are shown. I hope this post is useful to develop and test Glue ETL scripts locally.


Comments