
When I wrote my data lake demo series (part 1, part 2 and part 3) recently, I used an Aurora PostgreSQL, MSK and EMR cluster. All of them were deployed to private subnets and dedicated infrastructure was created using CloudFormation. Using the infrastructure as code (IaC) tool helped a lot, but it resulted in creating 7 CloudFormation stacks, which was a bit harder to manage in the end. Then I looked into how to simplify building infrastructure and managing resources on AWS and decided to use Terraform instead. I find it has useful constructs (e.g. meta-arguments) to make it simpler to create and manage resources. It also has a wide range of useful modules that facilitate development significantly. In this post, we’ll build an infrastructure for development on AWS with Terraform. A VPN server will also be included in order to improve developer experience by accessing resources in private subnets from developer machines.
[UPDATE 2023-10-13]
- In later projects, the VPN admin password and VPN pre shared key are auto-generated and saved as a secret in AWS Secrets Manager. The changes are added to VPN section.
Architecture
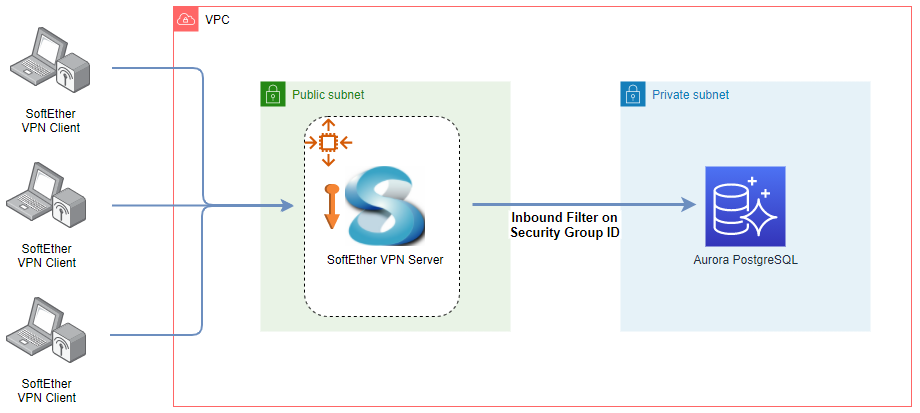
The infrastructure that we’ll discuss in this post is shown below. The database is deployed in a private subnet, and it is not possible to access it from the developer machine. We can construct a PC-to-PC VPN with SoftEther VPN. The VPN server runs in a public subnet, and it is managed by an autoscaling group where only a single instance will be maintained. An elastic IP address is associated by a bootstrap script so that its public IP doesn’t change even if the EC2 instance is recreated. We can add users with the server manager program, and they can access the server with the client program. Access from the VPN server to the database is allowed by adding an inbound rule where the source security group ID is set to the VPN server’s security group ID. Note that another option is AWS Client VPN, but it is way more expensive. We’ll create 2 private subnets, and it’ll cost $0.30/hour for endpoint association in the Sydney region. It also charges $0.05/hour for each connection and the minimum charge will be $0.35/hour. On the other hand, the SorftEther VPN server runs in the t3.nano instance and its cost is only $0.0066/hour.
Even developing a single database can result in a stack of resources and Terraform can be of great help to create and manage those resources. Also, VPN can improve developer experience significantly as it helps access them from developer machines. In this post, it’ll be illustrated how to access a database but access to other resources such as MSK, EMR, ECS and EKS can also be made.
Infrastructure
Terraform can be installed in multiple ways and the CLI has intuitive commands to manage AWS infrastructure. Key commands are
- init - It is used to initialize a working directory containing Terraform configuration files.
- plan - It creates an execution plan, which lets you preview the changes that Terraform plans to make to your infrastructure.
- apply - It executes the actions proposed in a Terraform plan.
- destroy - It is a convenient way to destroy all remote objects managed by a particular Terraform configuration.
The GitHub repository for this post has the following directory structure. Terraform resources are grouped into 4 files, and they’ll be discussed further below. The remaining files are supporting elements and their details can be found in the language reference.
 1$ tree
 2.
 3├── README.md
 4├── _data.tf
 5├── _outputs.tf
 6├── _providers.tf
 7├── _variables.tf
 8├── aurora.tf
 9├── keypair.tf
10├── scripts
11│   └── bootstrap.sh
12├── vpc.tf
13└── vpn.tf
14
151 directory, 10 files
VPC
We can use the AWS VPC module to construct a VPC. A Terraform module is a container for multiple resources, and it makes it easier to manage related resources. A VPC with 2 availability zones is defined and private/public subnets are configured to each of them. Optionally a NAT gateway is added only to a single availability zone.
 1# vpc.tf
 2module "vpc" {
 3  source = "terraform-aws-modules/vpc/aws"
 4
 5  name = "${local.resource_prefix}-vpc"
 6  cidr = "10.${var.class_b}.0.0/16"
 7
 8  azs             = ["${var.aws_region}a", "${var.aws_region}b"]
 9  private_subnets = ["10.${var.class_b}.0.0/19", "10.${var.class_b}.32.0/19"]
10  public_subnets  = ["10.${var.class_b}.64.0/19", "10.${var.class_b}.96.0/19"]
11
12  enable_nat_gateway = true
13  single_nat_gateway = true
14  one_nat_gateway_per_az = false
15}
Key Pair
An optional key pair is created. It can be used to access an EC2 instance via SSH. The PEM file will be saved to the key-pair folder once created.
 1# keypair.tf
 2resource "tls_private_key" "pk" {
 3  count     = var.key_pair_create ? 1 : 0
 4  algorithm = "RSA"
 5  rsa_bits  = 4096
 6}
 7
 8resource "aws_key_pair" "key_pair" {
 9  count      = var.key_pair_create ? 1 : 0
10  key_name   = "${local.resource_prefix}-key"
11  public_key = tls_private_key.pk[0].public_key_openssh
12}
13
14resource "local_file" "pem_file" {
15  count             = var.key_pair_create ? 1 : 0
16  filename          = pathexpand("${path.module}/key-pair/${local.resource_prefix}-key.pem")
17  file_permission   = "0400"
18  sensitive_content = tls_private_key.pk[0].private_key_pem
19}
VPN
The AWS Auto Scaling Group (ASG) module is used to manage the SoftEther VPN server. The ASG maintains a single EC2 instance in one of the public subnets. The user data script (bootstrap.sh) is configured to run at launch and it’ll be discussed below. Note that there are other resources that are necessary to make the VPN server to work correctly and those can be found in the vpn.tf. Also note that the VPN resource requires a number of configuration values. While most of them have default values or are automatically determined, the IPsec Pre-Shared key (vpn_psk) and administrator password (admin_password) do not have default values. They need to be specified while running the plan, apply and _destroy _commands. Finally, if the variable vpn_limit_ingress is set to true, the inbound rules of the VPN security group is limited to the running machine’s IP address.
  1# _variables.tf
  2variable "vpn_create" {
  3  description = "Whether to create a VPN instance"
  4  default = true
  5}
  6
  7variable "vpn_limit_ingress" {
  8  description = "Whether to limit the CIDR block of VPN security group inbound rules."
  9  default = true
 10}
 11
 12variable "vpn_use_spot" {
 13  description = "Whether to use spot or on-demand EC2 instance"
 14  default = false
 15}
 16
 17variable "vpn_psk" {
 18  description = "The IPsec Pre-Shared Key"
 19  type        = string
 20  sensitive   = true
 21}
 22
 23variable "admin_password" {
 24  description = "SoftEther VPN admin / database master password"
 25  type        = string
 26  sensitive   = true
 27}
 28
 29locals {
 30  ...
 31  local_ip_address  = "${chomp(data.http.local_ip_address.body)}/32"
 32  vpn_ingress_cidr  = var.vpn_limit_ingress ? local.local_ip_address : "0.0.0.0/0"
 33  vpn_spot_override = [
 34    { instance_type: "t3.nano" },
 35    { instance_type: "t3a.nano" },
 36  ]
 37}
 38
 39# vpn.tf
 40module "vpn" {
 41  source  = "terraform-aws-modules/autoscaling/aws"
 42  count   = var.vpn_create ? 1 : 0
 43
 44  name = "${local.resource_prefix}-vpn-asg"
 45
 46  key_name            = var.key_pair_create ? aws_key_pair.key_pair[0].key_name : null
 47  vpc_zone_identifier = module.vpc.public_subnets
 48  min_size            = 1
 49  max_size            = 1
 50  desired_capacity    = 1
 51
 52  image_id                  = data.aws_ami.amazon_linux_2.id
 53  instance_type             = element([for s in local.vpn_spot_override: s.instance_type], 0)
 54  security_groups           = [aws_security_group.vpn[0].id]
 55  iam_instance_profile_arn  = aws_iam_instance_profile.vpn[0].arn
 56
 57  # Launch template
 58  create_lt              = true
 59  update_default_version = true
 60
 61  user_data_base64 = base64encode(join("\n", [
 62    "#cloud-config",
 63    yamlencode({
 64      # https://cloudinit.readthedocs.io/en/latest/topics/modules.html
 65      write_files : [
 66        {
 67          path : "/opt/vpn/bootstrap.sh",
 68          content : templatefile("${path.module}/scripts/bootstrap.sh", {
 69            aws_region      = var.aws_region,
 70            allocation_id   = aws_eip.vpn[0].allocation_id,
 71            vpn_psk         = var.vpn_psk,
 72            admin_password  = var.admin_password
 73          }),
 74          permissions : "0755",
 75        }
 76      ],
 77      runcmd : [
 78        ["/opt/vpn/bootstrap.sh"],
 79      ],
 80    })
 81  ]))
 82
 83  # Mixed instances
 84  use_mixed_instances_policy = true
 85  mixed_instances_policy = {
 86    instances_distribution = {
 87      on_demand_base_capacity                  = var.vpn_use_spot ? 0 : 1
 88      on_demand_percentage_above_base_capacity = var.vpn_use_spot ? 0 : 100
 89      spot_allocation_strategy                 = "capacity-optimized"
 90    }
 91    override = local.vpn_spot_override
 92  }
 93
 94  tags_as_map = {
 95    "Name" = "${local.resource_prefix}-vpn-asg"
 96  }
 97}
 98
 99resource "aws_eip" "vpn" {
100  count = var.vpn_create ? 1 : 0
101  tags  = {
102    "Name" = "${local.resource_prefix}-vpn-eip"
103  }
104}
105
106...
The bootstrap script associates the elastic IP address followed by starting the SoftEther VPN server by a Docker container. It accepts the pre-shared key (vpn_psk) and administrator password (admin_password) as environment variables. Also, the Virtual Hub name is set to DEFAULT.
 1# scripts/bootstrap.sh
 2#!/bin/bash -ex
 3
 4## Allocate elastic IP and disable source/destination checks
 5TOKEN=$(curl --silent --max-time 60 -X PUT http://169.254.169.254/latest/api/token -H "X-aws-ec2-metadata-token-ttl-seconds: 30")
 6INSTANCEID=$(curl --silent --max-time 60 -H "X-aws-ec2-metadata-token: $TOKEN" http://169.254.169.254/latest/meta-data/instance-id)
 7aws --region ${aws_region} ec2 associate-address --instance-id $INSTANCEID --allocation-id ${allocation_id}
 8aws --region ${aws_region} ec2 modify-instance-attribute --instance-id $INSTANCEID --source-dest-check "{\"Value\": false}"
 9
10## Start SoftEther VPN server
11yum update -y && yum install docker -y
12systemctl enable docker.service && systemctl start docker.service
13
14docker pull siomiz/softethervpn:debian
15docker run -d \
16  --cap-add NET_ADMIN \
17  --name softethervpn \
18  --restart unless-stopped \
19  -p 500:500/udp -p 4500:4500/udp -p 1701:1701/tcp -p 1194:1194/udp -p 5555:5555/tcp -p 443:443/tcp \
20  -e PSK=${vpn_psk} \
21  -e SPW=${admin_password} \
22  -e HPW=DEFAULT \
23  siomiz/softethervpn:debian
[UPDATE 2023-10-13] In later projects, the VPN admin password and VPN pre shared key are auto-generated and saved as a secret in AWS Secrets Manager. The secret is named as "${local.name}-vpn-secrets" and can be obtained on AWS Console. Or the VPN secret ID are added to a Terraform output value, it can be obtained as shown below.
1aws secretsmanager get-secret-value \
2  --secret-id $(terraform output -raw vpn_secret_id) | jq -c '.SecretString | fromjson'
3# {"vpn_pre_shared_key":"xxxxxxxxxxxxxxxxxxxxxxxxxxxxxxxx","vpn_admin_password":"xxxxxxxxxxxxxxxx"}
Below shows relevant Terraform changes.
  1# vpn.tf
  2module "vpn" {
  3  source  = "terraform-aws-modules/autoscaling/aws"
  4  version = "~> 6.5"
  5  count   = local.vpn.to_create ? 1 : 0
  6
  7  name = "${local.name}-vpn-asg"
  8
  9  ...
 10
 11  # Launch template
 12  create_launch_template = true
 13  update_default_version = true
 14
 15  user_data = base64encode(join("\n", [
 16    "#cloud-config",
 17    yamlencode({
 18      # https://cloudinit.readthedocs.io/en/latest/topics/modules.html
 19      write_files : [
 20        {
 21          path : "/opt/vpn/bootstrap.sh",
 22          content : templatefile("${path.module}/scripts/bootstrap.sh", {
 23            aws_region     = local.region,
 24            allocation_id  = aws_eip.vpn[0].allocation_id,
 25            vpn_psk        = "${random_password.vpn_pre_shared_key[0].result}", # <- internally generated value
 26            admin_password = "${random_password.vpn_admin_pw[0].result}" # <- internally generated value
 27          }),
 28          permissions : "0755",
 29        }
 30      ],
 31      runcmd : [
 32        ["/opt/vpn/bootstrap.sh"],
 33      ],
 34    })
 35  ]))
 36
 37  ...
 38
 39  tags = local.tags
 40}
 41
 42...
 43
 44## create VPN secrets - IPsec Pre-Shared Key and admin password for VPN
 45##  see https://cloud.google.com/network-connectivity/docs/vpn/how-to/generating-pre-shared-key
 46resource "random_password" "vpn_pre_shared_key" {
 47  count            = local.vpn.to_create ? 1 : 0
 48  length           = 32
 49  override_special = "/+"
 50}
 51
 52resource "random_password" "vpn_admin_pw" {
 53  count   = local.vpn.to_create ? 1 : 0
 54  length  = 16
 55  special = false
 56}
 57
 58resource "aws_secretsmanager_secret" "vpn_secrets" {
 59  count                   = local.vpn.to_create ? 1 : 0
 60  name                    = "${local.name}-vpn-secrets"
 61  description             = "Service Account Password for the API"
 62  recovery_window_in_days = 0
 63
 64  tags = local.tags
 65}
 66
 67resource "aws_secretsmanager_secret_version" "vpn_secrets" {
 68  count         = local.vpn.to_create ? 1 : 0
 69  secret_id     = aws_secretsmanager_secret.vpn_secrets[0].id
 70  secret_string = <<EOF
 71  {
 72    "vpn_pre_shared_key": "${random_password.vpn_pre_shared_key[0].result}",
 73    "vpn_admin_password": "${random_password.vpn_admin_pw[0].result}"
 74  }
 75EOF
 76}
 77
 78resource "tls_private_key" "pk" {
 79  count     = local.vpn.to_create ? 1 : 0
 80  algorithm = "RSA"
 81  rsa_bits  = 4096
 82}
 83
 84resource "aws_key_pair" "key_pair" {
 85  count      = local.vpn.to_create ? 1 : 0
 86  key_name   = "${local.name}-vpn-key"
 87  public_key = tls_private_key.pk[0].public_key_openssh
 88}
 89
 90...
 91
 92# outputs.tf
 93...
 94
 95output "vpn_secret_id" {
 96  description = "VPN secret ID"
 97  value       = local.vpn.to_create ? aws_secretsmanager_secret.vpn_secrets[0].id : null
 98}
 99
100output "vpn_secret_version" {
101  description = "VPN secret version ID"
102  value       = local.vpn.to_create ? aws_secretsmanager_secret_version.vpn_secrets[0].version_id : null
103}
104...
Database
An Aurora PostgreSQL cluster is created using the AWS RDS Aurora module. It is set to have only a single instance and is deployed to a private subnet. Note that a security group (vpn_access) is created that allows access from the VPN server, and it is added to vpc_security_group_ids.
 1# aurora.tf
 2module "aurora" {
 3  source  = "terraform-aws-modules/rds-aurora/aws"
 4
 5  name                        = "${local.resource_prefix}-db-cluster"
 6  engine                      = "aurora-postgresql"
 7  engine_version              = "13"
 8  auto_minor_version_upgrade  = false
 9
10  instances = {
11    1 = {
12      instance_class = "db.t3.medium"
13    }
14  }
15
16  vpc_id                 = module.vpc.vpc_id
17  db_subnet_group_name   = aws_db_subnet_group.aurora.id
18  create_db_subnet_group = false
19  create_security_group  = true
20  vpc_security_group_ids = [aws_security_group.vpn_access.id]
21
22  iam_database_authentication_enabled = false
23  create_random_password              = false
24  master_password                     = var.admin_password
25  database_name                       = local.database_name
26
27  apply_immediately   = true
28  skip_final_snapshot = true
29
30  db_cluster_parameter_group_name = aws_rds_cluster_parameter_group.aurora.id
31  enabled_cloudwatch_logs_exports = ["postgresql"]
32
33  tags = {
34    Name = "${local.resource_prefix}-db-cluster"
35  }
36}
37
38resource "aws_db_subnet_group" "aurora" {
39  name       = "${local.resource_prefix}-db-subnet-group"
40  subnet_ids = module.vpc.private_subnets
41
42  tags = {
43    Name = "${local.resource_prefix}-db-subnet-group"
44  }
45}
46
47...
48
49resource "aws_security_group" "vpn_access" {
50  name   = "${local.resource_prefix}-db-security-group"
51  vpc_id = module.vpc.vpc_id
52
53  lifecycle {
54    create_before_destroy = true
55  }
56}
57
58resource "aws_security_group_rule" "aurora_vpn_inbound" {
59  count                    = var.vpn_create ? 1 : 0
60  type                     = "ingress"
61  description              = "VPN access"
62  security_group_id        = aws_security_group.vpn_access.id
63  protocol                 = "tcp"
64  from_port                = "5432"
65  to_port                  = "5432"
66  source_security_group_id = aws_security_group.vpn[0].id
67}
VPN Configuration
Both the VPN Server Manager and Client can be obtained from the download centre. The server and client configuration are illustrated below.
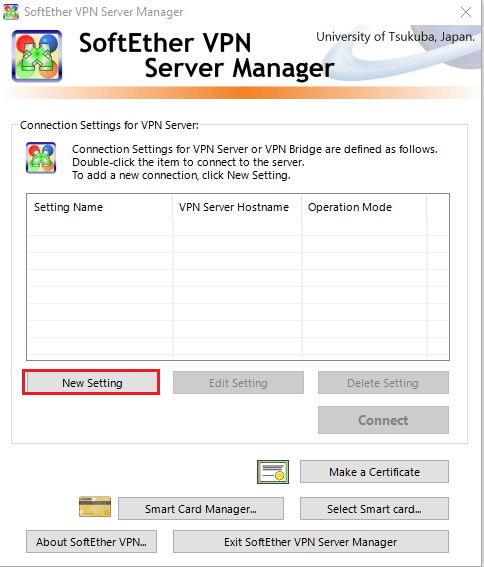
VPN Server
We can begin with adding a new setting.
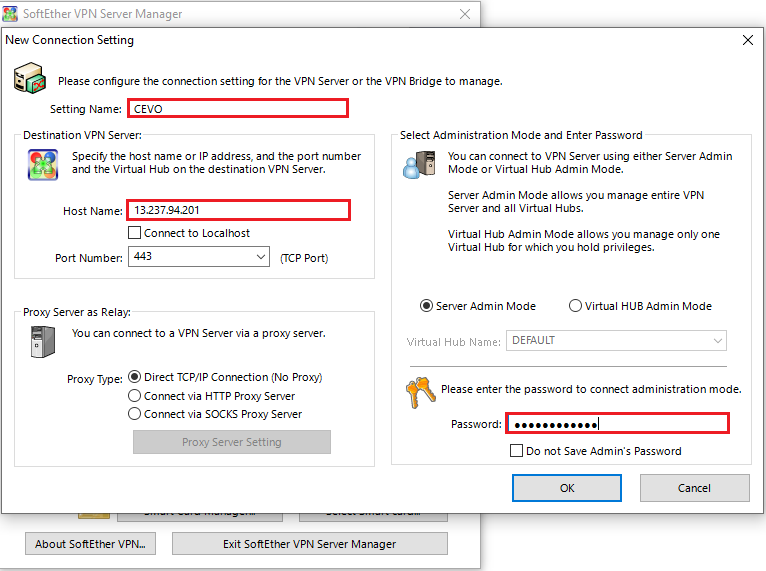
We need to fill in the input fields in the red boxes below. It’s possible to use the elastic IP address as the host name and the administrator password should match to what is used for Terraform.
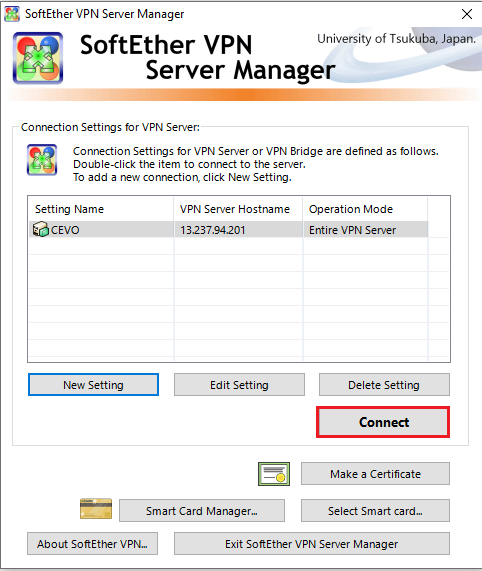
Then we can make a connection to the server by clicking the connect button.
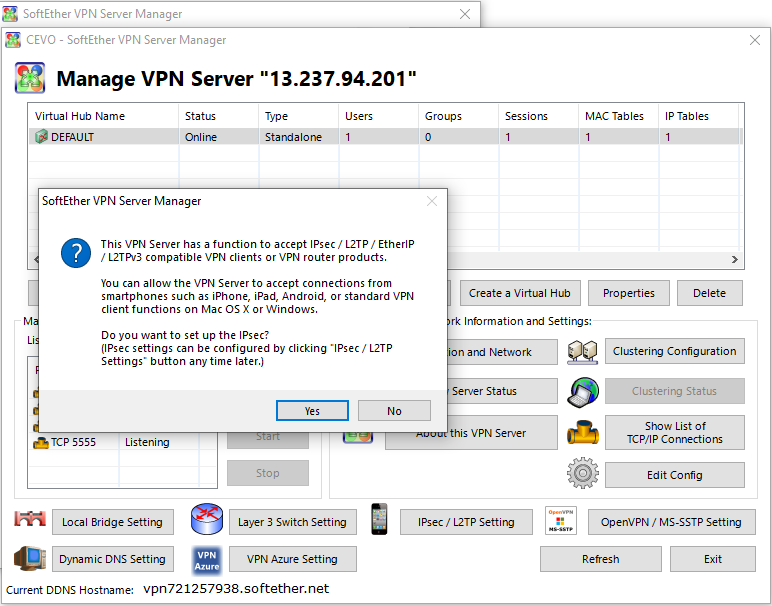
If it’s the first attempt, we’ll see the following pop-up message and we can click yes to set up the IPsec.
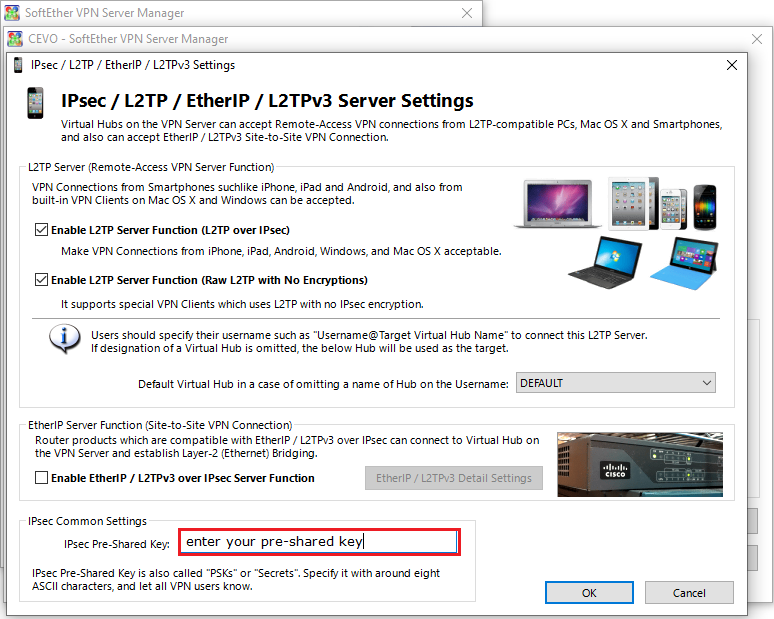
In the dialog, we just need to enter the IPsec Pre-Shared key and click ok.
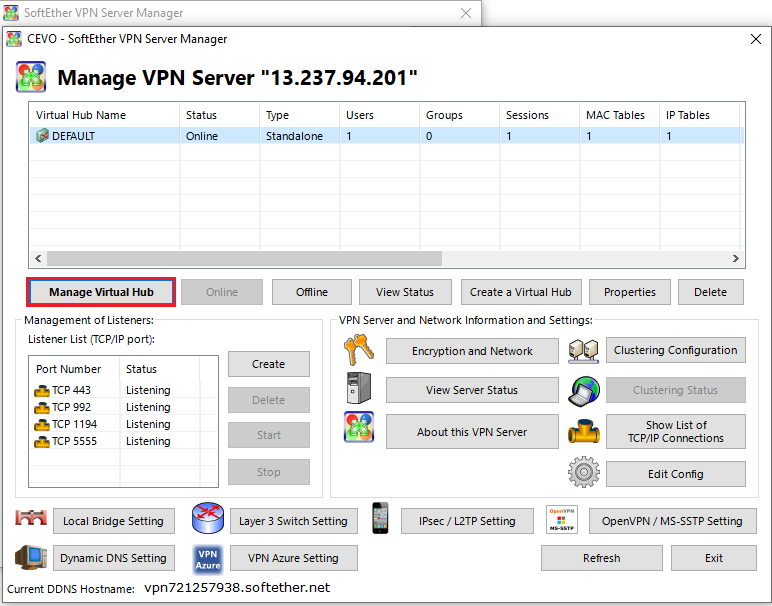
Once a connection is made successfully, we can manage the Virtual Hub by clicking the manage virtual hub button. Note that we created a Virtual Hub named DEFAULT and the session will be established on that Virtual Hub.
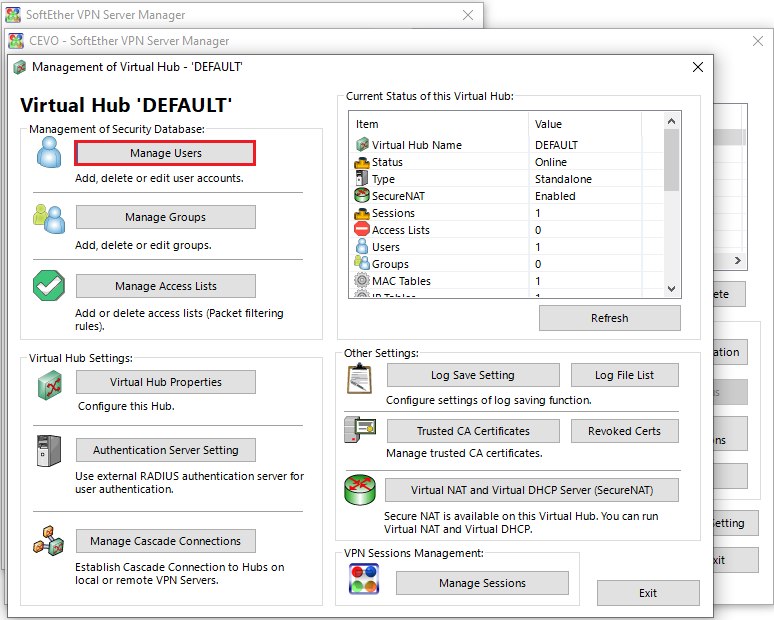
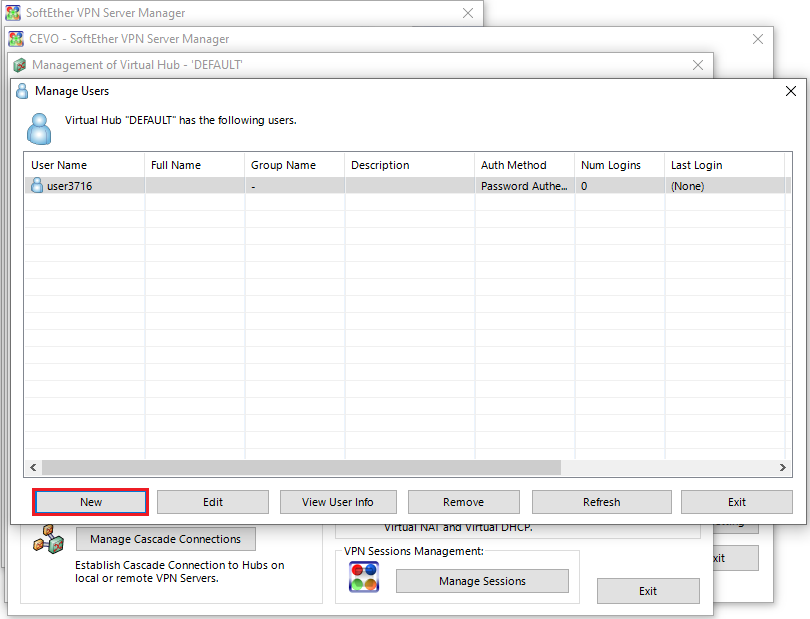
We can create a new user by clicking the manage users button.
And clicking the new button.
For simplicity, we can use Password Authentication as the auth type and enter the username and password.
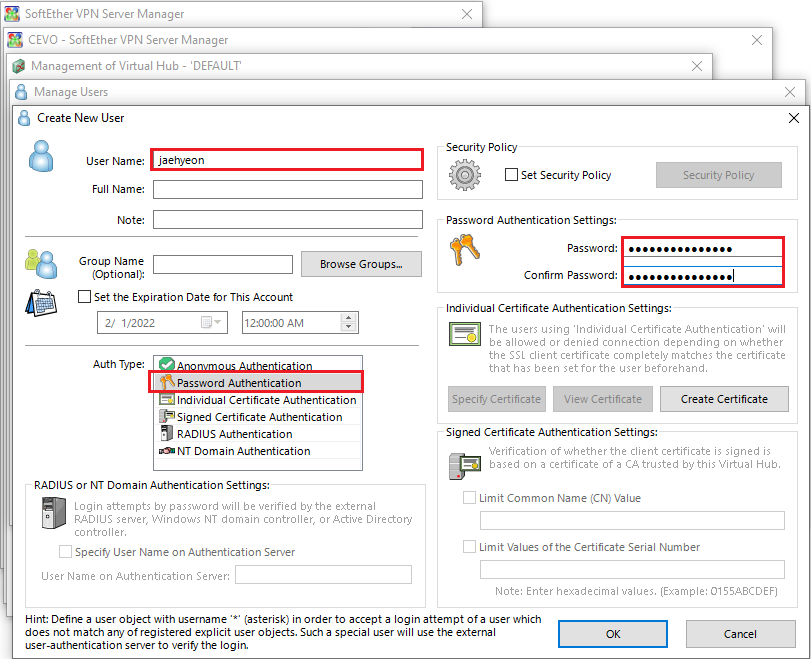
A new user is created, and we can use the credentials on the client program to make a connection to the server.
VPN Client
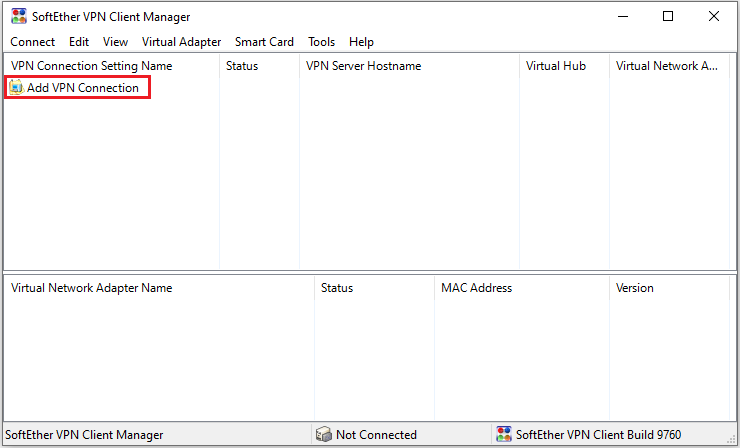
We can add a VPN connection by clicking the menu shown below.
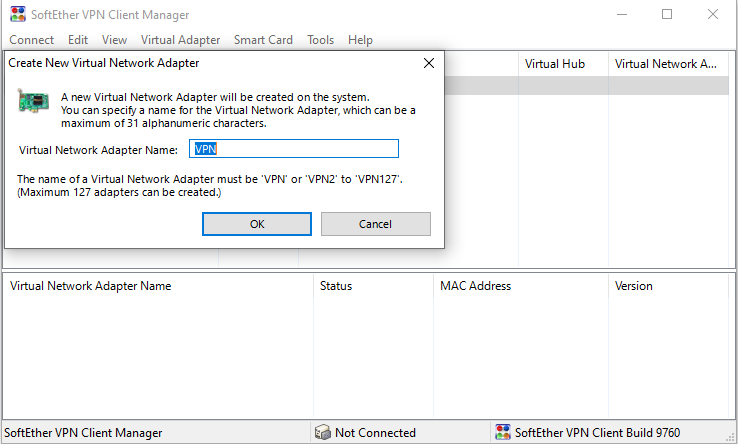
We’ll need to create a Virtual Network Adapter and should click the yes button.
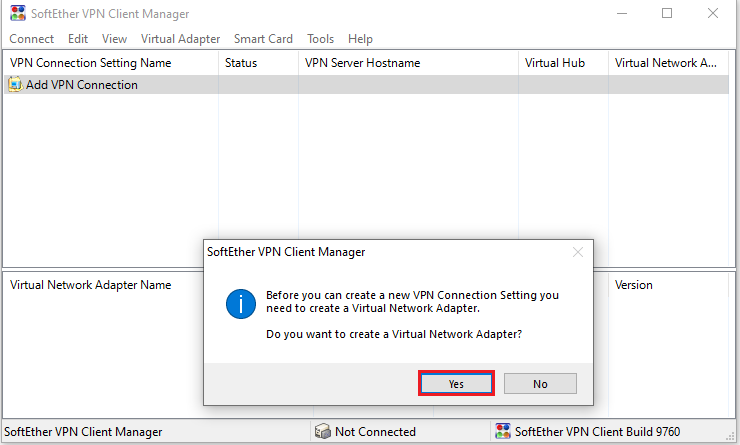
In the new dialog, we can add the adapter name and hit ok. Note we should have the administrator privilege to create a new adapter.
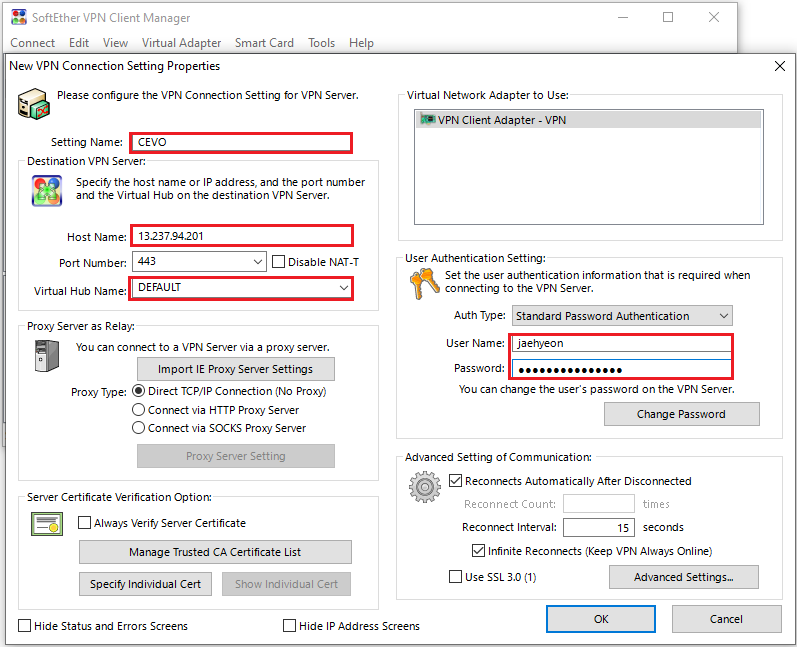
Then a new dialog box will be shown. We can add a connection by entering the input fields in the red boxes below. The VPN server details should match to what are created by Terraform and the user credentials that are created in the previous section can be used.
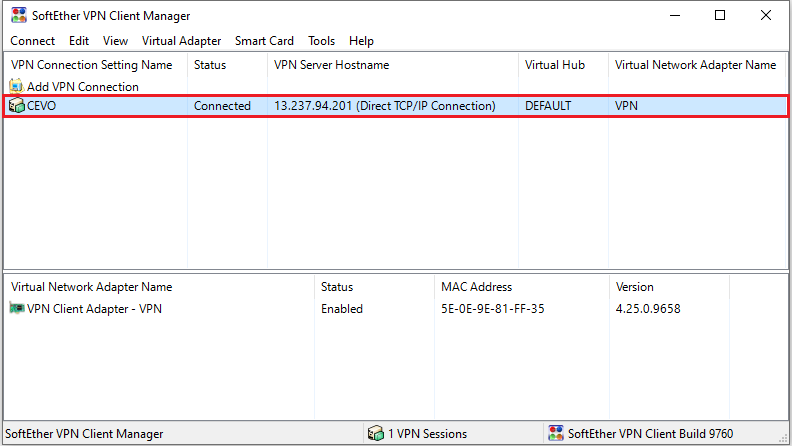
Once a connection is added, we can make a connection to the VPN server by right-clicking the item and clicking the connect menu.

We can see that the status is changed into connected.
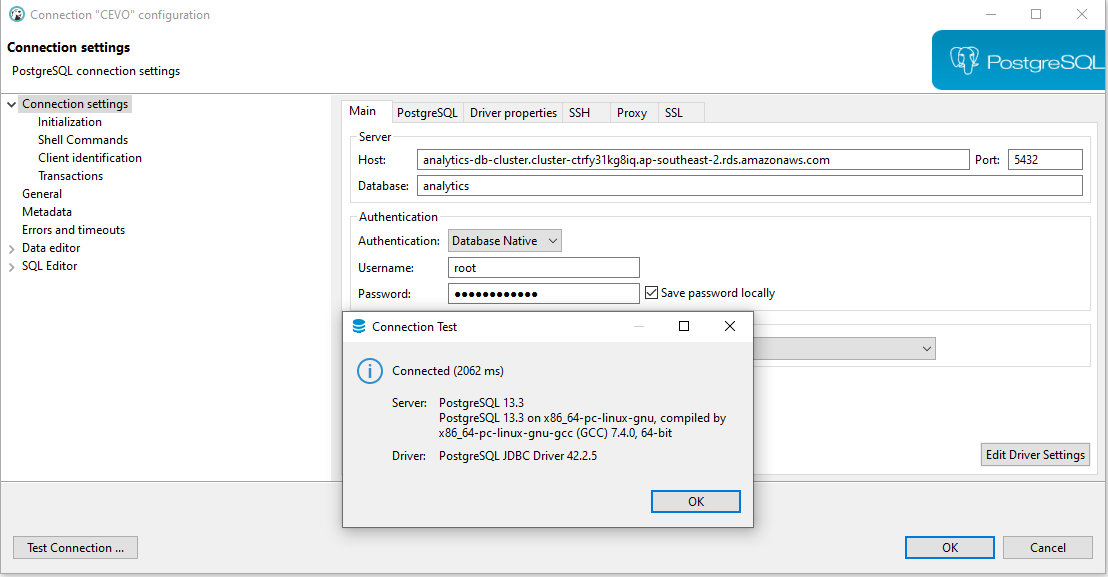
Once the VPN server is connected, we can access the database that is deployed in the private subnet. A connection is tested by a database client, and it is shown that the connection is successful.
Summary
In this post, we discussed how to set up a development infrastructure on AWS with Terraform. Terraform is used as an effective way of managing resources on AWS. An Aurora PostgreSQL cluster is created in a private subnet and SoftEther VPN is configured to access the database from the developer machine.


Comments