
In the previous post, we discussed a Change Data Capture (CDC) solution with a schema registry. A local development environment is set up using Docker Compose. The Debezium and Confluent S3 connectors are deployed with the Confluent Avro converter and the Apicurio registry is used as the schema registry service. A quick example is shown to illustrate how schema evolution can be managed by the schema registry. In this post, we’ll build the solution on AWS using MSK, MSK Connect, Aurora PostgreSQL and ECS.
- Part 1 Local Development
- Part 2 MSK Deployment (this post)
Architecture
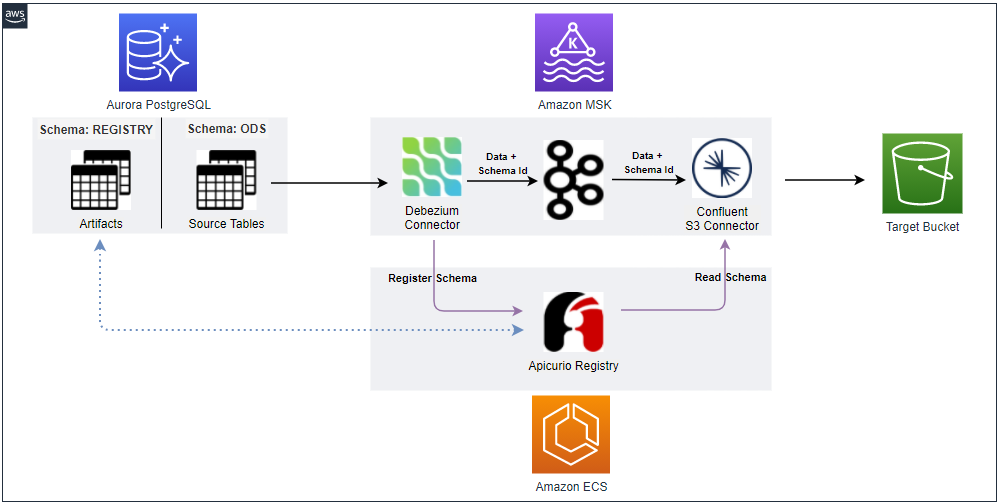
Below shows an updated CDC architecture with a schema registry. The Debezium connector talks to the schema registry first and checks if the schema is available. If it doesn’t exist, it is registered and cached in the schema registry. Then the producer serializes the data with the schema and sends it to the topic with the schema ID. When the sink connector consumes the message, it’ll read the schema with the ID and deserializes it. The schema registry uses a PostgreSQL database as an artifact store where multiple versions of schemas are kept. In this post, we’ll build it on AWS. An MSK cluster will be created and data will be pushed from a database deployed using Aurora PostgreSQL. The database has a schema called registry and schema metadata will be stored in it. The Apicurio registry will be deployed as an ECS service behind an internal load balancer.
Infrastructure
The main AWS resources will be deployed to private subnets of a VPC and connection between those will be managed by updating security group inbound rules. For example, the MSK connectors should have access to the registry service and the connectors’ security group ID should be added to the inbound rule of the registry service. As multiple resources are deployed to private subnets, it’ll be convenient to set up VPN so that access to them can be made from the developer machine. It can improve developer experience significantly. We’ll use Terraform for managing the resources on AWS and how to set up VPC, VPN and Aurora PostgreSQL is discussed in detail in one of my earlier posts. In this post, I’ll illustrate those that are not covered in the article. The Terraform source can be found in the GitHub repository for this post.
MSK Cluster
As discussed in one of the earlier posts, we’ll create an MSK cluster with 2 brokers of the kafka.m5.large instance type in order to prevent the failed authentication error. 2 inbound rules are configured for the MSK’s security group. The first one is allowing all access from its own security group, and it is required for MSK connectors to have access to the MKS cluster. Note, when we create a connector from the AWS console, the cluster’s subnets and security group are selected for the connector by default. The second inbound rule is allowing the VPN’s security group at port 9098, which is the port of bootstrap servers for IAM authentication. Also, an IAM role is created, which can be assumed by MSK connectors in order to have permission on the cluster, topic and group. The Terraform file for the MSK cluster and related resources can be found in infra/msk.tf.
Schema Registry
The schema registry is deployed via ECS as a Fargate task. 2 tasks are served by an ECS service, and it can be accessed by an internal load balancer. The load balancer is configured to allow inbound traffic from the MSK cluster and VPN, and it has access to the individual tasks. Normally inbound traffic to the tasks should be allowed to the load balancer only but, for testing, it is set that they accept inbound traffic from VPN as well. The Terraform file for the schema registry and related resources can be found in infra/registry.tf.
Setup Database
In order for the schema registry to work properly, the database should have the appropriate schema named registry. Also, the database needs to have sample data loaded into the ods schema. Therefore, it is not possible to create all resources at once, and we need to skip creating the registry service at first. It can be done by setting the registry_create variable to false.
1# infra/variables.tf
2variable "registry_create" {
3  description = "Whether to create an Apicurio registry service"
4  default     = false
5}
A simple python application is created to set up the database, and it can be run as shown below. Note do not forget to connect the VPN before executing the command.
 1(venv) $ python connect/data/load/main.py --help
 2Usage: main.py [OPTIONS]
 3
 4Options:
 5  -h, --host TEXT       Database host  [required]
 6  -p, --port INTEGER    Database port  [default: 5432]
 7  -d, --dbname TEXT     Database name  [required]
 8  -u, --user TEXT       Database user name  [required]
 9  --password TEXT       Database user password  [required]
10  --install-completion  Install completion for the current shell.
11  --show-completion     Show completion for the current shell, to copy it or
12                        customize the installation.
13  --help                Show this message and exit.
14
15(venv) $ python connect/data/load/main.py --help -h <db-host-name-or-ip> -d <dbname> -u <username>
16Password:
17To create database? [y/N]: y
18Database connection created
19Northwind SQL scripts executed
Deploy Schema Registry
Once the database setup is complete, we can apply the Terraform stack with the registry_create variable to true. When it’s deployed, we can check the APIs that the registry service supports as shown below. In line with the previous post, we’ll use the Confluent schema registry compatible API.

Kafka UI
The Kafka UI supports MSK IAM Authentication and we can use it to monitor and manage MSK clusters and related objects/resources. My AWS credentials are mapped to the container and my AWS profile (cevo) is added to the SASL config environment variable. Note environment variables are used for the bootstrap server endpoint and registry host. It can be started as docker-compose -f kafka-ui.yml up.
 1# kafka-ui.yml
 2version: "2"
 3services:
 4  kafka-ui:
 5    image: provectuslabs/kafka-ui:0.3.3
 6    container_name: kafka-ui
 7    ports:
 8      - "8080:8080"
 9    # restart: always
10    volumes:
11      - $HOME/.aws:/root/.aws
12    environment:
13      KAFKA_CLUSTERS_0_NAME: msk
14      KAFKA_CLUSTERS_0_BOOTSTRAPSERVERS: $BS_SERVERS
15      KAFKA_CLUSTERS_0_PROPERTIES_SECURITY_PROTOCOL: SASL_SSL
16      KAFKA_CLUSTERS_0_PROPERTIES_SASL_MECHANISM: AWS_MSK_IAM
17      KAFKA_CLUSTERS_0_PROPERTIES_SASL_CLIENT_CALLBACK_HANDLER_CLASS: software.amazon.msk.auth.iam.IAMClientCallbackHandler
18      KAFKA_CLUSTERS_0_PROPERTIES_SASL_JAAS_CONFIG: software.amazon.msk.auth.iam.IAMLoginModule required awsProfileName="cevo";
19      KAFKA_CLUSTERS_0_SCHEMAREGISTRY: http://$REGISTRY_HOST/apis/ccompat/v6
The UI can be checked on a browser as shown below.

Create Connectors
Creating custom plugins and connectors is illustrated in detail in one of my earlier posts. Here I’ll sketch key points only. The custom plugins for the source and sink connectors should include the Kafka Connect Avro Converter as well. The version 6.0.3 is used, and plugin packaging can be checked in connect/local/download-connectors.sh.
The Debezium Postgres Connector is used as the source connector. Here the main difference from the earlier post is using the Confluent Avro Converter class for key and value converter properties and adding the schema registry URL.
 1# connect/msk/debezium.properties
 2connector.class=io.debezium.connector.postgresql.PostgresConnector
 3tasks.max=1
 4plugin.name=pgoutput
 5publication.name=cdc_publication
 6slot.name=orders
 7database.hostname=analytics-db-cluster.cluster-ctrfy31kg8iq.ap-southeast-2.rds.amazonaws.com
 8database.port=5432
 9database.user=master
10database.password=<database-user-password>
11database.dbname=main
12database.server.name=ord
13schema.include=ods
14table.include.list=ods.cdc_events
15key.converter=io.confluent.connect.avro.AvroConverter
16key.converter.schema.registry.url=http://internal-analytics-registry-lb-754693167.ap-southeast-2.elb.amazonaws.com/apis/ccompat/v6
17value.converter=io.confluent.connect.avro.AvroConverter
18value.converter.schema.registry.url=http://internal-analytics-registry-lb-754693167.ap-southeast-2.elb.amazonaws.com/apis/ccompat/v6
19transforms=unwrap
20transforms.unwrap.type=io.debezium.transforms.ExtractNewRecordState
21transforms.unwrap.drop.tombstones=false
22transforms.unwrap.delete.handling.mode=rewrite
23transforms.unwrap.add.fields=op,db,table,schema,lsn,source.ts_ms
The sink connector also uses the Confluent Avro Converter class for key and value converter properties and the schema registry URL is added accordingly.
 1# connect/msk/confluent.properties
 2connector.class=io.confluent.connect.s3.S3SinkConnector
 3storage.class=io.confluent.connect.s3.storage.S3Storage
 4format.class=io.confluent.connect.s3.format.avro.AvroFormat
 5tasks.max=1
 6topics=ord.ods.cdc_events
 7s3.bucket.name=analytics-data-590312749310-ap-southeast-2
 8s3.region=ap-southeast-2
 9flush.size=100
10rotate.schedule.interval.ms=60000
11timezone=Australia/Sydney
12partitioner.class=io.confluent.connect.storage.partitioner.DefaultPartitioner
13key.converter=io.confluent.connect.avro.AvroConverter
14key.converter.schema.registry.url=http://internal-analytics-registry-lb-754693167.ap-southeast-2.elb.amazonaws.com/apis/ccompat/v6
15value.converter=io.confluent.connect.avro.AvroConverter
16value.converter.schema.registry.url=http://internal-analytics-registry-lb-754693167.ap-southeast-2.elb.amazonaws.com/apis/ccompat/v6
17errors.log.enable=true
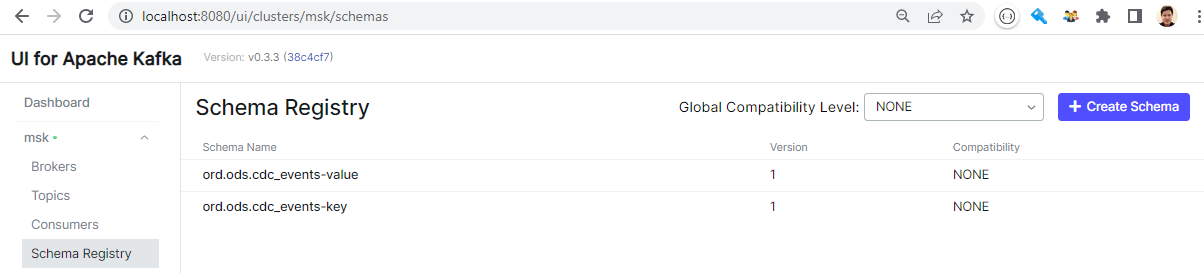
As with the previous post, we can check the key and value schemas are created once the source connector is deployed. Note we can check the details of the schemas by clicking the relevant schema items.
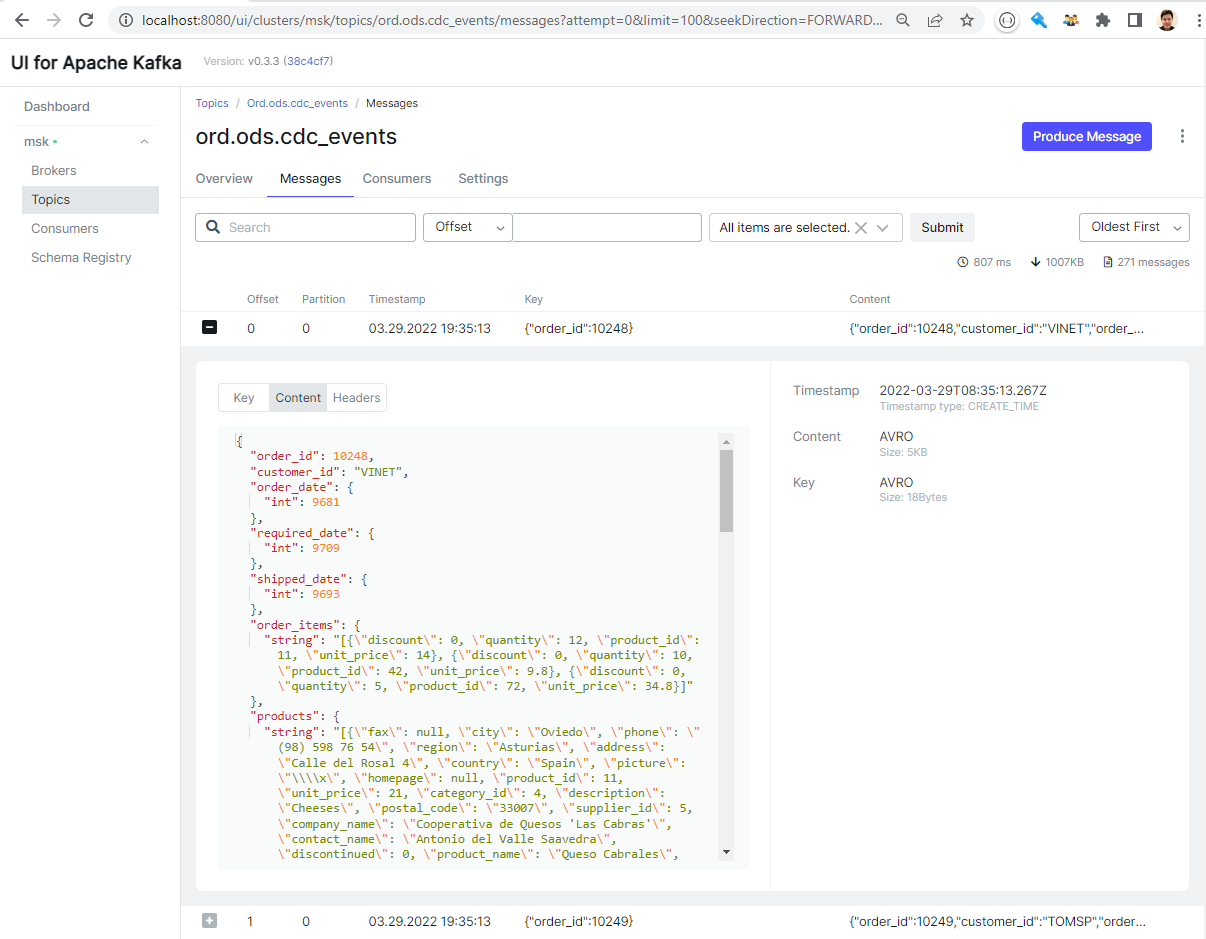
We can see the messages (key and value) are properly deserialized within the UI as we added the schema registry URL as an environment variable and it can be accessed from it.
Schema Evolution
The schema registry keeps multiple versions of schemas and we can check it by adding a column to the table and updating records.
1--// add a column with a default value
2ALTER TABLE ods.cdc_events
3    ADD COLUMN employee_id int DEFAULT -1;
4
5--// update employee ID
6UPDATE ods.cdc_events
7    SET employee_id = (employee ->> 'employee_id')::INT
8WHERE customer_id = 'VINET'
Once the above queries are executed, we see a new version is added to the topic’s value schema, and it includes the new field.

Summary
In this post, we continued the discussion of a Change Data Capture (CDC) solution with a schema registry, and it is deployed to AWS. Multiple services including MSK, MSK Connect, Aurora PostgreSQL and ECS are used to build the solution. All major resources are deployed in private subnets and VPN is used to access them in order to improve developer experience. The Apicurio registry is used as the schema registry service, and it is deployed as an ECS service. In order for the connectors to have access to the registry, the Confluent Avro Converter is packaged together with the connector sources. The post ends with illustrating how schema evolution is managed by the schema registry.


Comments