
[UPDATE 2023-12-07]
- I wrote a new post that simplifies the Spark configuration dramatically. Besides, the log configuration is based on Log4J2, which applies to newer Spark versions. Moreover, the container is configured to run the Spark History Server, and it allows us to debug and diagnose completed and running Spark applications. I recommend referring to the new post.
[UPDATE 2025-10-01]
Bitnami’s public Docker images have been moved to the Bitnami Legacy repository. To ensure continued access and compatibility, please update your Docker image references accordingly.
For example:
bitnami/kafka:2.8.1→bitnamilegacy/kafka:2.8.1bitnami/zookeeper:3.7.0→bitnamilegacy/zookeeper:3.7.0bitnami/python:3.9.0→bitnamilegacy/python:3.9.0
Amazon EMR is a managed service that simplifies running Apache Spark on AWS. It has multiple deployment options that cover EC2, EKS, Outposts and Serverless. For development and testing, EMR Notebooks or EMR Studio can be an option. Both provide a Jupyter Notebook environment and the former is only available for EMR on EC2. There are cases, however, that development (and learning) is performed in a local environment more efficiently. The AWS Glue team understands this demand, and they illustrate how to make use of a custom Docker image for Glue in a recent blog post. However, we don’t hear similar news from the EMR team. In order to fill the gap, we’ll discuss how to create a Spark local development environment for EMR using Docker and/or VSCode. Typical Spark development examples will be demonstrated, which covers Spark Submit, Pytest, PySpark shell, Jupyter Notebook and Spark Structured Streaming. For the Spark Submit and Jupyter Notebook examples, Glue Catalog integration will be illustrated as well. And both the cases of utilising Visual Studio Code Remote - Containers extension and running as an isolated container will be covered in some key examples.
Custom Docker Image
While we may build a custom Spark Docker image from scratch, it’ll be tricky to configure the AWS Glue Data Catalog as the metastore for Spark SQL. Note that it is important to set up this feature because it can be used to integrate other AWS services such as Athena, Glue, Redshift Spectrum and so on. For example, with this feature, we can create a Glue table using a Spark application and the table can be queried by Athena or Redshift Spectrum.
Instead, we can use one of the Docker images for EMR on EKS as a base image and build a custom image from it. As indicated in the EMR on EKS document, we can pull an EMR release image from ECR. Note to select the right AWS account ID as it is different from one region to another. After authenticating to the ECR repository, I pulled the latest EMR 6.5.0 release image.
1## different aws region has a different account id
2$ aws ecr get-login-password --region ap-southeast-2 \
3  | docker login --username AWS --password-stdin 038297999601.dkr.ecr.ap-southeast-2.amazonaws.com
4## download the latest release (6.5.0)
5$ docker pull 038297999601.dkr.ecr.ap-southeast-2.amazonaws.com/spark/emr-6.5.0:20211119
In the Dockerfile, I updated the default user (hadoop) to have the admin privilege as it can be handy to modify system configuration if necessary. Then spark-defaults.conf and log4j.properties are copied to the Spark configuration folder - they’ll be discussed in detail below. Finally a number of python packages are installed. Among those, the ipykernel and python-dotenv packages are installed to work on Jupyter Notebooks and the pytest and pytest-cov packages are for testing. The custom Docker image is built with the following command: docker build -t=emr-6.5.0:20211119 .devcontainer/.
 1# .devcontainer/Dockerfile
 2FROM 038297999601.dkr.ecr.ap-southeast-2.amazonaws.com/spark/emr-6.5.0:20211119
 3
 4USER root
 5
 6## Add hadoop to sudo
 7RUN yum install -y sudo git \
 8  && echo "hadoop ALL=(ALL) NOPASSWD:ALL" >> /etc/sudoers
 9
10## Update spark config and log4j properties
11COPY ./spark/spark-defaults.conf /usr/lib/spark/conf/spark-defaults.conf
12COPY ./spark/log4j.properties /usr/lib/spark/conf/log4j.properties
13
14## Install python packages
15COPY ./pkgs /tmp/pkgs
16RUN pip3 install -r /tmp/pkgs/requirements.txt
17
18USER hadoop:hadoop
In the default spark configuration file (spark-defaults.conf) shown below, I commented out the following properties that are strictly related to EMR on EKS.
- spark.master
- spark.submit.deployMode
- spark.kubernetes.container.image.pullPolicy
- spark.kubernetes.pyspark.pythonVersion
Then I changed the custom AWS credentials provider class from WebIdentityTokenCredentialsProvider to EnvironmentVariableCredentialsProvider. Note EMR jobs are run by a service account on EKS and authentication is managed by web identity token credentials. In a local environment, however, we don’t have an identity provider to authenticate so that access via environment variables can be an easy alternative option. We need the following environment variables to access AWS resources.
- AWS_ACCESS_KEY_ID
- AWS_SECRET_ACCESS_KEY
- AWS_SESSION_TOKEN
- note it is optional and required if authentication is made via assume role
- AWS_REGION
- note it is NOT AWS_DEFAULT_REGION
Finally, I enabled Hive support and set AWSGlueDataCatalogHiveClientFactory as the Hive metastore factory class. When we start an EMR job, we can override application configuration to use AWS Glue Data Catalog as the metastore for Spark SQL and these are the relevant configuration changes for it.
 1# .devcontainer/spark/spark-defaults.conf
 2
 3...
 4
 5#spark.master                     k8s://https://kubernetes.default.svc:443
 6#spark.submit.deployMode          cluster
 7spark.hadoop.fs.defaultFS        file:///
 8spark.shuffle.service.enabled    false
 9spark.dynamicAllocation.enabled  false
10#spark.kubernetes.container.image.pullPolicy  Always
11#spark.kubernetes.pyspark.pythonVersion 3
12spark.hadoop.fs.s3.customAWSCredentialsProvider  com.amazonaws.auth.EnvironmentVariableCredentialsProvider
13spark.hadoop.dynamodb.customAWSCredentialsProvider  com.amazonaws.auth.EnvironmentVariableCredentialsProvider
14spark.authenticate               true
15## for Glue catalog
16spark.sql.catalogImplementation  hive
17spark.hadoop.hive.metastore.client.factory.class  com.amazonaws.glue.catalog.metastore.AWSGlueDataCatalogHiveClientFactory
Even if the credentials provider class is changed, it keeps showing long warning messages while fetching EC2 metadata. The following lines are added to the Log4j properties in order to disable those messages.
1# .devcontainer/spark/log4j.properties
2
3...
4
5## Ignore warn messages related to EC2 metadata access failure
6log4j.logger.com.amazonaws.internal.InstanceMetadataServiceResourceFetcher=FATAL
7log4j.logger.com.amazonaws.util.EC2MetadataUtils=FATAL
VSCode Development Container
We are able to run Spark Submit, pytest, PySpark shell examples as an isolated container using the custom Docker image. However it can be much more convenient if we are able to perform development inside the Docker container where our app is executed. The Visual Studio Code Remote - Containers extension allows you to open a folder inside a container and to use VSCode’s feature sets. It supports both a standalone container and Docker Compose. In this post, we’ll use the latter as we’ll discuss an example Spark Structured Streaming application and multiple services should run and linked together for it.
Docker Compose
The main service (container) is named spark and its command prevents it from being terminated. The current working directory is mapped to /home/hadoop/repo and it’ll be the container folder that we’ll open for development. The aws configuration folder is volume-mapped to the container user’s home directory. It is an optional configuration to access AWS services without relying on AWS credentials via environment variables. The remaining services are related to Kafka. The kafka and zookeeper services are to run a Kafka cluster and the kafka-ui allows us to access the cluster on a browser. The services share the same Docker network named spark. Note that the compose file includes other Kafka related services and their details can be found in one of my earlier posts.
 1# .devcontainer/docker-compose.yml
 2version: "2"
 3
 4services:
 5  spark:
 6    image: emr-6.5.0:20211119
 7    container_name: spark
 8    command: /bin/bash -c "while sleep 1000; do :; done"
 9    networks:
10      - spark
11    volumes:
12      - ${PWD}:/home/hadoop/repo
13      - ${HOME}/.aws:/home/hadoop/.aws
14  zookeeper:
15    image: bitnami/zookeeper:3.7.0
16    container_name: zookeeper
17    ports:
18      - "2181:2181"
19    networks:
20      - spark
21    environment:
22      - ALLOW_ANONYMOUS_LOGIN=yes
23  kafka:
24    image: bitnami/kafka:2.8.1
25    container_name: kafka
26    ports:
27      - "9092:9092"
28    networks:
29      - spark
30    environment:
31      - KAFKA_CFG_ZOOKEEPER_CONNECT=zookeeper:2181
32      - ALLOW_PLAINTEXT_LISTENER=yes
33    depends_on:
34      - zookeeper
35  kafka-ui:
36    image: provectuslabs/kafka-ui:0.3.3
37    container_name: kafka-ui
38    ports:
39      - "8080:8080"
40    networks:
41      - spark
42    environment:
43      KAFKA_CLUSTERS_0_NAME: local
44      KAFKA_CLUSTERS_0_BOOTSTRAPSERVERS: kafka:9092
45      KAFKA_CLUSTERS_0_ZOOKEEPER: zookeeper:2181
46      ...
47    depends_on:
48      - zookeeper
49      - kafka
50...
51
52networks:
53  spark:
54    name: spark
Development Container
The development container is configured to connect the _spark _service among the Docker Compose services. The _AWS_PROFILE _environment variable is optionally set for AWS configuration and additional folders are added to PYTHONPATH, which is to use the bundled pyspark and py4j packages of the Spark distribution. The port 4040 for Spark History Server is added to the forwarded ports array - I guess it’s optional as the port is made accessible in the compose file. The remaining sections are for installing VSCode extensions and adding editor configuration. Note we need the Python extension (ms-python.python) not only for code formatting but also for working on Jupyter Notebooks.
 1# .devcontainer/devcontainer.json
 2{
 3  "name": "Spark Development",
 4  "dockerComposeFile": "docker-compose.yml",
 5  "service": "spark",
 6  "runServices": [
 7    "spark",
 8    "zookeeper",
 9    "kafka",
10    "kafka-ui"
11  ],
12  "remoteEnv": {
13    "AWS_PROFILE": "cevo",
14    "PYTHONPATH": "/usr/lib/spark/python/lib/py4j-0.10.9-src.zip:/usr/lib/spark/python/"
15  },
16  "workspaceFolder": "/home/hadoop/repo",
17  "extensions": ["ms-python.python", "esbenp.prettier-vscode"],
18  "forwardPorts": [4040],
19  "settings": {
20    "terminal.integrated.profiles.linux": {
21      "bash": {
22        "path": "/bin/bash"
23      }
24    },
25    "terminal.integrated.defaultProfile.linux": "bash",
26    "editor.formatOnSave": true,
27    "editor.defaultFormatter": "esbenp.prettier-vscode",
28    "editor.tabSize": 2,
29    "python.defaultInterpreterPath": "python3",
30    "python.testing.pytestEnabled": true,
31    "python.linting.enabled": true,
32    "python.linting.pylintEnabled": false,
33    "python.linting.flake8Enabled": false,
34    "python.formatting.provider": "black",
35    "python.formatting.blackPath": "black",
36    "python.formatting.blackArgs": ["--line-length", "100"],
37    "[python]": {
38      "editor.tabSize": 4,
39      "editor.defaultFormatter": "ms-python.python"
40    }
41  }
42}
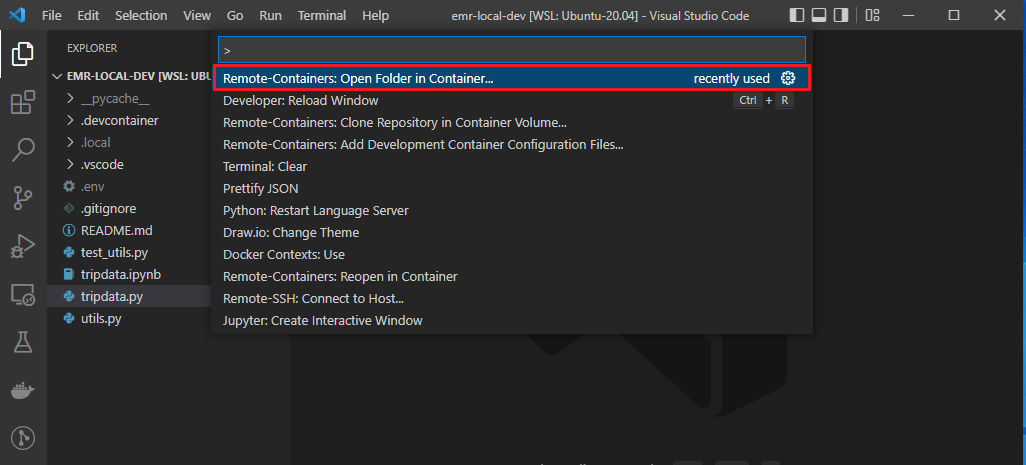
We can open the current folder in the development container after launching the Docker Compose services by executing the following command in the command palette.
- Remote-Containers: Open Folder in Container…
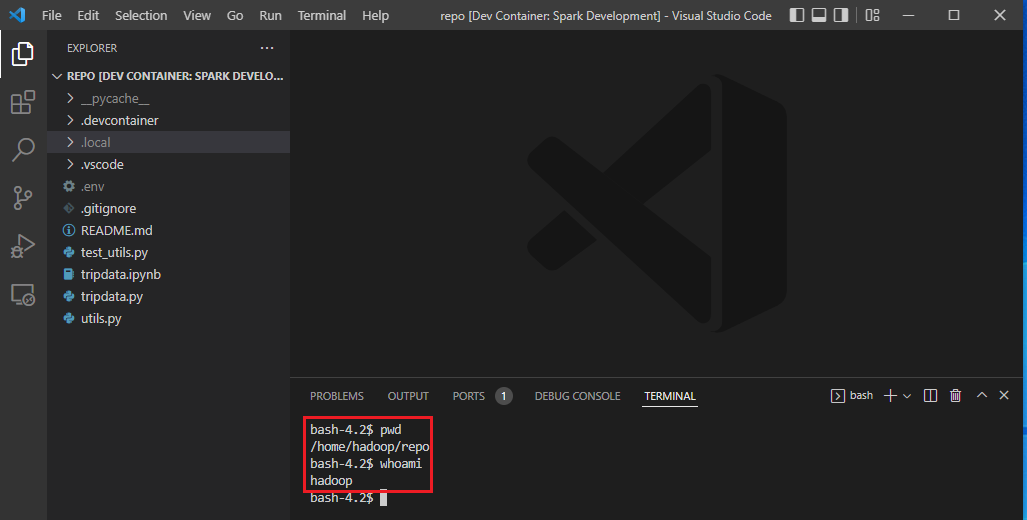
Once the development container is ready, the current folder will be open within the spark service container. We are able to check the container’s current folder is /home/hadoop/repo and the container user is hadoop.
File Permission Management
I use Ubuntu in WSL 2 for development and the user ID and group ID of my WSL user are 1000. On the other hand, the container user is hadoop and its user ID and group ID are 999 and 1000 respectively. When you create a file in the host, the user has the read and write permissions of the file while the group only has the read permission. Therefore, you can read the file inside the development container by the container user, but it is not possible to modify it due to lack of the write permission. This file permission issue will happen when a file is created by the container user and the WSL user tries to modify it in the host. A quick search shows this is a typical behaviour applicable only to Linux (not Mac or Windows).
In order to handle this file permission issue, we can update the file permission so that the read and write permissions are given to both the user and group. Note the host (WSL) user and container user have the same group ID and writing activities will be allowed at least by the group permission. Below shows an example. The read and write permissions for files in the project folder are given to both the user and group. Those that are created by the container user indicate the username while there are 2 files that are created by the WSL user, and it is indicated by the user ID because there is no user whose user ID is 1000 in the container.
1bash-4.2$ ls -al | grep '^-'
2-rw-rw-r--  1 hadoop hadoop 1086 Apr 12 22:23 .env
3-rw-rw-r--  1   1000 hadoop 1855 Apr 12 19:45 .gitignore
4-rw-rw-r--  1   1000 hadoop   66 Mar 30 22:39 README.md
5-rw-rw-r--  1 hadoop hadoop  874 Apr  5 11:14 test_utils.py
6-rw-rw-r--  1 hadoop hadoop 3882 Apr 12 22:24 tripdata.ipynb
7-rw-rw-r--  1 hadoop hadoop 1653 Apr 24 13:09 tripdata_notify.py
8-rw-rw-r--  1 hadoop hadoop 1101 Apr 24 01:22 tripdata.py
9-rw-rw-r--  1 hadoop hadoop  664 Apr 12 19:45 utils.py
Below is the same file list that is printed in the host. Note that the group name is changed into the WSL user’s group and those that are created by the container user are marked by the user ID.
1jaehyeon@cevo:~/personal/emr-local-dev$ ls -al | grep '^-'
2-rw-rw-r--  1      999 jaehyeon 1086 Apr 13 08:23 .env
3-rw-rw-r--  1 jaehyeon jaehyeon 1855 Apr 13 05:45 .gitignore
4-rw-rw-r--  1 jaehyeon jaehyeon   66 Mar 31 09:39 README.md
5-rw-rw-r--  1      999 jaehyeon  874 Apr  5 21:14 test_utils.py
6-rw-rw-r--  1      999 jaehyeon 3882 Apr 13 08:24 tripdata.ipynb
7-rw-rw-r--  1      999 jaehyeon 1101 Apr 24 11:22 tripdata.py
8-rw-rw-r--  1      999 jaehyeon 1653 Apr 24 23:09 tripdata_notify.py
9-rw-rw-r--  1      999 jaehyeon  664 Apr 13 05:45 utils.py
We can add the read or write permission of a single file or a folder easily as shown below - g+rw. Note the last example is for the AWS configuration folder and only the read access is given to the group. Note also that file permission change is not affected if the repository is cloned into a new place, and thus it only affects the local development environment.
1# add write access of a file to the group
2sudo chmod g+rw /home/hadoop/repo/<file-name>
3# add write access of a folder to the group
4sudo chmod -R g+rw /home/hadoop/repo/<folder-name>
5# add read access of the .aws folder to the group
6sudo chmod -R g+r /home/hadoop/.aws
Examples
In this section, I’ll demonstrate typical Spark development examples. They’ll cover Spark Submit, Pytest, PySpark shell, Jupyter Notebook and Spark Structured Streaming. For the Spark Submit and Jupyter Notebook examples, Glue Catalog integration will be illustrated as well. And both the cases of utilising Visual Studio Code Remote - Containers extension and running as an isolated container will be covered in some key examples.
Spark Submit
It is a simple Spark application that reads a sample NY taxi trip dataset from a public S3 bucket. Once loaded, it converts the pick-up and drop-off datetime columns from string to timestamp followed by writing the transformed data to a destination S3 bucket. The destination bucket name (bucket_name) can be specified by a system argument or its default value is taken. It finishes by creating a Glue table and, similar to the destination bucket name, the table name (tblname) can be specified as well.
 1# tripdata.py
 2import sys
 3from pyspark.sql import SparkSession
 4
 5from utils import to_timestamp_df
 6
 7if __name__ == "__main__":
 8    spark = SparkSession.builder.appName("Trip Data").getOrCreate()
 9
10    dbname = "tripdata"
11    tblname = "ny_taxi" if len(sys.argv) <= 1 else sys.argv[1]
12    bucket_name = "emr-local-dev" if len(sys.argv) <= 2 else sys.argv[2]
13    dest_path = f"s3://{bucket_name}/{tblname}/"
14    src_path = "s3://aws-data-analytics-workshops/shared_datasets/tripdata/"
15    # read csv
16    ny_taxi = spark.read.option("inferSchema", "true").option("header", "true").csv(src_path)
17    ny_taxi = to_timestamp_df(ny_taxi, ["lpep_pickup_datetime", "lpep_dropoff_datetime"])
18    ny_taxi.printSchema()
19    # write parquet
20    ny_taxi.write.mode("overwrite").parquet(dest_path)
21    # create glue table
22    ny_taxi.registerTempTable(tblname)
23    spark.sql(f"CREATE DATABASE IF NOT EXISTS {dbname}")
24    spark.sql(f"USE {dbname}")
25    spark.sql(
26        f"""CREATE TABLE IF NOT EXISTS {tblname}
27            USING PARQUET
28            LOCATION '{dest_path}'
29            AS SELECT * FROM {tblname}
30        """
31    )
The Spark application can be submitted as shown below.
 1export AWS_ACCESS_KEY_ID=<AWS-ACCESS-KEY-ID>
 2export AWS_SECRET_ACCESS_KEY=<AWS-SECRET-ACCESS-KEY>
 3export AWS_REGION=<AWS-REGION>
 4# optional
 5export AWS_SESSION_TOKEN=<AWS-SESSION-TOKEN>
 6
 7$SPARK_HOME/bin/spark-submit \
 8  --deploy-mode client \
 9  --master local[*] \
10  tripdata.py
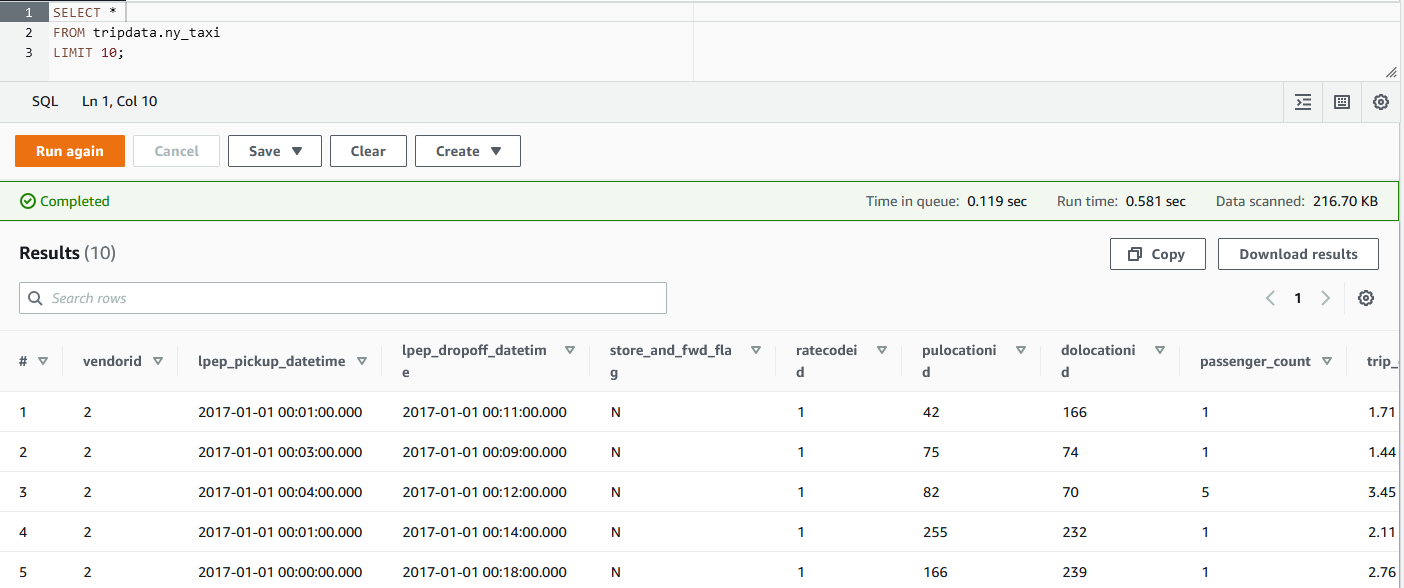
Once it completes, the Glue table will be created, and we can query it using Athena as shown below.
If we want to submit the application as an isolated container, we can use the custom image directly. Below shows the equivalent Docker run command.
1docker run --rm \
2  -e AWS_ACCESS_KEY_ID=$AWS_ACCESS_KEY_ID \
3  -e AWS_SECRET_ACCESS_KEY=$AWS_SECRET_ACCESS_KEY \
4  -e AWS_SESSION_TOKEN=$AWS_SESSION_TOKEN \ # optional
5  -e AWS_REGION=$AWS_REGION \
6  -v $PWD:/usr/hadoop \
7  emr-6.5.0:20211119 \
8  /usr/lib/spark/bin/spark-submit --deploy-mode client --master local[*] /usr/hadoop/tripdata.py taxi emr-local-dev
Pytest
The Spark application in the earlier example uses a custom function that converts the data type of one or more columns from string to timestamp - to_timestamp_df(). The source of the function and the testing script of it can be found below.
 1# utils.py
 2from typing import List, Union
 3from pyspark.sql import DataFrame
 4from pyspark.sql.functions import col, to_timestamp
 5
 6def to_timestamp_df(
 7    df: DataFrame, fields: Union[List[str], str], format: str = "M/d/yy H:mm"
 8) -> DataFrame:
 9    fields = [fields] if isinstance(fields, str) else fields
10    for field in fields:
11        df = df.withColumn(field, to_timestamp(col(field), format))
12    return df
13# test_utils.py
14import pytest
15import datetime
16from pyspark.sql import SparkSession
17from py4j.protocol import Py4JError
18
19from utils import to_timestamp_df
20
21@pytest.fixture(scope="session")
22def spark():
23    return (
24        SparkSession.builder.master("local")
25        .appName("test")
26        .config("spark.submit.deployMode", "client")
27        .getOrCreate()
28    )
29
30
31def test_to_timestamp_success(spark):
32    raw_df = spark.createDataFrame(
33        [("1/1/17 0:01",)],
34        ["date"],
35    )
36
37    test_df = to_timestamp_df(raw_df, "date", "M/d/yy H:mm")
38    for row in test_df.collect():
39        assert row["date"] == datetime.datetime(2017, 1, 1, 0, 1)
40
41
42def test_to_timestamp_bad_format(spark):
43    raw_df = spark.createDataFrame(
44        [("1/1/17 0:01",)],
45        ["date"],
46    )
47
48    with pytest.raises(Py4JError):
49        to_timestamp_df(raw_df, "date", "M/d/yy HH:mm").collect()
As the test cases don’t access AWS services, they can be executed simply by the Pytest command (e.g. pytest -v).

Testing can also be made in an isolated container as shown below. Note that we need to add the PYTHONPATH environment variable because we use the bundled Pyspark package.
1docker run --rm \
2  -e PYTHONPATH="/usr/lib/spark/python/lib/py4j-0.10.9-src.zip:/usr/lib/spark/python/" \
3  -v $PWD:/usr/hadoop \
4  emr-6.5.0:20211119 \
5  pytest /usr/hadoop -v
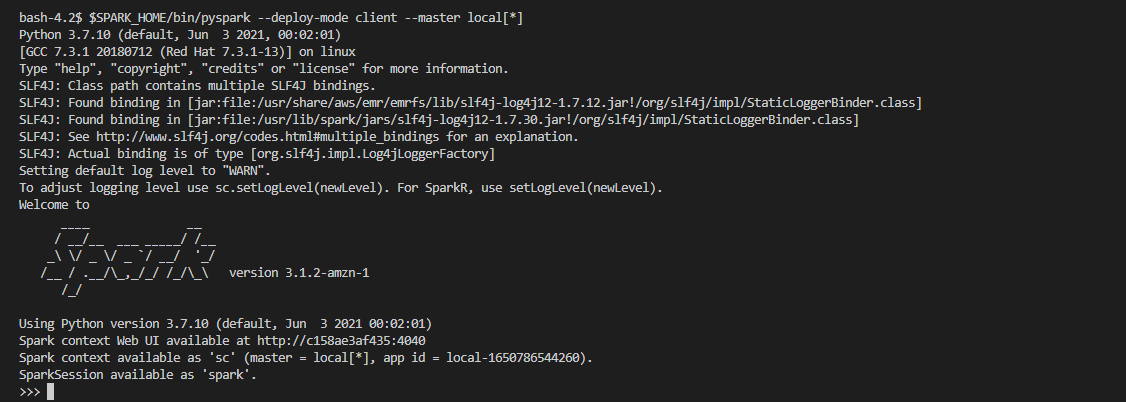
PySpark Shell
The PySpark shell can be launched as shown below.
1$SPARK_HOME/bin/pyspark \
2  --deploy-mode client \
3  --master local[*]
Also, below shows an example of launching it as an isolated container.
1docker run --rm -it \
2  -e AWS_ACCESS_KEY_ID=$AWS_ACCESS_KEY_ID \
3  -e AWS_SECRET_ACCESS_KEY=$AWS_SECRET_ACCESS_KEY \
4  -e AWS_SESSION_TOKEN=$AWS_SESSION_TOKEN \ # optional
5  -e AWS_REGION=$AWS_REGION \
6  -v $PWD:/usr/hadoop \
7  emr-6.5.0:20211119 \
8  /usr/lib/spark/bin/pyspark --deploy-mode client --master local[*]
Jupyter Notebook
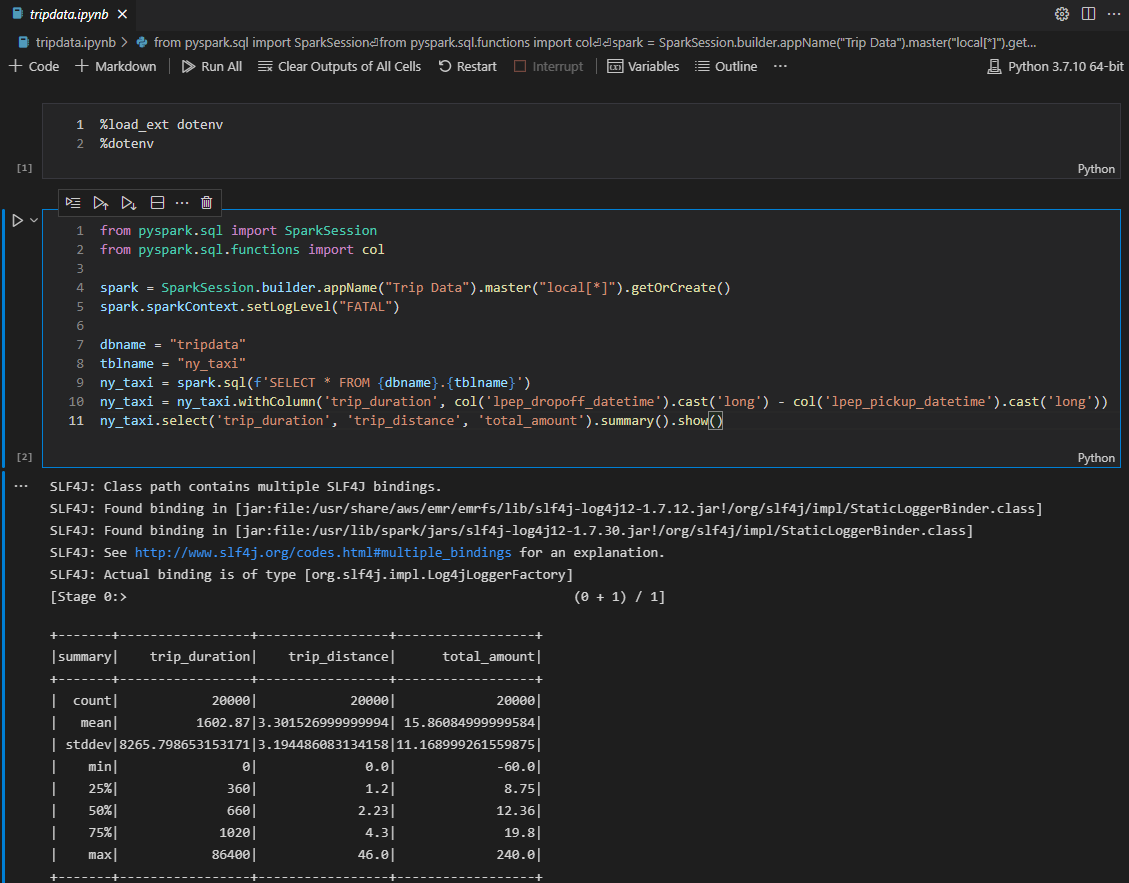
Jupyter Notebook is a popular Spark application authoring tool, and we can create a notebook simply by creating a file with the ipynb extension in VSCode. Note we need the ipykernel package in order to run code cells, and it is already installed in the custom Docker image. For accessing AWS resources, we need the environment variables of AWS credentials mentioned earlier. We can use the python-dotenv package. Specifically we can create an .env file and add AWS credentials to it. Then we can add a code cell that loads the .env file at the beginning of the notebook.
In the next code cell, the app reads the Glue table and adds a column of trip duration followed by showing the summary statistics of key columns. We see some puzzling records that show zero trip duration or negative total amount. Among those, we find negative total amount records should be reported immediately and a Spark Structured Streaming application turns out to be a good option.

Spark Streaming
We need sample data that can be read by the Spark application. In order to generate it, the individual records are taken from the source CSV file and saved locally after being converted into json. Below script creates those json files in the data/json folder. Inside the development container, it can be executed as python3 data/generate.py.
 1# data/generate.py
 2import shutil
 3import io
 4import json
 5import csv
 6from pathlib import Path
 7import boto3
 8
 9BUCKET_NAME = "aws-data-analytics-workshops"
10KEY_NAME = "shared_datasets/tripdata/tripdata.csv"
11DATA_PATH = Path.joinpath(Path(__file__).parent, "json")
12
13
14def recreate_data_path_if(data_path: Path, recreate: bool = True):
15    if recreate:
16        shutil.rmtree(data_path, ignore_errors=True)
17        data_path.mkdir()
18
19
20def write_to_json(bucket_name: str, key_name: str, data_path: Path, recreate: bool = True):
21    s3 = boto3.resource("s3")
22    data = io.BytesIO()
23    bucket = s3.Bucket(bucket_name)
24    bucket.download_fileobj(key_name, data)
25    contents = data.getvalue().decode("utf-8")
26    print("download complete")
27    reader = csv.DictReader(contents.split("\n"))
28    recreate_data_path_if(data_path, recreate)
29    for c, row in enumerate(reader):
30        record_id = str(c).zfill(5)
31        data_path.joinpath(f"{record_id}.json").write_text(
32            json.dumps({**{"record_id": record_id}, **row})
33        )
34
35
36if __name__ == "__main__":
37    write_to_json(BUCKET_NAME, KEY_NAME, DATA_PATH, True)
In the Spark streaming application, the steam reader loads JSON files in the data/json folder and the data schema is provided by DDL statements. Then it generates the target dataframe that filters records whose total amount is negative. Note the target dataframe is structured to have the key and value columns, which is required by Kafka. Finally, it writes the records of the target dataframe to the _notifications _topics of the Kafka cluster.
 1# tripdata_notify.py
 2from pyspark.sql import SparkSession
 3from pyspark.sql.functions import col, to_json, struct
 4from utils import remove_checkpoint
 5
 6if __name__ == "__main__":
 7    remove_checkpoint()
 8
 9    spark = (
10        SparkSession.builder.appName("Trip Data Notification")
11        .config("spark.streaming.stopGracefullyOnShutdown", "true")
12        .config("spark.sql.shuffle.partitions", 3)
13        .getOrCreate()
14    )
15
16    tripdata_ddl = """
17    record_id STRING,
18    VendorID STRING,
19    lpep_pickup_datetime STRING,
20    lpep_dropoff_datetime STRING,
21    store_and_fwd_flag STRING,
22    RatecodeID STRING,
23    PULocationID STRING,
24    DOLocationID STRING,
25    passenger_count STRING,
26    trip_distance STRING,
27    fare_amount STRING,
28    extra STRING,
29    mta_tax STRING,
30    tip_amount STRING,
31    tolls_amount STRING,
32    ehail_fee STRING,
33    improvement_surcharge STRING,
34    total_amount STRING,
35    payment_type STRING,
36    trip_type STRING
37    """
38
39    ny_taxi = (
40        spark.readStream.format("json")
41        .option("path", "data/json")
42        .option("maxFilesPerTrigger", "1000")
43        .schema(tripdata_ddl)
44        .load()
45    )
46
47    target_df = ny_taxi.filter(col("total_amount") <= 0).select(
48        col("record_id").alias("key"), to_json(struct("*")).alias("value")
49    )
50
51    notification_writer_query = (
52        target_df.writeStream.format("kafka")
53        .queryName("notifications")
54        .option("kafka.bootstrap.servers", "kafka:9092")
55        .option("topic", "notifications")
56        .outputMode("append")
57        .option("checkpointLocation", ".checkpoint")
58        .start()
59    )
60
61    notification_writer_query.awaitTermination()
The streaming application can be submitted as shown below. Note the Kafak 0.10+ Source for Structured Streaming and its dependencies are added directly to the spark submit command as indicated by the official document.
1$SPARK_HOME/bin/spark-submit \
2  --deploy-mode client \
3  --master local[*] \
4  --packages org.apache.spark:spark-sql-kafka-0-10_2.12:3.1.2 \
5  tripdata_notify.py
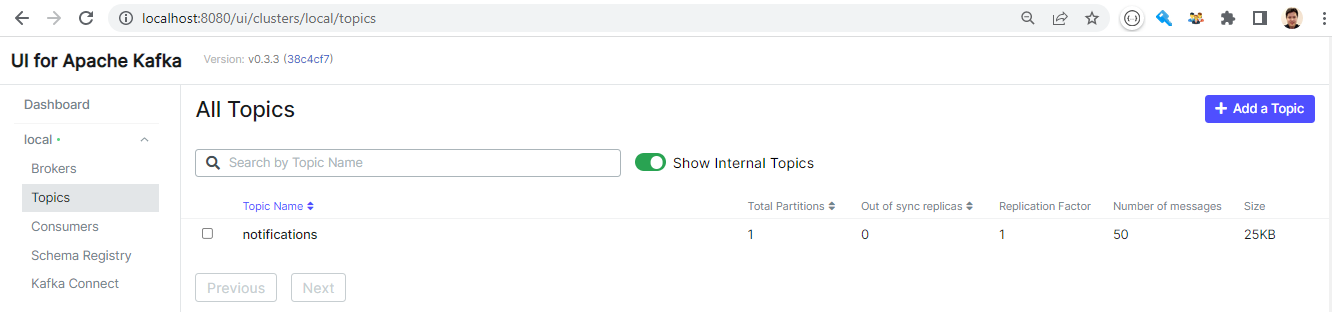
We can check the topic via Kafka UI on port 8080. We see the notifications topic has 50 messages, which matches to the number that we obtained from the notebook.
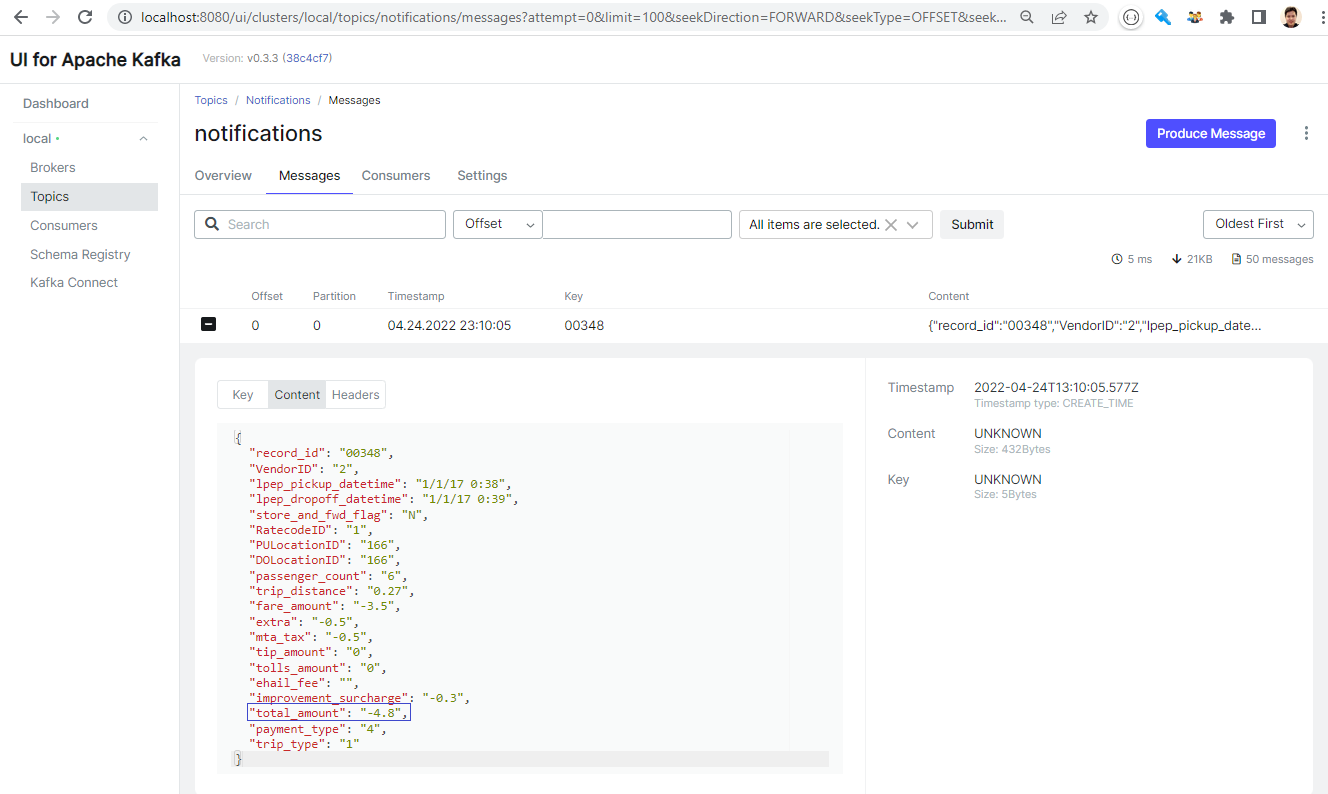
We can check the individual messages via the UI as well.
Summary
In this post, we discussed how to create a Spark local development environment for EMR using Docker and/or VSCode. A range of Spark development examples are demonstrated, and Glue Catalog integration is illustrated in some of them. And both the cases of utilising Visual Studio Code Remote - Containers extension and running as an isolated container are covered in some key examples.


Comments