
In this series of posts, we discuss a Flink (Pyflink) application that reads/writes from/to Kafka topics. In part 1, an app that targets a local Kafka cluster was created. In this post, we will update the app by connecting a Kafka cluster on Amazon MSK. The Kafka cluster is authenticated by IAM and the app has additional jar dependency. As Amazon Managed Service for Apache Flink does not allow you to specify multiple pipeline jar files, we have to build a custom Uber Jar that combines multiple jar files. Same as part 1, the app will be executed in a virtual environment as well as in a local Flink cluster for improved monitoring with the updated pipeline jar file.
- Part 1 Local Flink and Local Kafka
- Part 2 Local Flink and MSK (this post)
- Part 3 AWS Managed Flink and MSK
[Update 2023-08-30] Amazon Kinesis Data Analytics is renamed into Amazon Managed Service for Apache Flink. In this post, Kinesis Data Analytics (KDA) and Amazon Managed Service for Apache Flink will be used interchangeably.
Architecture
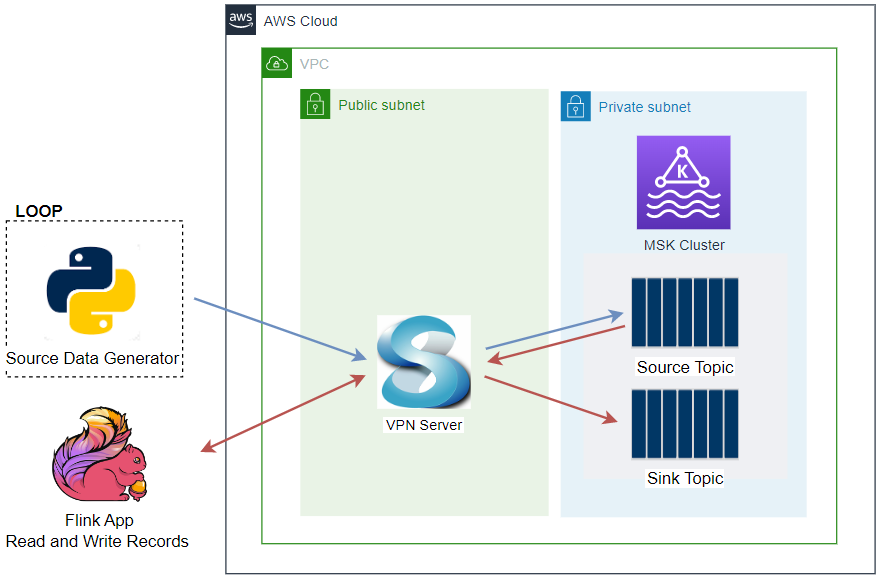
The Python source data generator sends random stock price records into a Kafka topic. The messages in the source topic are consumed by a Flink application, and it just writes those messages into a different sink topic. As the Kafka cluster is deployed in private subnets, it is accessed via a VPN server from the developer machine. This is the simplest application of the Pyflink getting started guide from AWS, and you may try other examples if interested.
Infrastructure
A Kafka cluster is created on Amazon MSK using Terraform, and the cluster is secured by IAM access control. Similar to part 1, the Python apps including the Flink app run in a virtual environment in the first trial. After that the Flink app is submitted to a local Flink cluster for improved monitoring. Same as part 1, the Flink cluster is created using Docker. The source can be found in the GitHub repository of this post.
Preparation
Flink Pipeline Jar
The Flink application should be able to connect a Kafka cluster on Amazon MSK, and we used the Apache Kafka SQL Connector artifact (flink-sql-connector-kafka-1.15.2.jar) in part 1. The Kafka cluster is authenticated by IAM, however, it should be able to refer to the Amazon MSK Library for AWS Identity and Access Management (MSK IAM Auth). So far KDA does not allow you to specify multiple pipeline jar files, and we have to build a single Jar file (Uber Jar) that includes all the dependencies of the application. Moreover, as the MSK IAM Auth library is not compatible with the Apache Kafka SQL Connector due to shade relocation, we have to build the Jar file based on the Apache Kafka Connector instead. After some search, I found an example from the Blueprints: Kinesis Data Analytics for Apache Flink and was able to modify the POM file with necessary dependencies for this post. The modified POM file can be shown below, and it creates the Uber Jar file for this post - pyflink-getting-started-1.0.0.jar.
  1<!--package/uber-jar-for-pyflink/pom.xml-->
  2<project xmlns="http://maven.apache.org/POM/4.0.0" xmlns:xsi="http://www.w3.org/2001/XMLSchema-instance"
  3	xsi:schemaLocation="http://maven.apache.org/POM/4.0.0 http://maven.apache.org/xsd/maven-4.0.0.xsd">
  4	<modelVersion>4.0.0</modelVersion>
  5
  6	<groupId>com.amazonaws.services.kinesisanalytics</groupId>
  7	<artifactId>pyflink-getting-started</artifactId>
  8	<version>1.0.0</version>
  9	<packaging>jar</packaging>
 10
 11	<name>Uber Jar for PyFlink App</name>
 12
 13	<properties>
 14		<project.build.sourceEncoding>UTF-8</project.build.sourceEncoding>
 15		<flink.version>1.15.2</flink.version>
 16		<target.java.version>1.11</target.java.version>
 17		<jdk.version>11</jdk.version>
 18		<scala.binary.version>2.12</scala.binary.version>
 19		<kda.connectors.version>2.0.0</kda.connectors.version>
 20		<kda.runtime.version>1.2.0</kda.runtime.version>
 21		<kafka.clients.version>2.8.1</kafka.clients.version>
 22		<log4j.version>2.17.1</log4j.version>
 23		<aws-msk-iam-auth.version>1.1.7</aws-msk-iam-auth.version>
 24	</properties>
 25
 26	<repositories>
 27		<repository>
 28			<id>apache.snapshots</id>
 29			<name>Apache Development Snapshot Repository</name>
 30			<url>https://repository.apache.org/content/repositories/snapshots/</url>
 31			<releases>
 32				<enabled>false</enabled>
 33			</releases>
 34			<snapshots>
 35				<enabled>true</enabled>
 36			</snapshots>
 37		</repository>
 38	</repositories>
 39
 40	<dependencies>
 41
 42		<dependency>
 43			<groupId>org.apache.flink</groupId>
 44			<artifactId>flink-connector-base</artifactId>
 45			<version>${flink.version}</version>
 46		</dependency>
 47
 48		<dependency>
 49			<groupId>org.apache.flink</groupId>
 50			<artifactId>flink-connector-kafka</artifactId>
 51			<version>${flink.version}</version>
 52		</dependency>
 53
 54		<dependency>
 55			<groupId>org.apache.flink</groupId>
 56			<artifactId>flink-connector-files</artifactId>
 57			<version>${flink.version}</version>
 58		</dependency>
 59
 60		<dependency>
 61			<groupId>org.apache.kafka</groupId>
 62			<artifactId>kafka-clients</artifactId>
 63			<version>${kafka.clients.version}</version>
 64		</dependency>
 65
 66		<dependency>
 67			<groupId>software.amazon.msk</groupId>
 68			<artifactId>aws-msk-iam-auth</artifactId>
 69			<version>${aws-msk-iam-auth.version}</version>
 70		</dependency>
 71
 72		<!-- Add logging framework, to produce console output when running in the IDE. -->
 73		<!-- These dependencies are excluded from the application JAR by default. -->
 74		<dependency>
 75			<groupId>org.apache.logging.log4j</groupId>
 76			<artifactId>log4j-slf4j-impl</artifactId>
 77			<version>${log4j.version}</version>
 78			<scope>runtime</scope>
 79		</dependency>
 80		<dependency>
 81			<groupId>org.apache.logging.log4j</groupId>
 82			<artifactId>log4j-api</artifactId>
 83			<version>${log4j.version}</version>
 84			<scope>runtime</scope>
 85		</dependency>
 86		<dependency>
 87			<groupId>org.apache.logging.log4j</groupId>
 88			<artifactId>log4j-core</artifactId>
 89			<version>${log4j.version}</version>
 90			<scope>runtime</scope>
 91		</dependency>
 92	</dependencies>
 93
 94	<build>
 95		<plugins>
 96
 97			<!-- Java Compiler -->
 98			<plugin>
 99				<groupId>org.apache.maven.plugins</groupId>
100				<artifactId>maven-compiler-plugin</artifactId>
101				<version>3.8.0</version>
102				<configuration>
103					<source>${jdk.version}</source>
104					<target>${jdk.version}</target>
105				</configuration>
106			</plugin>
107
108			<!-- We use the maven-shade plugin to create a fat jar that contains all necessary dependencies. -->
109			<!-- Change the value of <mainClass>...</mainClass> if your program entry point changes. -->
110			<plugin>
111				<groupId>org.apache.maven.plugins</groupId>
112				<artifactId>maven-shade-plugin</artifactId>
113				<version>3.4.1</version>
114				<executions>
115					<!-- Run shade goal on package phase -->
116					<execution>
117						<phase>package</phase>
118						<goals>
119							<goal>shade</goal>
120						</goals>
121						<configuration>
122							<artifactSet>
123								<excludes>
124									<exclude>org.apache.flink:force-shading</exclude>
125									<exclude>com.google.code.findbugs:jsr305</exclude>
126									<exclude>org.slf4j:*</exclude>
127									<exclude>org.apache.logging.log4j:*</exclude>
128								</excludes>
129							</artifactSet>
130							<filters>
131								<filter>
132									<!-- Do not copy the signatures in the META-INF folder.
133									Otherwise, this might cause SecurityExceptions when using the JAR. -->
134									<artifact>*:*</artifact>
135									<excludes>
136										<exclude>META-INF/*.SF</exclude>
137										<exclude>META-INF/*.DSA</exclude>
138										<exclude>META-INF/*.RSA</exclude>
139									</excludes>
140								</filter>
141							</filters>
142							<transformers>
143								<transformer implementation="org.apache.maven.plugins.shade.resource.ServicesResourceTransformer"/>
144							</transformers>
145						</configuration>
146					</execution>
147				</executions>
148			</plugin>
149		</plugins>
150
151		<pluginManagement>
152			<plugins>
153
154				<!-- This improves the out-of-the-box experience in Eclipse by resolving some warnings. -->
155				<plugin>
156					<groupId>org.eclipse.m2e</groupId>
157					<artifactId>lifecycle-mapping</artifactId>
158					<version>1.0.0</version>
159					<configuration>
160						<lifecycleMappingMetadata>
161							<pluginExecutions>
162								<pluginExecution>
163									<pluginExecutionFilter>
164										<groupId>org.apache.maven.plugins</groupId>
165										<artifactId>maven-shade-plugin</artifactId>
166										<versionRange>[3.1.1,)</versionRange>
167										<goals>
168											<goal>shade</goal>
169										</goals>
170									</pluginExecutionFilter>
171									<action>
172										<ignore/>
173									</action>
174								</pluginExecution>
175								<pluginExecution>
176									<pluginExecutionFilter>
177										<groupId>org.apache.maven.plugins</groupId>
178										<artifactId>maven-compiler-plugin</artifactId>
179										<versionRange>[3.1,)</versionRange>
180										<goals>
181											<goal>testCompile</goal>
182											<goal>compile</goal>
183										</goals>
184									</pluginExecutionFilter>
185									<action>
186										<ignore/>
187									</action>
188								</pluginExecution>
189							</pluginExecutions>
190						</lifecycleMappingMetadata>
191					</configuration>
192				</plugin>
193			</plugins>
194		</pluginManagement>
195	</build>
196</project>
The following script (build.sh) builds to create the Uber Jar file for this post, followed by downloading the kafka-python package and creating a zip file that can be used to deploy the Flink app via KDA. Although the Flink app does not need the package, it is added in order to check if --pyFiles option works when submitting the app to a Flink cluster or deploying via KDA. The zip package file will be used for KDA deployment in the next post.
 1# build.sh
 2#!/usr/bin/env bash
 3SCRIPT_DIR="$(cd $(dirname "$0"); pwd)"
 4SRC_PATH=$SCRIPT_DIR/package
 5
 6# remove contents under $SRC_PATH (except for uber-jar-for-pyflink) and kda-package.zip file
 7shopt -s extglob
 8rm -rf $SRC_PATH/!(uber-jar-for-pyflink) kda-package.zip
 9
10## Generate Uber Jar for PyFlink app for MSK cluster with IAM authN
11echo "generate Uber jar for PyFlink app..."
12mkdir $SRC_PATH/lib
13mvn clean install -f $SRC_PATH/uber-jar-for-pyflink/pom.xml \
14  && mv $SRC_PATH/uber-jar-for-pyflink/target/pyflink-getting-started-1.0.0.jar $SRC_PATH/lib \
15  && rm -rf $SRC_PATH/uber-jar-for-pyflink/target
16
17## Install pip packages
18echo "install and zip pip packages..."
19pip install -r requirements.txt --target $SRC_PATH/site_packages
20
21## Package pyflink app
22echo "package pyflink app"
23zip -r kda-package.zip processor.py package/lib package/site_packages
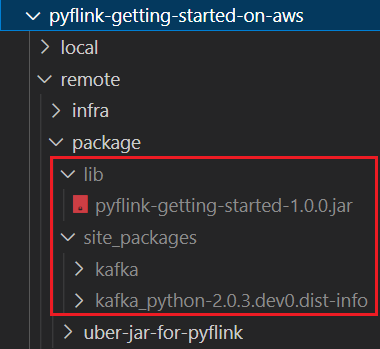
Once completed, the Uber Jar file and python package can be found in the lib and site_packages folders respectively as shown below.
VPC and VPN
A VPC with 3 public and private subnets is created using the AWS VPC Terraform module (infra/vpc.tf). Also, a SoftEther VPN server is deployed in order to access the resources in the private subnets from the developer machine (infra/vpn.tf). It is particularly useful to monitor and manage the MSK cluster and Kafka topic locally. The details about how to configure the VPN server can be found in an earlier post.
MSK Cluster
An MSK cluster with 2 brokers is created. The broker nodes are deployed with the kafka.m5.large instance type in private subnets and IAM authentication is used for the client authentication method. Finally, additional server configurations are added such as enabling auto creation of topics and topic deletion.
 1# infra/variable.tf
 2locals {
 3  ...
 4  msk = {
 5    version                    = "2.8.1"
 6    instance_size              = "kafka.m5.large"
 7    ebs_volume_size            = 20
 8    log_retention_ms           = 604800000 # 7 days
 9    num_partitions             = 2
10    default_replication_factor = 2
11  }
12  ...
13}
14# infra/msk.tf
15resource "aws_msk_cluster" "msk_data_cluster" {
16  cluster_name           = "${local.name}-msk-cluster"
17  kafka_version          = local.msk.version
18  number_of_broker_nodes = local.msk.number_of_broker_nodes
19  configuration_info {
20    arn      = aws_msk_configuration.msk_config.arn
21    revision = aws_msk_configuration.msk_config.latest_revision
22  }
23
24  broker_node_group_info {
25    instance_type   = local.msk.instance_size
26    client_subnets  = slice(module.vpc.private_subnets, 0, local.msk.number_of_broker_nodes)
27    security_groups = [aws_security_group.msk.id]
28    storage_info {
29      ebs_storage_info {
30        volume_size = local.msk.ebs_volume_size
31      }
32    }
33  }
34
35  client_authentication {
36    sasl {
37      iam = true
38    }
39  }
40
41  logging_info {
42    broker_logs {
43      cloudwatch_logs {
44        enabled   = true
45        log_group = aws_cloudwatch_log_group.msk_cluster_lg.name
46      }
47      s3 {
48        enabled = true
49        bucket  = aws_s3_bucket.default_bucket.id
50        prefix  = "logs/msk/cluster/"
51      }
52    }
53  }
54
55  tags = local.tags
56
57  depends_on = [aws_msk_configuration.msk_config]
58}
59
60resource "aws_msk_configuration" "msk_config" {
61  name = "${local.name}-msk-configuration"
62
63  kafka_versions = [local.msk.version]
64
65  server_properties = <<PROPERTIES
66    auto.create.topics.enable = true
67    delete.topic.enable = true
68    log.retention.ms = ${local.msk.log_retention_ms}
69    num.partitions = ${local.msk.num_partitions}
70    default.replication.factor = ${local.msk.default_replication_factor}
71  PROPERTIES
72}
Kafka Management App
The Kpow CE is used for ease of monitoring Kafka topics and related resources. The bootstrap server address, security configuration for IAM authentication and AWS credentials are added as environment variables. See this post for details about Kafka management apps.
 1# compose-ui.yml
 2version: "3"
 3
 4services:
 5  kpow:
 6    image: factorhouse/kpow-ce:91.2.1
 7    container_name: kpow
 8    ports:
 9      - "3000:3000"
10    networks:
11      - appnet
12    environment:
13      AWS_ACCESS_KEY_ID: $AWS_ACCESS_KEY_ID
14      AWS_SECRET_ACCESS_KEY: $AWS_SECRET_ACCESS_KEY
15      AWS_SESSION_TOKEN: $AWS_SESSION_TOKEN
16      # kafka cluster
17      BOOTSTRAP: $BOOTSTRAP_SERVERS
18      SECURITY_PROTOCOL: SASL_SSL
19      SASL_MECHANISM: AWS_MSK_IAM
20      SASL_CLIENT_CALLBACK_HANDLER_CLASS: software.amazon.msk.auth.iam.IAMClientCallbackHandler
21      SASL_JAAS_CONFIG: software.amazon.msk.auth.iam.IAMLoginModule required;
22
23networks:
24  appnet:
25    name: app-network
Flink Cluster
We can create a Flink cluster using the custom Docker image that we used in part 1. The cluster is made up of a single Job Manger and Task Manager, and the cluster runs in the Session Mode where one or more Flink applications can be submitted/executed simultaneously. See this page for details about how to create a Flink cluster using docker-compose.
A set of environment variables are configured to adjust the application behaviour and to give permission to read/write messages from the Kafka cluster with IAM authentication. The RUNTIME_ENV is set to DOCKER, and it determines which pipeline jar and application property file to choose. Also, the BOOTSTRAP_SERVERS overrides the Kafka bootstrap server address value from the application property file. The bootstrap server address of the MSK cluster are referred from the host environment variable that has the same name. Finally, the current directory is volume-mapped into /etc/flink so that the application and related resources can be available in the Flink cluster.
The Flink cluster can be started by docker-compose -f compose-flink.yml up -d.
 1version: "3.5"
 2
 3services:
 4  jobmanager:
 5    image: pyflink:1.15.2-scala_2.12
 6    container_name: jobmanager
 7    command: jobmanager
 8    ports:
 9      - "8081:8081"
10    networks:
11      - flinknet
12    environment:
13      - |
14        FLINK_PROPERTIES=
15        jobmanager.rpc.address: jobmanager
16        state.backend: filesystem
17        state.checkpoints.dir: file:///tmp/flink-checkpoints
18        heartbeat.interval: 1000
19        heartbeat.timeout: 5000
20        rest.flamegraph.enabled: true
21        web.backpressure.refresh-interval: 10000
22      - RUNTIME_ENV=DOCKER
23      - BOOTSTRAP_SERVERS=$BOOTSTRAP_SERVERS
24      - AWS_ACCESS_KEY_ID=$AWS_ACCESS_KEY_ID
25      - AWS_SECRET_ACCESS_KEY=$AWS_SECRET_ACCESS_KEY
26      - AWS_SESSION_TOKEN=$AWS_SESSION_TOKEN
27    volumes:
28      - $PWD:/etc/flink
29  taskmanager:
30    image: pyflink:1.15.2-scala_2.12
31    container_name: taskmanager
32    command: taskmanager
33    networks:
34      - flinknet
35    volumes:
36      - flink_data:/tmp/
37      - $PWD:/etc/flink
38    environment:
39      - |
40        FLINK_PROPERTIES=
41        jobmanager.rpc.address: jobmanager
42        taskmanager.numberOfTaskSlots: 3
43        state.backend: filesystem
44        state.checkpoints.dir: file:///tmp/flink-checkpoints
45        heartbeat.interval: 1000
46        heartbeat.timeout: 5000
47      - RUNTIME_ENV=DOCKER
48      - BOOTSTRAP_SERVERS=$BOOTSTRAP_SERVERS
49      - AWS_ACCESS_KEY_ID=$AWS_ACCESS_KEY_ID
50      - AWS_SECRET_ACCESS_KEY=$AWS_SECRET_ACCESS_KEY
51      - AWS_SESSION_TOKEN=$AWS_SESSION_TOKEN
52    depends_on:
53      - jobmanager
54
55networks:
56  flinknet:
57    name: flink-network
58
59volumes:
60  flink_data:
61    driver: local
62    name: flink_data
Virtual Environment
As mentioned earlier, all Python apps run in a virtual environment, and we have the following pip packages. We use the version 1.15.2 of the apache-flink package because it is the latest supported version by KDA. We also need the kafka-python package for source data generation. As the Kafka cluster is IAM-authenticated, a patched version is installed instead of the stable version. The pip packages can be installed by pip install -r requirements-dev.txt.
1# kafka-python with IAM auth support - https://github.com/dpkp/kafka-python/pull/2255
2https://github.com/mattoberle/kafka-python/archive/7ff323727d99e0c33a68423300e7f88a9cf3f830.tar.gz
3
4# requirements-dev.txt
5-r requirements.txt
6apache-flink==1.15.2
7black==19.10b0
8pytest
9pytest-cov
Application
Source Data
A single Python script is created to generate fake stock price records. The class for the stock record has the asdict, auto and create methods. The create method generates a list of records where each element is instantiated by the auto method. Those records are sent into the relevant Kafka topic after being converted into a dictionary by the asdict method.
A Kafka producer is created as an attribute of the Producer class. The producer adds security configuration for IAM authentication when the bootstrap server address ends with 9098. The source records are sent into the relevant topic by the send method. Note that both the key and value of the messages are serialized as json.
The data generator can be started simply by python producer.py.
 1# producer.py
 2import os
 3import datetime
 4import time
 5import json
 6import typing
 7import random
 8import logging
 9import re
10import dataclasses
11
12from kafka import KafkaProducer
13
14logging.basicConfig(
15    level=logging.INFO,
16    format="%(asctime)s.%(msecs)03d:%(levelname)s:%(name)s:%(message)s",
17    datefmt="%Y-%m-%d %H:%M:%S",
18)
19
20datetime.datetime.now().strftime("%Y-%m-%d %H:%M:%S.%f")
21
22
23@dataclasses.dataclass
24class Stock:
25    event_time: str
26    ticker: str
27    price: float
28
29    def asdict(self):
30        return dataclasses.asdict(self)
31
32    @classmethod
33    def auto(cls, ticker: str):
34        # event_time = datetime.datetime.now().isoformat(timespec="milliseconds")
35        event_time = datetime.datetime.now().strftime("%Y-%m-%d %H:%M:%S.%f")
36        price = round(random.random() * 100, 2)
37        return cls(event_time, ticker, price)
38
39    @staticmethod
40    def create():
41        tickers = '["AAPL", "ACN", "ADBE", "AMD", "AVGO", "CRM", "CSCO", "IBM", "INTC", "MA", "MSFT", "NVDA", "ORCL", "PYPL", "QCOM", "TXN", "V"]'
42        return [Stock.auto(ticker) for ticker in json.loads(tickers)]
43
44
45class Producer:
46    def __init__(self, bootstrap_servers: list, topic: str):
47        self.bootstrap_servers = bootstrap_servers
48        self.topic = topic
49        self.producer = self.create()
50
51    def create(self):
52        params = {
53            "bootstrap_servers": self.bootstrap_servers,
54            "key_serializer": lambda v: json.dumps(v, default=self.serialize).encode("utf-8"),
55            "value_serializer": lambda v: json.dumps(v, default=self.serialize).encode("utf-8"),
56            "api_version": (2, 8, 1),
57        }
58        if re.search("9098$", self.bootstrap_servers[0]):
59            params = {
60                **params,
61                **{"security_protocol": "SASL_SSL", "sasl_mechanism": "AWS_MSK_IAM"},
62            }
63        return KafkaProducer(**params)
64
65    def send(self, stocks: typing.List[Stock]):
66        for stock in stocks:
67            try:
68                self.producer.send(self.topic, key={"ticker": stock.ticker}, value=stock.asdict())
69            except Exception as e:
70                raise RuntimeError("fails to send a message") from e
71        self.producer.flush()
72
73    def serialize(self, obj):
74        if isinstance(obj, datetime.datetime):
75            return obj.isoformat()
76        if isinstance(obj, datetime.date):
77            return str(obj)
78        return obj
79
80
81if __name__ == "__main__":
82    producer = Producer(
83        bootstrap_servers=os.getenv("BOOTSTRAP_SERVERS", "localhost:29092").split(","),
84        topic=os.getenv("TOPIC_NAME", "stocks-in"),
85    )
86    max_run = int(os.getenv("MAX_RUN", "-1"))
87    logging.info(f"max run - {max_run}")
88    current_run = 0
89    while True:
90        current_run += 1
91        logging.info(f"current run - {current_run}")
92        if current_run - max_run == 0:
93            logging.info(f"reached max run, finish")
94            producer.producer.close()
95            break
96        producer.send(Stock.create())
97        secs = random.randint(5, 10)
98        logging.info(f"messages sent... wait {secs} seconds")
99        time.sleep(secs)
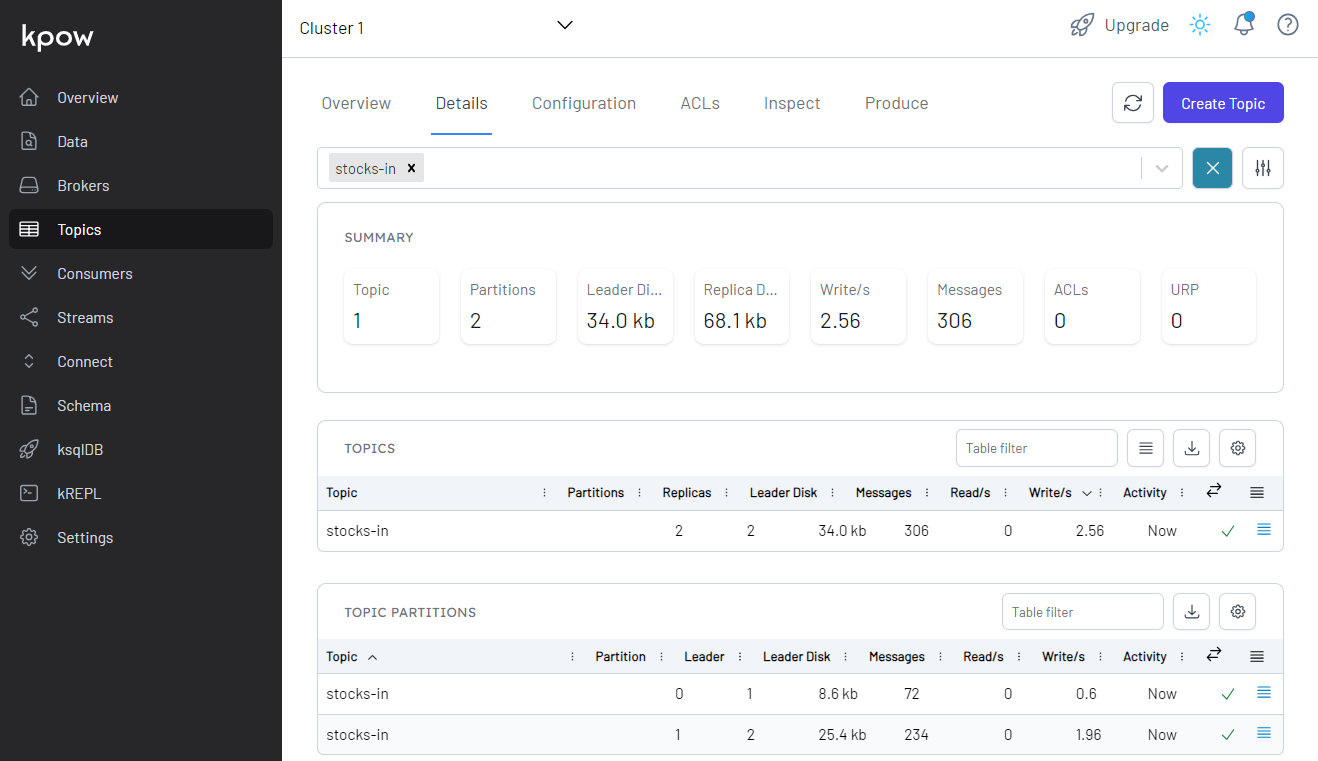
Once we start the app, we can check the topic for the source data is created and messages are ingested.
Process Data
The Flink application is built using the Table API. We have two Kafka topics - one for the source and the other for the sink. Simply put, we can manipulate the records of the topics as tables of unbounded real-time streams with the Table API. In order to read/write records from/to a Kafka topic where the cluster is IAM authenticated, we need to specify the custom Uber Jar that we created earlier - pyflink-getting-started-1.0.0.jar. Note we only need to configure the connector jar when we develop the app locally as the jar file will be specified by the --jarfile option when submitting it to a Flink cluster or deploying via KDA. We also need the application properties file (application_properties.json) in order to be comparable with KDA. The file contains the Flink runtime options in KDA as well as application specific properties. All the properties should be specified when deploying via KDA and, for local development, we keep them as a json file and only the application specific properties are used.
The tables for the source and output topics can be created using SQL with options that are related to the Kafka connector. Key options cover the connector name (connector), topic name (topic), bootstrap server address (properties.bootstrap.servers) and format (format). See the connector document for more details about the connector configuration. Note that the security options of the tables are updated for IAM authentication when the bootstrap server argument ends with 9098 using the inject_security_opts function. When it comes to inserting the source records into the output table, we can use either SQL or built-in add_insert method.
In the main method, we create all the source and sink tables after mapping relevant application properties. Then the output records are inserted into the output Kafka topic. Note that the output records are printed in the terminal additionally when the app is running locally for ease of checking them.
  1# processor.py
  2import os
  3import json
  4import re
  5import logging
  6
  7import kafka  # check if --pyFiles works
  8from pyflink.table import EnvironmentSettings, TableEnvironment
  9
 10logging.basicConfig(
 11    level=logging.INFO,
 12    format="%(asctime)s.%(msecs)03d:%(levelname)s:%(name)s:%(message)s",
 13    datefmt="%Y-%m-%d %H:%M:%S",
 14)
 15
 16RUNTIME_ENV = os.environ.get("RUNTIME_ENV", "KDA")  # KDA, DOCKER, LOCAL
 17BOOTSTRAP_SERVERS = os.environ.get("BOOTSTRAP_SERVERS")  # overwrite app config
 18
 19logging.info(f"runtime environment - {RUNTIME_ENV}...")
 20
 21env_settings = EnvironmentSettings.in_streaming_mode()
 22table_env = TableEnvironment.create(env_settings)
 23
 24APPLICATION_PROPERTIES_FILE_PATH = (
 25    "/etc/flink/application_properties.json"  # on kda or docker-compose
 26    if RUNTIME_ENV != "LOCAL"
 27    else "application_properties.json"
 28)
 29
 30if RUNTIME_ENV != "KDA":
 31    # on non-KDA, multiple jar files can be passed after being delimited by a semicolon
 32    CURRENT_DIR = os.path.dirname(os.path.realpath(__file__))
 33    PIPELINE_JAR = "pyflink-getting-started-1.0.0.jar"
 34    # PIPELINE_JAR = "uber-jar-for-pyflink-1.0.1.jar"
 35    table_env.get_config().set(
 36        "pipeline.jars", f"file://{os.path.join(CURRENT_DIR, 'package', 'lib', PIPELINE_JAR)}"
 37    )
 38logging.info(f"app properties file path - {APPLICATION_PROPERTIES_FILE_PATH}")
 39
 40
 41def get_application_properties():
 42    if os.path.isfile(APPLICATION_PROPERTIES_FILE_PATH):
 43        with open(APPLICATION_PROPERTIES_FILE_PATH, "r") as file:
 44            contents = file.read()
 45            properties = json.loads(contents)
 46            return properties
 47    else:
 48        raise RuntimeError(f"A file at '{APPLICATION_PROPERTIES_FILE_PATH}' was not found")
 49
 50
 51def property_map(props: dict, property_group_id: str):
 52    for prop in props:
 53        if prop["PropertyGroupId"] == property_group_id:
 54            return prop["PropertyMap"]
 55
 56
 57def inject_security_opts(opts: dict, bootstrap_servers: str):
 58    if re.search("9098$", bootstrap_servers):
 59        opts = {
 60            **opts,
 61            **{
 62                "properties.security.protocol": "SASL_SSL",
 63                "properties.sasl.mechanism": "AWS_MSK_IAM",
 64                "properties.sasl.jaas.config": "software.amazon.msk.auth.iam.IAMLoginModule required;",
 65                "properties.sasl.client.callback.handler.class": "software.amazon.msk.auth.iam.IAMClientCallbackHandler",
 66            },
 67        }
 68    return ", ".join({f"'{k}' = '{v}'" for k, v in opts.items()})
 69
 70
 71def create_source_table(
 72    table_name: str, topic_name: str, bootstrap_servers: str, startup_mode: str
 73):
 74    opts = {
 75        "connector": "kafka",
 76        "topic": topic_name,
 77        "properties.bootstrap.servers": bootstrap_servers,
 78        "properties.group.id": "soruce-group",
 79        "format": "json",
 80        "scan.startup.mode": startup_mode,
 81    }
 82    stmt = f"""
 83    CREATE TABLE {table_name} (
 84        event_time TIMESTAMP(3),
 85        ticker VARCHAR(6),
 86        price DOUBLE
 87    )
 88    WITH (
 89        {inject_security_opts(opts, bootstrap_servers)}
 90    )
 91    """
 92    logging.info("source table statement...")
 93    logging.info(stmt)
 94    return stmt
 95
 96
 97def create_sink_table(table_name: str, topic_name: str, bootstrap_servers: str):
 98    opts = {
 99        "connector": "kafka",
100        "topic": topic_name,
101        "properties.bootstrap.servers": bootstrap_servers,
102        "format": "json",
103        "key.format": "json",
104        "key.fields": "ticker",
105        "properties.allow.auto.create.topics": "true",
106    }
107    stmt = f"""
108    CREATE TABLE {table_name} (
109        event_time TIMESTAMP(3),
110        ticker VARCHAR(6),
111        price DOUBLE
112    )
113    WITH (
114        {inject_security_opts(opts, bootstrap_servers)}
115    )
116    """
117    logging.info("sint table statement...")
118    logging.info(stmt)
119    return stmt
120
121
122def create_print_table(table_name: str):
123    return f"""
124    CREATE TABLE {table_name} (
125        event_time TIMESTAMP(3),
126        ticker VARCHAR(6),
127        price DOUBLE
128    )
129    WITH (
130        'connector' = 'print'
131    )
132    """
133
134
135def main():
136    ## map consumer/producer properties
137    props = get_application_properties()
138    # consumer
139    consumer_property_group_key = "consumer.config.0"
140    consumer_properties = property_map(props, consumer_property_group_key)
141    consumer_table_name = consumer_properties["table.name"]
142    consumer_topic_name = consumer_properties["topic.name"]
143    consumer_bootstrap_servers = BOOTSTRAP_SERVERS or consumer_properties["bootstrap.servers"]
144    consumer_startup_mode = consumer_properties["startup.mode"]
145    # producer
146    producer_property_group_key = "producer.config.0"
147    producer_properties = property_map(props, producer_property_group_key)
148    producer_table_name = producer_properties["table.name"]
149    producer_topic_name = producer_properties["topic.name"]
150    producer_bootstrap_servers = BOOTSTRAP_SERVERS or producer_properties["bootstrap.servers"]
151    # print
152    print_table_name = "sink_print"
153    ## create a souce table
154    table_env.execute_sql(
155        create_source_table(
156            consumer_table_name,
157            consumer_topic_name,
158            consumer_bootstrap_servers,
159            consumer_startup_mode,
160        )
161    )
162    ## create sink tables
163    table_env.execute_sql(
164        create_sink_table(producer_table_name, producer_topic_name, producer_bootstrap_servers)
165    )
166    table_env.execute_sql(create_print_table("sink_print"))
167    ## insert into sink tables
168    if RUNTIME_ENV == "LOCAL":
169        source_table = table_env.from_path(consumer_table_name)
170        statement_set = table_env.create_statement_set()
171        statement_set.add_insert(producer_table_name, source_table)
172        statement_set.add_insert(print_table_name, source_table)
173        statement_set.execute().wait()
174    else:
175        table_result = table_env.execute_sql(
176            f"INSERT INTO {producer_table_name} SELECT * FROM {consumer_table_name}"
177        )
178        logging.info(table_result.get_job_client().get_job_status())
179
180
181if __name__ == "__main__":
182    main()
 1// application_properties.json
 2[
 3  {
 4    "PropertyGroupId": "kinesis.analytics.flink.run.options",
 5    "PropertyMap": {
 6      "python": "processor.py",
 7      "jarfile": "package/lib/pyflink-getting-started-1.0.0.jar",
 8      "pyFiles": "package/site_packages/"
 9    }
10  },
11  {
12    "PropertyGroupId": "consumer.config.0",
13    "PropertyMap": {
14      "table.name": "source_table",
15      "topic.name": "stocks-in",
16      "bootstrap.servers": "localhost:29092",
17      "startup.mode": "earliest-offset"
18    }
19  },
20  {
21    "PropertyGroupId": "producer.config.0",
22    "PropertyMap": {
23      "table.name": "sink_table",
24      "topic.name": "stocks-out",
25      "bootstrap.servers": "localhost:29092"
26    }
27  }
28]
Run Locally
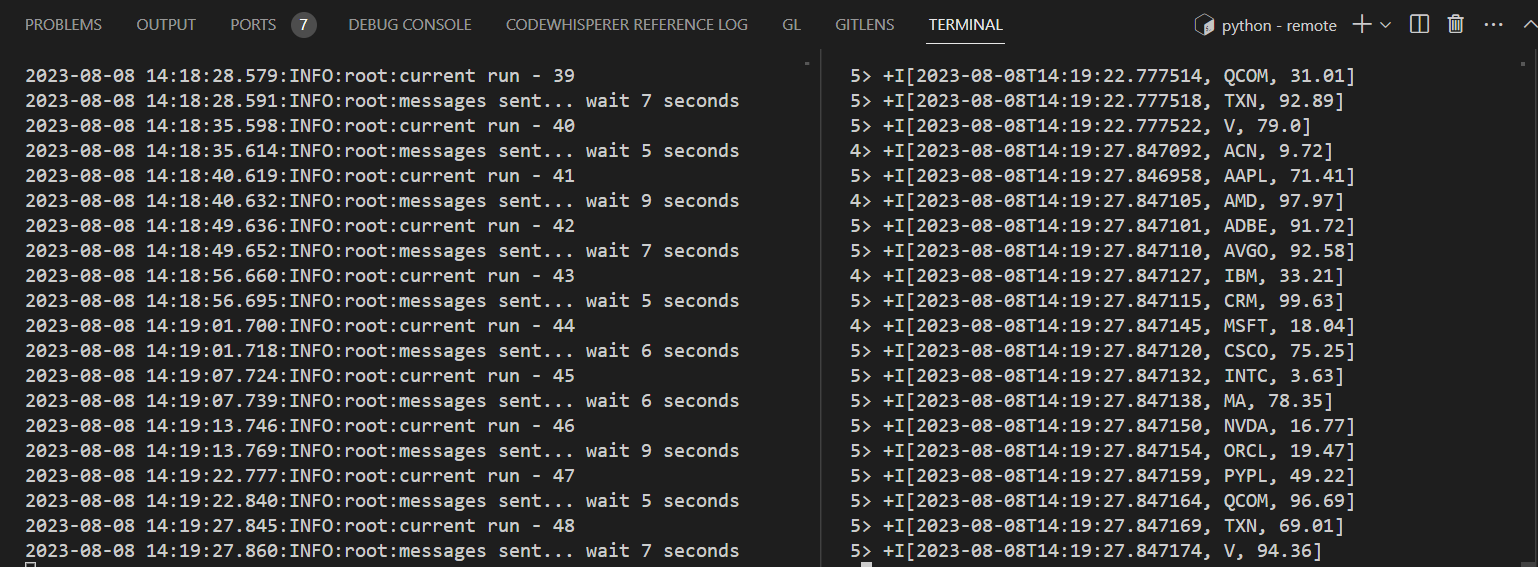
We can run the app locally as following - RUNTIME_ENV=LOCAL python processor.py. The terminal on the right-hand side shows the output records of the Flink app while the left-hand side records logs of the producer app. We can see that the print output from the Flink app gets updated when new source records are sent into the source topic by the producer app.
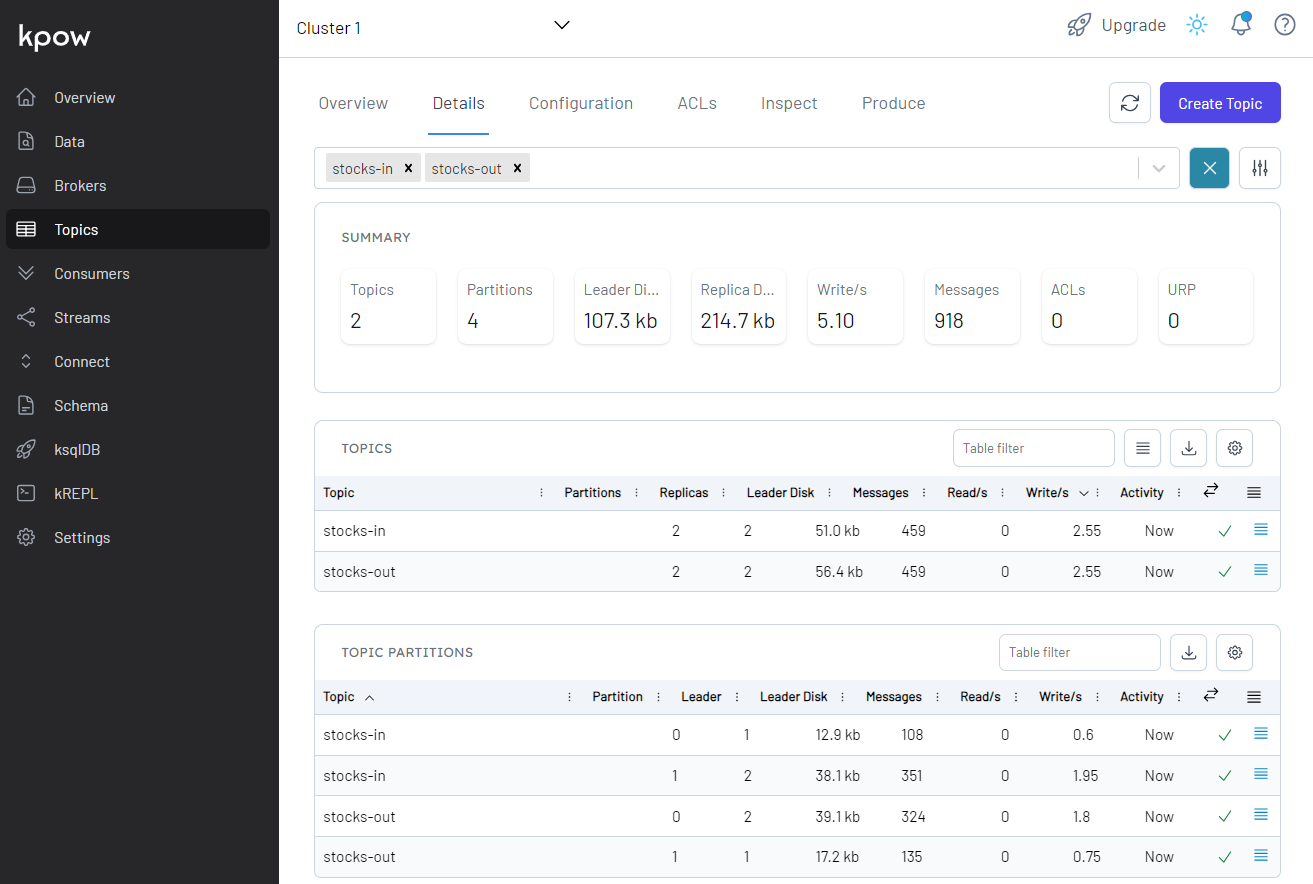
We can also see details of all the topics in Kpow as shown below. The total number of messages matches between the source and output topics but not within partitions.
Run in Flink Cluster
The execution in a terminal is limited for monitoring, and we can inspect and understand what is happening inside Flink using the Flink Web UI. For this, we need to submit the app to the Flink cluster we created earlier. Typically, a Pyflink app can be submitted using the CLI interface by specifying the main application (–python), Kafka connector artifact file (–jarfile), and 3rd-party Python packages (–pyFiles) if necessary. Once submitted, it shows the status with the job ID.
 1$ docker exec jobmanager /opt/flink/bin/flink run \
 2  --python /etc/flink/processor.py \
 3  --jarfile /etc/flink/package/lib/pyflink-getting-started-1.0.0.jar \
 4  --pyFiles /etc/flink/package/site_packages/ \
 5  -d
 62023-08-08 04:21:48.198:INFO:root:runtime environment - DOCKER...
 72023-08-08 04:21:49.187:INFO:root:app properties file path - /etc/flink/application_properties.json
 82023-08-08 04:21:49.187:INFO:root:source table statement...
 92023-08-08 04:21:49.187:INFO:root:
10    CREATE TABLE source_table (
11        event_time TIMESTAMP(3),
12        ticker VARCHAR(6),
13        price DOUBLE
14    )
15    WITH (
16        'properties.sasl.jaas.config' = 'software.amazon.msk.auth.iam.IAMLoginModule required;', 'scan.startup.mode' = 'earliest-offset', 'properties.sasl.client.callback.handler.class' = 'software.amazon.msk.auth.iam.IAMClientCallbackHandler', 'connector' = 'kafka', 'properties.bootstrap.servers' = 'b-1.kdagettingstarted.j92edp.c3.kafka.ap-southeast-2.amazonaws.com:9098,b-2.kdagettingstarted.j92edp.c3.kafka.ap-southeast-2.amazonaws.com:9098', 'properties.sasl.mechanism' = 'AWS_MSK_IAM', 'format' = 'json', 'properties.security.protocol' = 'SASL_SSL', 'topic' = 'stocks-in', 'properties.group.id' = 'soruce-group'
17    )
18
192023-08-08 04:21:49.301:INFO:root:sint table statement...
202023-08-08 04:21:49.301:INFO:root:
21    CREATE TABLE sink_table (
22        event_time TIMESTAMP(3),
23        ticker VARCHAR(6),
24        price DOUBLE
25    )
26    WITH (
27        'topic' = 'stocks-out', 'key.fields' = 'ticker', 'properties.sasl.jaas.config' = 'software.amazon.msk.auth.iam.IAMLoginModule required;', 'properties.sasl.client.callback.handler.class' = 'software.amazon.msk.auth.iam.IAMClientCallbackHandler', 'key.format' = 'json', 'connector' = 'kafka', 'properties.bootstrap.servers' = 'b-1.kdagettingstarted.j92edp.c3.kafka.ap-southeast-2.amazonaws.com:9098,b-2.kdagettingstarted.j92edp.c3.kafka.ap-southeast-2.amazonaws.com:9098', 'properties.allow.auto.create.topics' = 'true', 'properties.sasl.mechanism' = 'AWS_MSK_IAM', 'format' = 'json', 'properties.security.protocol' = 'SASL_SSL'
28    )
29
30WARNING: An illegal reflective access operation has occurred
31WARNING: Illegal reflective access by org.apache.flink.api.java.ClosureCleaner (file:/opt/flink/lib/flink-dist-1.15.4.jar) to field java.lang.String.value
32WARNING: Please consider reporting this to the maintainers of org.apache.flink.api.java.ClosureCleaner
33WARNING: Use --illegal-access=warn to enable warnings of further illegal reflective access operations
34WARNING: All illegal access operations will be denied in a future release
35Job has been submitted with JobID 4827bc6fbafd8b628a26f1095dfc28f9
362023-08-08 04:21:56.327:INFO:root:java.util.concurrent.CompletableFuture@2da94b9a[Not completed]
We can check the submitted job by listing all jobs as shown below.
1$ docker exec jobmanager /opt/flink/bin/flink list
2Waiting for response...
3------------------ Running/Restarting Jobs -------------------
408.08.2023 04:21:52 : 4827bc6fbafd8b628a26f1095dfc28f9 : insert-into_default_catalog.default_database.sink_table (RUNNING)
5--------------------------------------------------------------
6No scheduled jobs.
The Flink Web UI can be accessed on port 8081. In the Overview section, it shows the available task slots, running jobs and completed jobs.

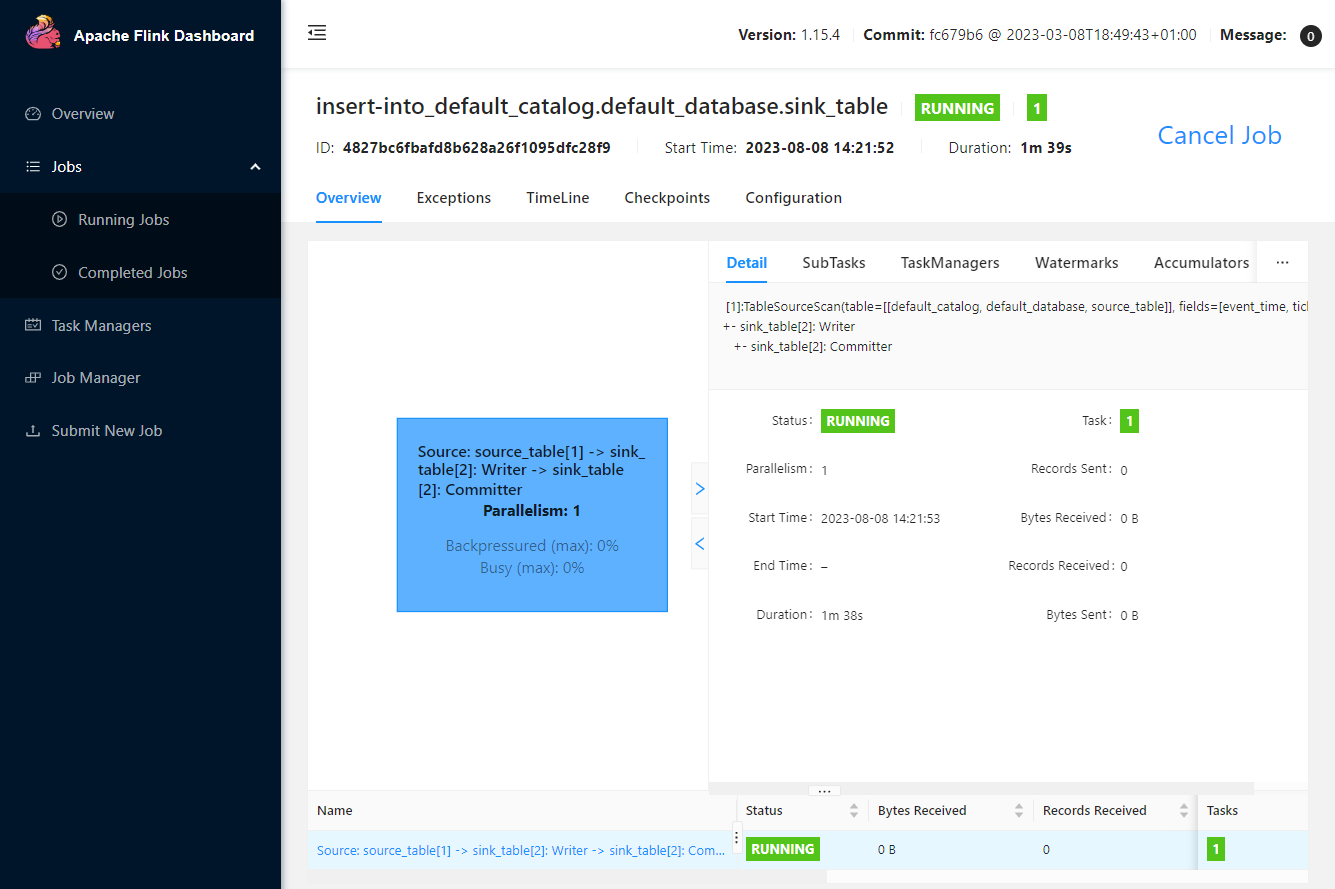
We can inspect an individual job in the Jobs menu. It shows key details about a job execution in Overview, Exceptions, TimeLine, Checkpoints and Configuration tabs.
We can cancel a job on the web UI or using the CLI. Below shows how to cancel the job we submitted earlier using the CLI.
1$ docker exec jobmanager /opt/flink/bin/flink cancel 4827bc6fbafd8b628a26f1095dfc28f9
2Cancelling job 4827bc6fbafd8b628a26f1095dfc28f9.
3Cancelled job 4827bc6fbafd8b628a26f1095dfc28f9.
Summary
In this post, we updated the Pyflink app developed in part 1 by connecting a Kafka cluster on Amazon MSK. The Kafka cluster is authenticated by IAM and the app has additional jar dependency. As Kinesis Data Analytics (KDA) does not allow you to specify multiple pipeline jar files, we had to build a custom Uber Jar that combines multiple jar files. Same as part 1, the app was executed in a virtual environment as well as in a local Flink cluster for improved monitoring with the updated pipeline jar file.


Comments