
This series aims to help those who are new to Apache Flink and Amazon Managed Service for Apache Flink by re-implementing a simple fraud detection application that is discussed in an AWS workshop titled AWS Kafka and DynamoDB for real time fraud detection. In part 1, I demonstrated how to develop the application locally, and the app will be deployed via Amazon Managed Service for Apache Flink in this post.
[Update 2023-08-30] Amazon Kinesis Data Analytics is renamed into Amazon Managed Service for Apache Flink. In this post, Kinesis Data Analytics (KDA) and Amazon Managed Service for Apache Flink will be used interchangeably.
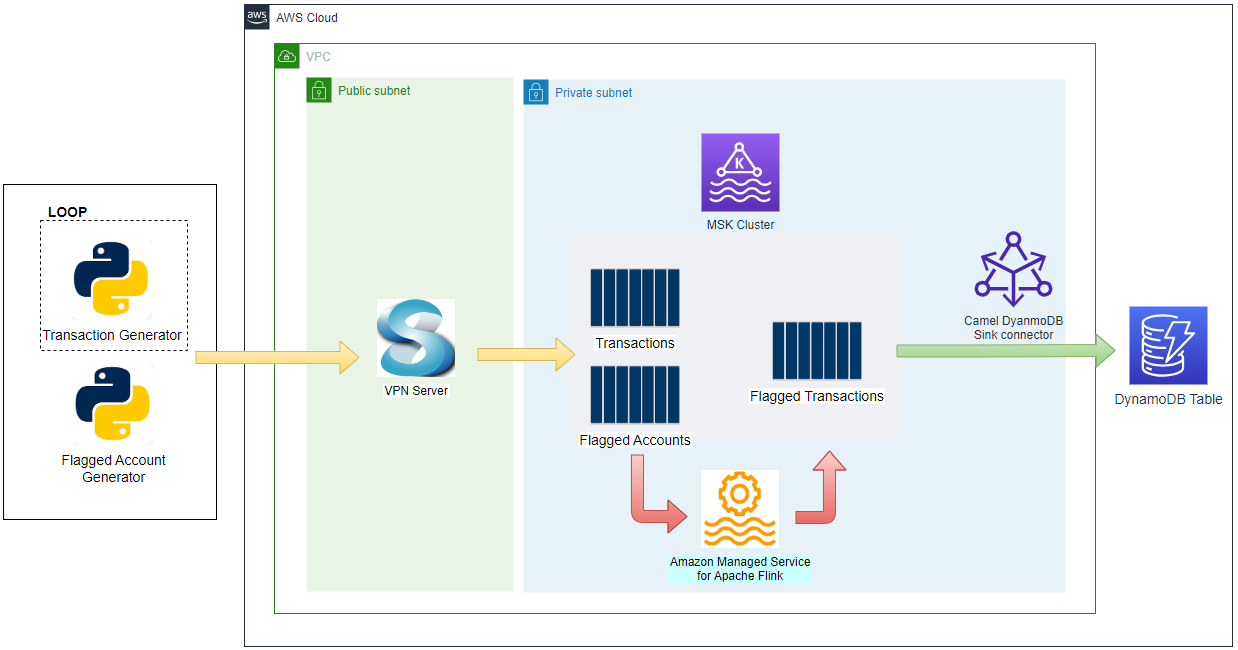
Architecture
There are two Python applications that send transaction and flagged account records into the corresponding topics - the transaction app sends records indefinitely in a loop. Note that, as the Kafka cluster is deployed in private subnets, a VPN server is used to generate records from the developer machine. Both the topics are consumed by a Flink application, and it filters the transactions from the flagged accounts followed by sending them into an output topic of flagged transactions. Finally, the flagged transaction records are sent into a DynamoDB table by the Camel DynamoDB sink connector in order to serve real-time requests from an API.
Infrastructure
The infrastructure resources are created using Terraform. The source can be found in the GitHub repository of this post.
Preparation
Flink Application and Kafka Connector Packages
The Flink application has multiple jar dependencies as the Kafka cluster is authenticated via IAM. Therefore, the jar files have to be combined into a single Uber jar file because KDA does not allow you to specify multiple pipeline jar files. The details about how to create the custom jar file can be found in this post. Also, the Camel DynamoDB sink connector needs to be packaged into a zip file, and it can be performed after downloading the binaries from the Maven repository.
The following script (build.sh) creates the Flink app and Kafka connector packages. For the former, it builds the Uber Jar file, followed by downloading the kafka-python package, creating a zip file that can be used to deploy the Flink app via KDA. Note that, although the Flink app does not need the kafka-python package, it is added in order to check if --pyFiles option works.
 1# build.sh
 2#!/usr/bin/env bash
 3shopt -s extglob
 4
 5PKG_ALL="${PKG_ALL:-yes}"
 6SCRIPT_DIR="$(cd $(dirname "$0"); pwd)"
 7
 8#### Steps to package the flink app
 9# remove contents under $SRC_PATH (except for uber-jar-for-pyflink) and kda-package.zip file
10SRC_PATH=$SCRIPT_DIR/package
11rm -rf $SRC_PATH/!(uber-jar-for-pyflink) kda-package.zip
12
13## Generate Uber Jar for PyFlink app for MSK cluster with IAM authN
14echo "generate Uber jar for PyFlink app..."
15mkdir $SRC_PATH/lib
16mvn clean install -f $SRC_PATH/uber-jar-for-pyflink/pom.xml \
17  && mv $SRC_PATH/uber-jar-for-pyflink/target/pyflink-getting-started-1.0.0.jar $SRC_PATH/lib \
18  && rm -rf $SRC_PATH/uber-jar-for-pyflink/target
19
20## Install pip packages
21echo "install and zip pip packages..."
22pip install -r requirements.txt --target $SRC_PATH/site_packages
23
24if [ $PKG_ALL == "yes" ]; then
25  ## Package pyflink app
26  echo "package pyflink app"
27  zip -r kda-package.zip processor.py package/lib package/site_packages
28fi
29
30#### Steps to create the sink connector
31CONN_PATH=$SCRIPT_DIR/connectors
32rm -rf $CONN_PATH && mkdir $CONN_PATH
33
34## Download camel dynamodb sink connector
35echo "download camel dynamodb sink connector..."
36CONNECTOR_SRC_DOWNLOAD_URL=https://repo.maven.apache.org/maven2/org/apache/camel/kafkaconnector/camel-aws-ddb-sink-kafka-connector/3.20.3/camel-aws-ddb-sink-kafka-connector-3.20.3-package.tar.gz
37
38## decompress and zip contents to create custom plugin of msk connect later
39curl -o $CONN_PATH/camel-aws-ddb-sink-kafka-connector.tar.gz $CONNECTOR_SRC_DOWNLOAD_URL \
40  && tar -xvzf $CONN_PATH/camel-aws-ddb-sink-kafka-connector.tar.gz -C $CONN_PATH \
41  && cd $CONN_PATH/camel-aws-ddb-sink-kafka-connector \
42  && zip -r camel-aws-ddb-sink-kafka-connector.zip . \
43  && mv camel-aws-ddb-sink-kafka-connector.zip $CONN_PATH \
44  && rm $CONN_PATH/camel-aws-ddb-sink-kafka-connector.tar.gz
Once completed, we can obtain the following zip files.
- Kafka sink connector - connectors/camel-aws-ddb-sink-kafka-connector.zip
- Flink application - kda-package.zip
- Flink application - processor.py
- Pipeline jar file - package/lib/pyflink-getting-started-1.0.0.jar
- kafka-python package - package/site_packages/kafka
Kafka Management App
The Kpow CE is used for ease of monitoring Kafka topics and related resources. The bootstrap server address, security configuration for IAM authentication and AWS credentials are added as environment variables. See this post for details about Kafka management apps.
 1# docker-compose.yml
 2version: "3"
 3
 4services:
 5  kpow:
 6    image: factorhouse/kpow-ce:91.2.1
 7    container_name: kpow
 8    ports:
 9      - "3000:3000"
10    networks:
11      - appnet
12    environment:
13      AWS_ACCESS_KEY_ID: $AWS_ACCESS_KEY_ID
14      AWS_SECRET_ACCESS_KEY: $AWS_SECRET_ACCESS_KEY
15      AWS_SESSION_TOKEN: $AWS_SESSION_TOKEN
16      # MSK cluster
17      BOOTSTRAP: $BOOTSTRAP_SERVERS
18      SECURITY_PROTOCOL: SASL_SSL
19      SASL_MECHANISM: AWS_MSK_IAM
20      SASL_CLIENT_CALLBACK_HANDLER_CLASS: software.amazon.msk.auth.iam.IAMClientCallbackHandler
21      SASL_JAAS_CONFIG: software.amazon.msk.auth.iam.IAMLoginModule required;
22      # MSK connect
23      CONNECT_AWS_REGION: $AWS_DEFAULT_REGION
24
25networks:
26  appnet:
27    name: app-network
VPC and VPN
A VPC with 3 public and private subnets is created using the AWS VPC Terraform module (infra/vpc.tf). Also, a SoftEther VPN server is deployed in order to access the resources in the private subnets from the developer machine (infra/vpn.tf). It is particularly useful to monitor and manage the MSK cluster and Kafka topic locally. The details about how to configure the VPN server can be found in this post.
MSK Cluster
An MSK cluster with 2 brokers is created. The broker nodes are deployed with the kafka.m5.large instance type in private subnets and IAM authentication is used for the client authentication method. Finally, additional server configurations are added such as enabling auto creation of topics and topic deletion.
 1# infra/variable.tf
 2locals {
 3  ...
 4  msk = {
 5    version                    = "2.8.1"
 6    instance_size              = "kafka.m5.large"
 7    ebs_volume_size            = 20
 8    log_retention_ms           = 604800000 # 7 days
 9    number_of_broker_nodes     = 2
10    num_partitions             = 2
11    default_replication_factor = 2
12  }
13  ...
14}
15# infra/msk.tf
16resource "aws_msk_cluster" "msk_data_cluster" {
17  cluster_name           = "${local.name}-msk-cluster"
18  kafka_version          = local.msk.version
19  number_of_broker_nodes = local.msk.number_of_broker_nodes
20  configuration_info {
21    arn      = aws_msk_configuration.msk_config.arn
22    revision = aws_msk_configuration.msk_config.latest_revision
23  }
24
25  broker_node_group_info {
26    instance_type   = local.msk.instance_size
27    client_subnets  = slice(module.vpc.private_subnets, 0, local.msk.number_of_broker_nodes)
28    security_groups = [aws_security_group.msk.id]
29    storage_info {
30      ebs_storage_info {
31        volume_size = local.msk.ebs_volume_size
32      }
33    }
34  }
35
36  client_authentication {
37    sasl {
38      iam = true
39    }
40  }
41
42  logging_info {
43    broker_logs {
44      cloudwatch_logs {
45        enabled   = true
46        log_group = aws_cloudwatch_log_group.msk_cluster_lg.name
47      }
48      s3 {
49        enabled = true
50        bucket  = aws_s3_bucket.default_bucket.id
51        prefix  = "logs/msk/cluster/"
52      }
53    }
54  }
55
56  tags = local.tags
57
58  depends_on = [aws_msk_configuration.msk_config]
59}
60
61resource "aws_msk_configuration" "msk_config" {
62  name = "${local.name}-msk-configuration"
63
64  kafka_versions = [local.msk.version]
65
66  server_properties = <<PROPERTIES
67    auto.create.topics.enable = true
68    delete.topic.enable = true
69    log.retention.ms = ${local.msk.log_retention_ms}
70    num.partitions = ${local.msk.num_partitions}
71    default.replication.factor = ${local.msk.default_replication_factor}
72  PROPERTIES
73}
Security Group
The security group of the MSK cluster allows all inbound traffic from itself and all outbound traffic into all IP addresses. The Kafka connectors will use the same security group and the former is necessary. Both the rules are configured too generously, however, we can limit the protocol and port ranges in production. Also, the security group has an additional inbound rule that permits it to connect on port 9098 from the security group of the Flink application.
 1resource "aws_security_group" "msk" {
 2  name   = "${local.name}-msk-sg"
 3  vpc_id = module.vpc.vpc_id
 4
 5  lifecycle {
 6    create_before_destroy = true
 7  }
 8
 9  tags = local.tags
10}
11
12resource "aws_security_group_rule" "msk_self_inbound_all" {
13  type                     = "ingress"
14  description              = "Allow ingress from itself - required for MSK Connect"
15  security_group_id        = aws_security_group.msk.id
16  protocol                 = "-1"
17  from_port                = "0"
18  to_port                  = "0"
19  source_security_group_id = aws_security_group.msk.id
20}
21
22resource "aws_security_group_rule" "msk_self_outbound_all" {
23  type              = "egress"
24  description       = "Allow outbound all"
25  security_group_id = aws_security_group.msk.id
26  protocol          = "-1"
27  from_port         = "0"
28  to_port           = "0"
29  cidr_blocks       = ["0.0.0.0/0"]
30}
31
32resource "aws_security_group_rule" "msk_kda_inbound" {
33  type                     = "ingress"
34  description              = "Allow KDA access"
35  security_group_id        = aws_security_group.msk.id
36  protocol                 = "tcp"
37  from_port                = 9098
38  to_port                  = 9098
39  source_security_group_id = aws_security_group.kda_sg.id
40}
DynamoDB Table
The destination table is configured to have a composite primary key where transaction_id and transaction_date are the hash and range key respectively. It also has a global secondary index (GSI) where account_id and transaction_date constitute the primary key. The GSI is to facilitate querying by account id.
 1# infra/ddb.tf
 2resource "aws_dynamodb_table" "transactions_table" {
 3  name           = "${local.name}-flagged-transactions"
 4  billing_mode   = "PROVISIONED"
 5  read_capacity  = 2
 6  write_capacity = 2
 7  hash_key       = "transaction_id"
 8  range_key      = "transaction_date"
 9
10  attribute {
11    name = "transaction_id"
12    type = "S"
13  }
14
15  attribute {
16    name = "account_id"
17    type = "N"
18  }
19
20  attribute {
21    name = "transaction_date"
22    type = "S"
23  }
24
25  global_secondary_index {
26    name            = "account"
27    hash_key        = "account_id"
28    range_key       = "transaction_date"
29    write_capacity  = 2
30    read_capacity   = 2
31    projection_type = "ALL"
32  }
33
34  tags = local.tags
35}
Flink Application
The runtime environment and service execution role are required to create a Flink app. The latest supported Flink version (1.15.2) is specified for the former and an IAM role is created for the latter - it’ll be discussed more in a later section. Furthermore, we need to specify more configurations that are related to the Flink application and CloudWatch logging, and they will be covered below in detail as well.
 1# infra/variable.tf
 2locals {
 3  ...
 4  kda = {
 5    runtime_env  = "FLINK-1_15"
 6    package_name = "kda-package.zip"
 7    consumer_0 = {
 8      table_name = "flagged_accounts"
 9      topic_name = "flagged-accounts"
10    }
11    consumer_1 = {
12      table_name = "transactions"
13      topic_name = "transactions"
14    }
15    producer_0 = {
16      table_name = "flagged_transactions"
17      topic_name = "flagged-transactions"
18    }
19  }
20  ...
21}
22
23resource "aws_kinesisanalyticsv2_application" "kda_app" {
24  name                   = "${local.name}-kda-app"
25  runtime_environment    = local.kda.runtime_env
26  service_execution_role = aws_iam_role.kda_app_role.arn
27
28  ...
29}
Application Configuration
In the application configuration section, we can specify details of the application code, VPC, environment properties, and application itself.
Application Code Configuration
The application package (kda-package.zip) is uploaded into the default S3 bucket using the aws_s3_object Terraform resource. Then it can be used as the code content by specifying the bucket and key names.
 1# infra/kda.tf
 2resource "aws_kinesisanalyticsv2_application" "kda_app" {
 3
 4  ...
 5
 6  application_configuration {
 7    application_code_configuration {
 8      code_content {
 9        s3_content_location {
10          bucket_arn = aws_s3_bucket.default_bucket.arn
11          file_key   = aws_s3_object.kda_package[0].key
12        }
13      }
14
15      code_content_type = "ZIPFILE"
16    }
17
18    ...
19
20  }
21
22  ...
23
24}
25
26...
27
28
29resource "aws_s3_object" "kda_package" {
30  bucket = aws_s3_bucket.default_bucket.id
31  key    = "packages/${local.kda.package_name}"
32  source = "${dirname(path.cwd)}/${local.kda.package_name}"
33
34  etag = filemd5("${dirname(path.cwd)}/${local.kda.package_name}")
35}
VPC Configuration
The app can be deployed in the private subnets as it doesn’t need to be connected from outside. Note that an outbound rule that permits connection on port 9098 is created in its security group because it should be able to access the Kafka brokers.
 1# infra/kda.tf
 2resource "aws_kinesisanalyticsv2_application" "kda_app" {
 3
 4  ...
 5
 6  application_configuration {
 7
 8    ...
 9
10    vpc_configuration {
11      security_group_ids = [aws_security_group.kda_sg.id]
12      subnet_ids         = module.vpc.private_subnets
13    }
14
15    ...
16
17  }
18
19  ...
20
21}
22
23...
24
25resource "aws_security_group" "kda_sg" {
26  name   = "${local.name}-kda-sg"
27  vpc_id = module.vpc.vpc_id
28
29  egress {
30    from_port   = 9098
31    to_port     = 9098
32    protocol    = "tcp"
33    cidr_blocks = ["0.0.0.0/0"]
34  }
35
36  lifecycle {
37    create_before_destroy = true
38  }
39
40  tags = local.tags
41}
Environment Properties
In environment properties, we first add Flink CLI options in the kinesis.analytics.flink.run.options group. The values of the Pyflink app (python), pipeline jar (jarfile) and 3rd-party python package location (pyFiles) should match those in the application package (kda-package.zip). The other property groups are related to the Kafka source/sink table options, and they will be read by the application.
 1# infra/kda.tf
 2resource "aws_kinesisanalyticsv2_application" "kda_app" {
 3
 4  ...
 5
 6  application_configuration {
 7
 8    ...
 9
10    environment_properties {
11      property_group {
12        property_group_id = "kinesis.analytics.flink.run.options"
13
14        property_map = {
15          python  = "processor.py"
16          jarfile = "package/lib/pyflink-getting-started-1.0.0.jar"
17          pyFiles = "package/site_packages/"
18        }
19      }
20
21      property_group {
22        property_group_id = "consumer.config.0"
23
24        property_map = {
25          "table.name"        = local.kda.consumer_0.table_name
26          "topic.name"        = local.kda.consumer_0.topic_name
27          "bootstrap.servers" = aws_msk_cluster.msk_data_cluster.bootstrap_brokers_sasl_iam
28          "startup.mode"      = "earliest-offset"
29        }
30      }
31
32      property_group {
33        property_group_id = "consumer.config.1"
34
35        property_map = {
36          "table.name"        = local.kda.consumer_1.table_name
37          "topic.name"        = local.kda.consumer_1.topic_name
38          "bootstrap.servers" = aws_msk_cluster.msk_data_cluster.bootstrap_brokers_sasl_iam
39          "startup.mode"      = "earliest-offset"
40        }
41      }
42
43      property_group {
44        property_group_id = "producer.config.0"
45
46        property_map = {
47          "table.name"        = local.kda.producer_0.table_name
48          "topic.name"        = local.kda.producer_0.topic_name
49          "bootstrap.servers" = aws_msk_cluster.msk_data_cluster.bootstrap_brokers_sasl_iam
50        }
51      }
52    }
53
54    ...
55
56  }
57
58  ...
59
60}
Flink Application Configuration
The Flink application configurations consist of the following.
- Checkpoints - Checkpoints are backups of application state that Managed Service for Apache Flink automatically creates periodically and uses to restore from faults. By default, the following values are configured.
- CheckpointingEnabled: true
- CheckpointInterval: 60000
- MinPauseBetweenCheckpoints: 5000
- Monitoring - The metrics level determines which metrics are created to CloudWatch - see this page for details. The supported values are APPLICATION, OPERATOR, PARALLELISM, and TASK. Here APPLICATION is selected as the metrics level value.
- Parallelism - We can configure the parallel execution of tasks and the allocation of resources to implement scaling. The parallelism indicates the initial number of parallel tasks that an application can perform while the parallelism_per_kpu is the number of parallel tasks that an application can perform per Kinesis Processing Unit (KPU). The application parallelism can be updated by enabling auto-scaling.
 1# infra/kda.tf
 2resource "aws_kinesisanalyticsv2_application" "kda_app" {
 3
 4  ...
 5
 6  application_configuration {
 7
 8    ...
 9
10    flink_application_configuration {
11      checkpoint_configuration {
12        configuration_type = "DEFAULT"
13      }
14
15      monitoring_configuration {
16        configuration_type = "CUSTOM"
17        log_level          = "INFO"
18        metrics_level      = "APPLICATION"
19      }
20
21      parallelism_configuration {
22        configuration_type   = "CUSTOM"
23        auto_scaling_enabled = true
24        parallelism          = 1
25        parallelism_per_kpu  = 1
26      }
27    }
28  }
29
30  ...
31
32}
Cloudwatch Logging Options
We can add a CloudWatch log stream ARN to the CloudWatch logging options. Note that, when I missed it at first, I saw a CloudWatch log group and log stream are created automatically, but logging was not enabled. It was only when I specified a custom log stream ARN that logging was enabled and log messages were ingested.
 1# infra/kda.tf
 2resource "aws_kinesisanalyticsv2_application" "kda_app" {
 3
 4  ...
 5
 6  cloudwatch_logging_options {
 7    log_stream_arn = aws_cloudwatch_log_stream.kda_ls.arn
 8  }
 9
10  ...
11
12}
13
14...
15
16resource "aws_cloudwatch_log_group" "kda_lg" {
17  name = "/${local.name}-kda-log-group"
18}
19
20resource "aws_cloudwatch_log_stream" "kda_ls" {
21  name = "${local.name}-kda-log-stream"
22
23  log_group_name = aws_cloudwatch_log_group.kda_lg.name
24}
IAM Role
The service execution role has the following permissions.
- Full access to CloudWatch, CloudWatch Log and Amazon Kinesis Data Analytics. It is given by AWS managed policies for logging, metrics generation etc. However, it is by no means recommended and should be updated according to the least privilege principle for production.
- 3 inline policies for connecting to the MSK cluster (kda-msk-access) in private subnets (kda-vpc-access) as well as giving access to the application package in S3 (kda-s3-access).
  1# infra/kda.tf
  2resource "aws_iam_role" "kda_app_role" {
  3  name = "${local.name}-kda-role"
  4
  5  assume_role_policy = jsonencode({
  6    Version = "2012-10-17"
  7    Statement = [
  8      {
  9        Action = "sts:AssumeRole"
 10        Effect = "Allow"
 11        Sid    = ""
 12        Principal = {
 13          Service = "kinesisanalytics.amazonaws.com"
 14        }
 15      },
 16    ]
 17  })
 18
 19  managed_policy_arns = [
 20    "arn:aws:iam::aws:policy/CloudWatchFullAccess",
 21    "arn:aws:iam::aws:policy/CloudWatchLogsFullAccess",
 22    "arn:aws:iam::aws:policy/AmazonKinesisAnalyticsFullAccess"
 23  ]
 24
 25  inline_policy {
 26    name = "kda-msk-access"
 27
 28    policy = jsonencode({
 29      Version = "2012-10-17"
 30      Statement = [
 31        {
 32          Sid = "PermissionOnCluster"
 33          Action = [
 34            "kafka-cluster:Connect",
 35            "kafka-cluster:AlterCluster",
 36            "kafka-cluster:DescribeCluster"
 37          ]
 38          Effect   = "Allow"
 39          Resource = "arn:aws:kafka:${local.region}:${data.aws_caller_identity.current.account_id}:cluster/${local.name}-msk-cluster/*"
 40        },
 41        {
 42          Sid = "PermissionOnTopics"
 43          Action = [
 44            "kafka-cluster:*Topic*",
 45            "kafka-cluster:WriteData",
 46            "kafka-cluster:ReadData"
 47          ]
 48          Effect   = "Allow"
 49          Resource = "arn:aws:kafka:${local.region}:${data.aws_caller_identity.current.account_id}:topic/${local.name}-msk-cluster/*"
 50        },
 51        {
 52          Sid = "PermissionOnGroups"
 53          Action = [
 54            "kafka-cluster:AlterGroup",
 55            "kafka-cluster:DescribeGroup"
 56          ]
 57          Effect   = "Allow"
 58          Resource = "arn:aws:kafka:${local.region}:${data.aws_caller_identity.current.account_id}:group/${local.name}-msk-cluster/*"
 59        }
 60      ]
 61    })
 62  }
 63
 64  inline_policy {
 65    name = "kda-vpc-access"
 66    # https://docs.aws.amazon.com/kinesisanalytics/latest/java/vpc-permissions.html
 67
 68    policy = jsonencode({
 69      Version = "2012-10-17"
 70      Statement = [
 71        {
 72          Sid = "VPCReadOnlyPermissions"
 73          Action = [
 74            "ec2:DescribeVpcs",
 75            "ec2:DescribeSubnets",
 76            "ec2:DescribeSecurityGroups",
 77            "ec2:DescribeDhcpOptions"
 78          ]
 79          Effect   = "Allow"
 80          Resource = "*"
 81        },
 82        {
 83          Sid = "ENIReadWritePermissions"
 84          Action = [
 85            "ec2:CreateNetworkInterface",
 86            "ec2:CreateNetworkInterfacePermission",
 87            "ec2:DescribeNetworkInterfaces",
 88            "ec2:DeleteNetworkInterface"
 89          ]
 90          Effect   = "Allow"
 91          Resource = "*"
 92        }
 93
 94      ]
 95    })
 96  }
 97
 98  inline_policy {
 99    name = "kda-s3-access"
100
101    policy = jsonencode({
102      Version = "2012-10-17"
103      Statement = [
104        {
105          Sid      = "ListObjectsInBucket"
106          Action   = ["s3:ListBucket"]
107          Effect   = "Allow"
108          Resource = "arn:aws:s3:::${aws_s3_bucket.default_bucket.id}"
109        },
110        {
111          Sid      = "AllObjectActions"
112          Action   = ["s3:*Object"]
113          Effect   = "Allow"
114          Resource = "arn:aws:s3:::${aws_s3_bucket.default_bucket.id}/*"
115        },
116      ]
117    })
118  }
119
120  tags = local.tags
121}
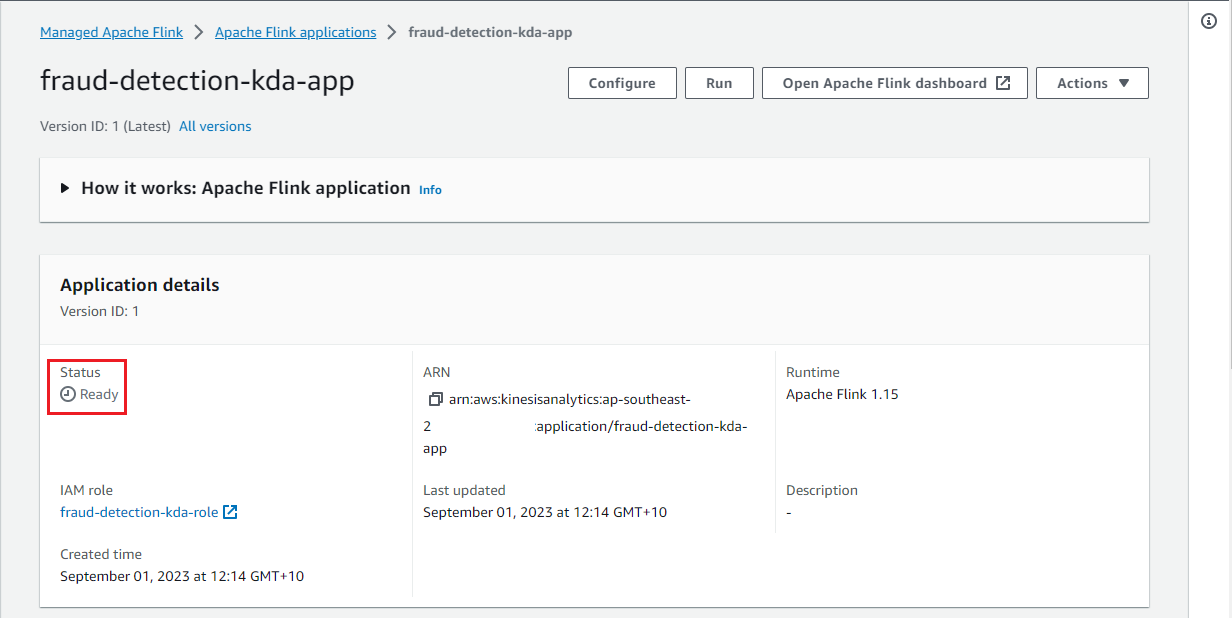
Once deployed, we can see the application on AWS console, and it stays in the ready status.
Camel DynamoDB Sink Connector
The connector is configured to write messages from the flagged-transactions topic into the DynamoDB table created earlier. It requires to specify the table name, AWS region, operation, write capacity and whether to use the default credential provider - see the documentation for details. See this post for details about how to set up the sink connector.
  1# infra/msk-connect.tf
  2resource "aws_mskconnect_connector" "camel_ddb_sink" {
  3  name = "${local.name}-transactions-sink"
  4
  5  kafkaconnect_version = "2.7.1"
  6
  7  capacity {
  8    provisioned_capacity {
  9      mcu_count    = 1
 10      worker_count = 1
 11    }
 12  }
 13
 14  connector_configuration = {
 15    # connector configuration
 16    "connector.class"                = "org.apache.camel.kafkaconnector.awsddbsink.CamelAwsddbsinkSinkConnector",
 17    "tasks.max"                      = "2",
 18    "key.converter"                  = "org.apache.kafka.connect.json.JsonConverter",
 19    "key.converter.schemas.enable"   = false,
 20    "value.converter"                = "org.apache.kafka.connect.json.JsonConverter",
 21    "value.converter.schemas.enable" = false,
 22    # camel ddb sink configuration
 23    "topics"                                                   = local.kda.producer_0.topic_name,
 24    "camel.kamelet.aws-ddb-sink.table"                         = aws_dynamodb_table.transactions_table.id,
 25    "camel.kamelet.aws-ddb-sink.region"                        = local.region,
 26    "camel.kamelet.aws-ddb-sink.operation"                     = "PutItem",
 27    "camel.kamelet.aws-ddb-sink.writeCapacity"                 = 1,
 28    "camel.kamelet.aws-ddb-sink.useDefaultCredentialsProvider" = true,
 29    "camel.sink.unmarshal"                                     = "jackson"
 30  }
 31
 32  kafka_cluster {
 33    apache_kafka_cluster {
 34      bootstrap_servers = aws_msk_cluster.msk_data_cluster.bootstrap_brokers_sasl_iam
 35
 36      vpc {
 37        security_groups = [aws_security_group.msk.id]
 38        subnets         = module.vpc.private_subnets
 39      }
 40    }
 41  }
 42
 43  kafka_cluster_client_authentication {
 44    authentication_type = "IAM"
 45  }
 46
 47  kafka_cluster_encryption_in_transit {
 48    encryption_type = "TLS"
 49  }
 50
 51  plugin {
 52    custom_plugin {
 53      arn      = aws_mskconnect_custom_plugin.camel_ddb_sink.arn
 54      revision = aws_mskconnect_custom_plugin.camel_ddb_sink.latest_revision
 55    }
 56  }
 57
 58  log_delivery {
 59    worker_log_delivery {
 60      cloudwatch_logs {
 61        enabled   = true
 62        log_group = aws_cloudwatch_log_group.camel_ddb_sink.name
 63      }
 64      s3 {
 65        enabled = true
 66        bucket  = aws_s3_bucket.default_bucket.id
 67        prefix  = "logs/msk/connect/camel-ddb-sink"
 68      }
 69    }
 70  }
 71
 72  service_execution_role_arn = aws_iam_role.kafka_connector_role.arn
 73}
 74
 75resource "aws_mskconnect_custom_plugin" "camel_ddb_sink" {
 76  name         = "${local.name}-camel-ddb-sink"
 77  content_type = "ZIP"
 78
 79  location {
 80    s3 {
 81      bucket_arn = aws_s3_bucket.default_bucket.arn
 82      file_key   = aws_s3_object.camel_ddb_sink.key
 83    }
 84  }
 85}
 86
 87resource "aws_s3_object" "camel_ddb_sink" {
 88  bucket = aws_s3_bucket.default_bucket.id
 89  key    = "plugins/${local.msk_connect.package_name}"
 90  source = "${dirname(path.cwd)}/connectors/${local.msk_connect.package_name}"
 91
 92  etag = filemd5("${dirname(path.cwd)}/connectors/${local.msk_connect.package_name}")
 93}
 94
 95resource "aws_cloudwatch_log_group" "camel_ddb_sink" {
 96  name = "/msk/connect/camel-ddb-sink"
 97
 98  retention_in_days = 1
 99
100  tags = local.tags
101}
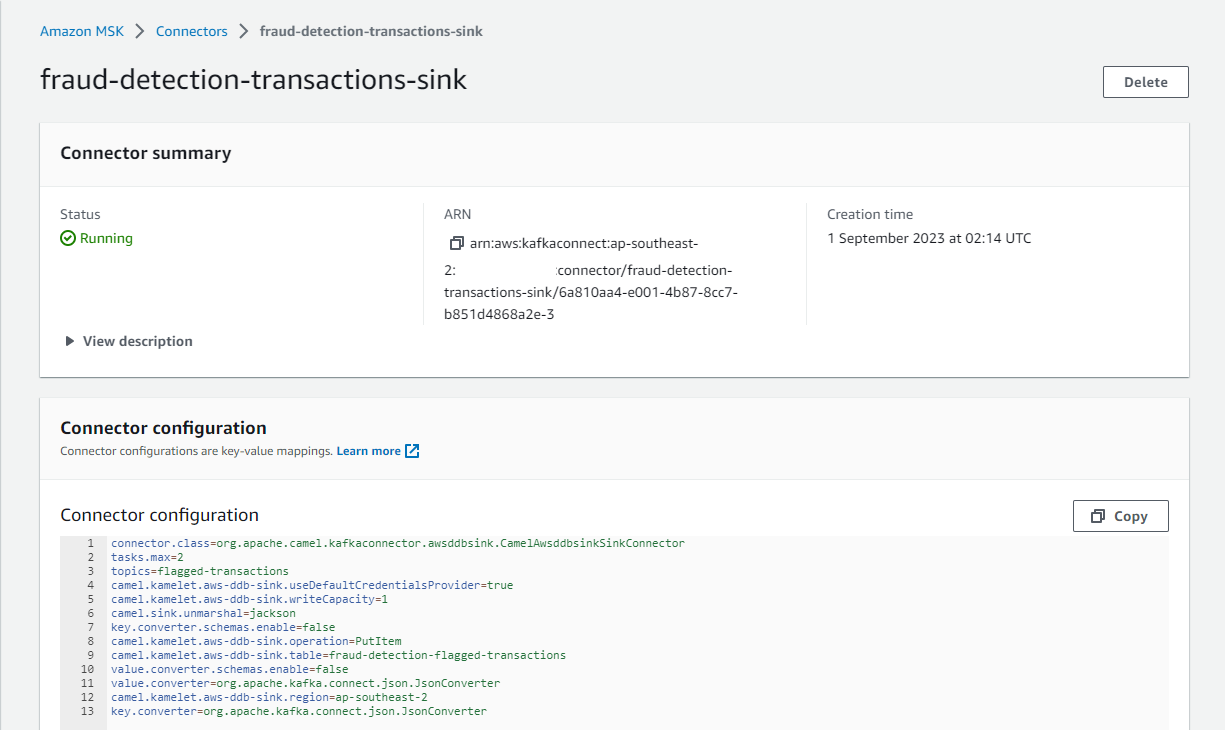
The sink connector can be checked on AWS Console as shown below.
Run Application
We first need to create records in the source Kafka topics. It is performed by executing the data generator app (producer.py). See part 1 for details about the generator app and how to execute it. Note that we should connect to the VPN server in order to create records from the developer machine.
Once executed, we can check the source topics are created and messages are ingested.
Monitoring on Flink Web UI
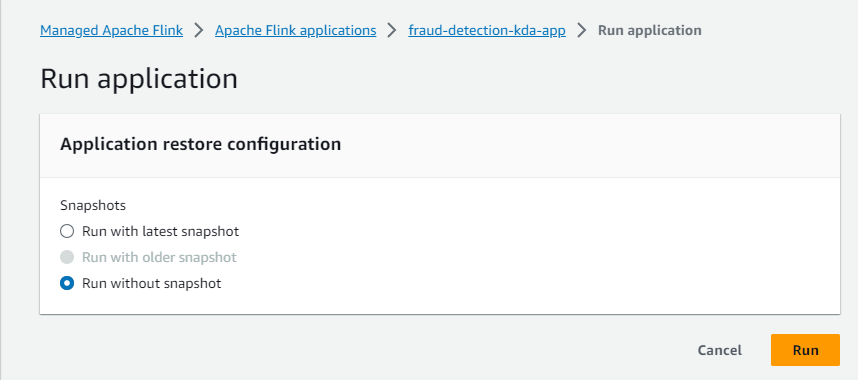
We can run the Flink application on AWS console with the Run without snapshot option as we haven’t enabled snapshots.
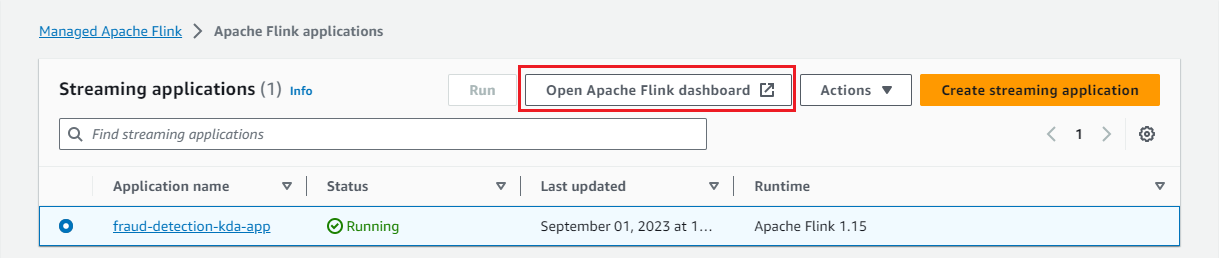
Once the app is running, we can monitor it on the Flink Web UI available on AWS Console.
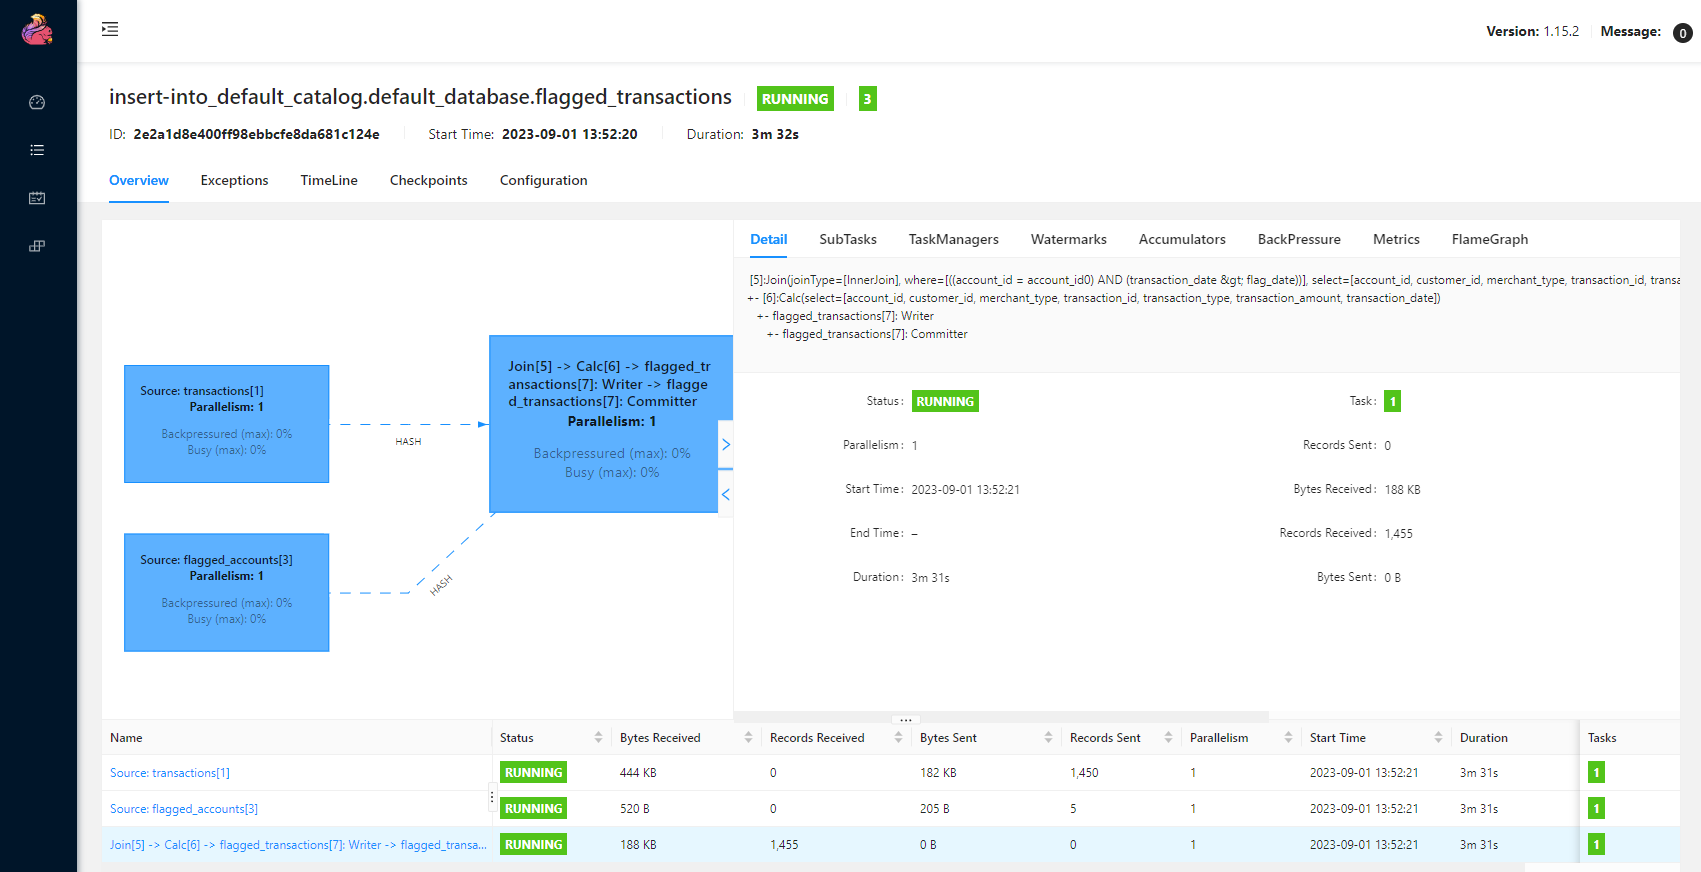
In the Overview section, it shows the available task slots, running jobs and completed jobs.

We can inspect an individual job in the Jobs menu. It shows key details about a job execution in Overview, Exceptions, TimeLine, Checkpoints and Configuration tabs.
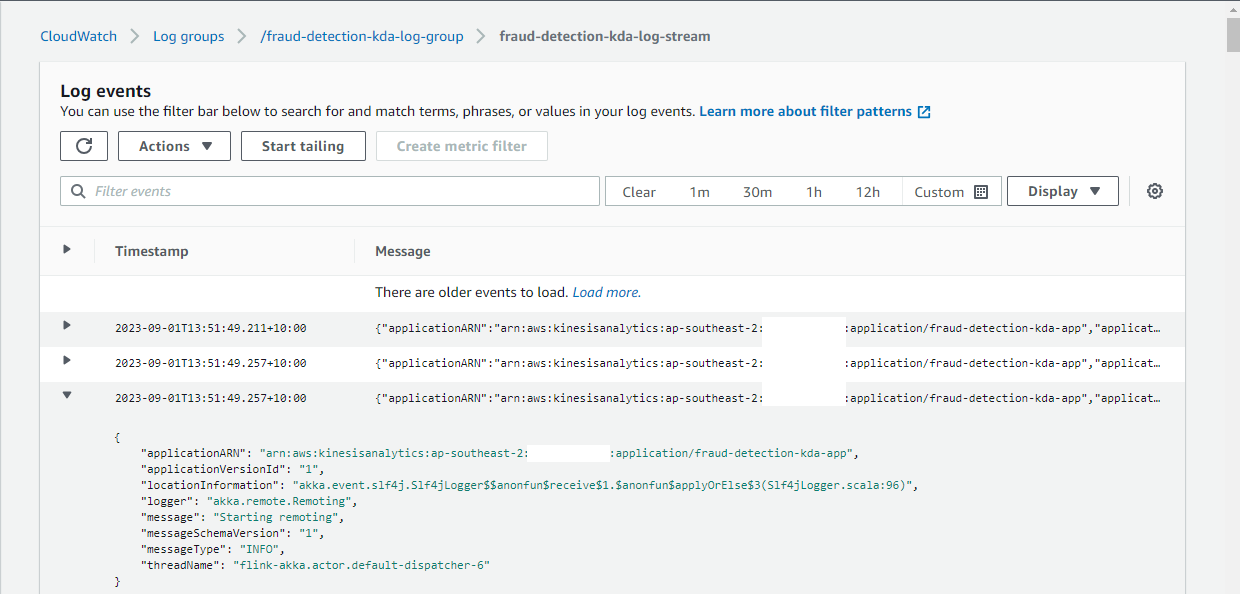
CloudWatch Logging
The application log messages can be checked in the CloudWatch Console, and it gives additional capability to debug the application.
Application Output
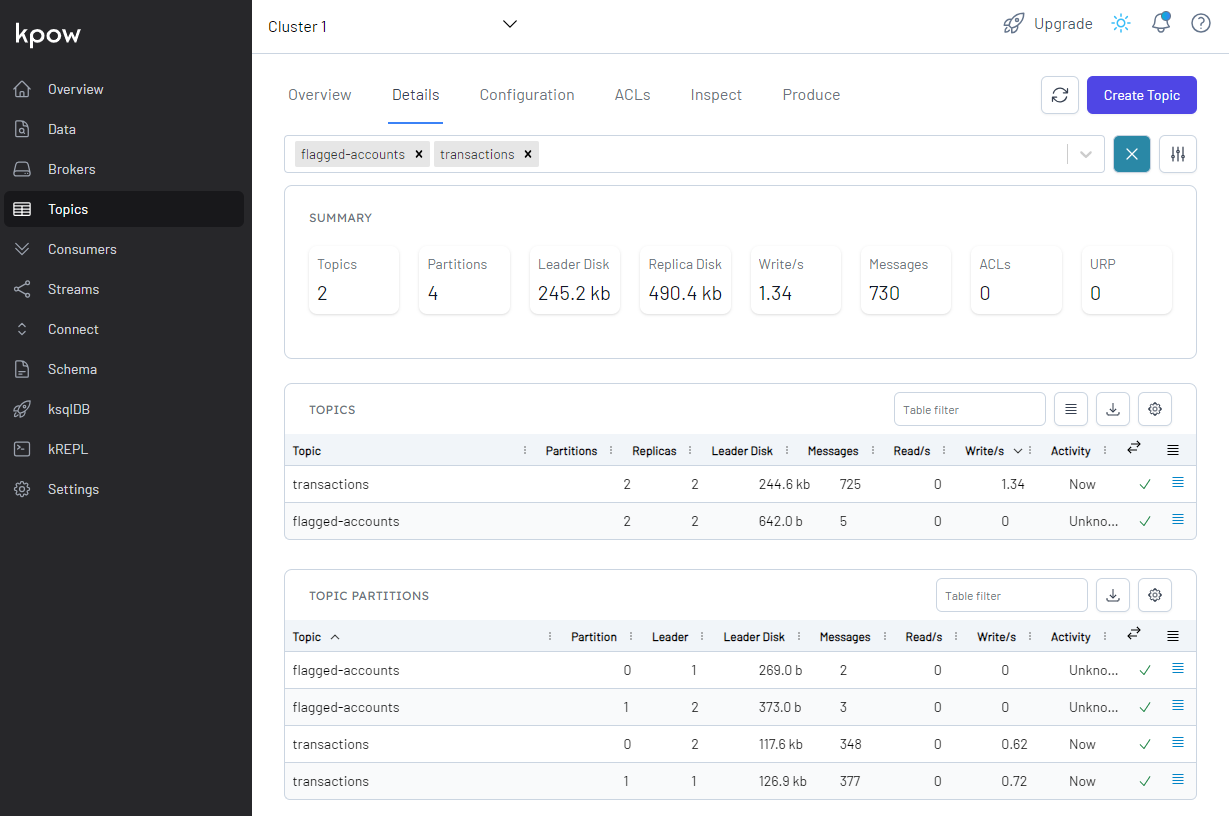
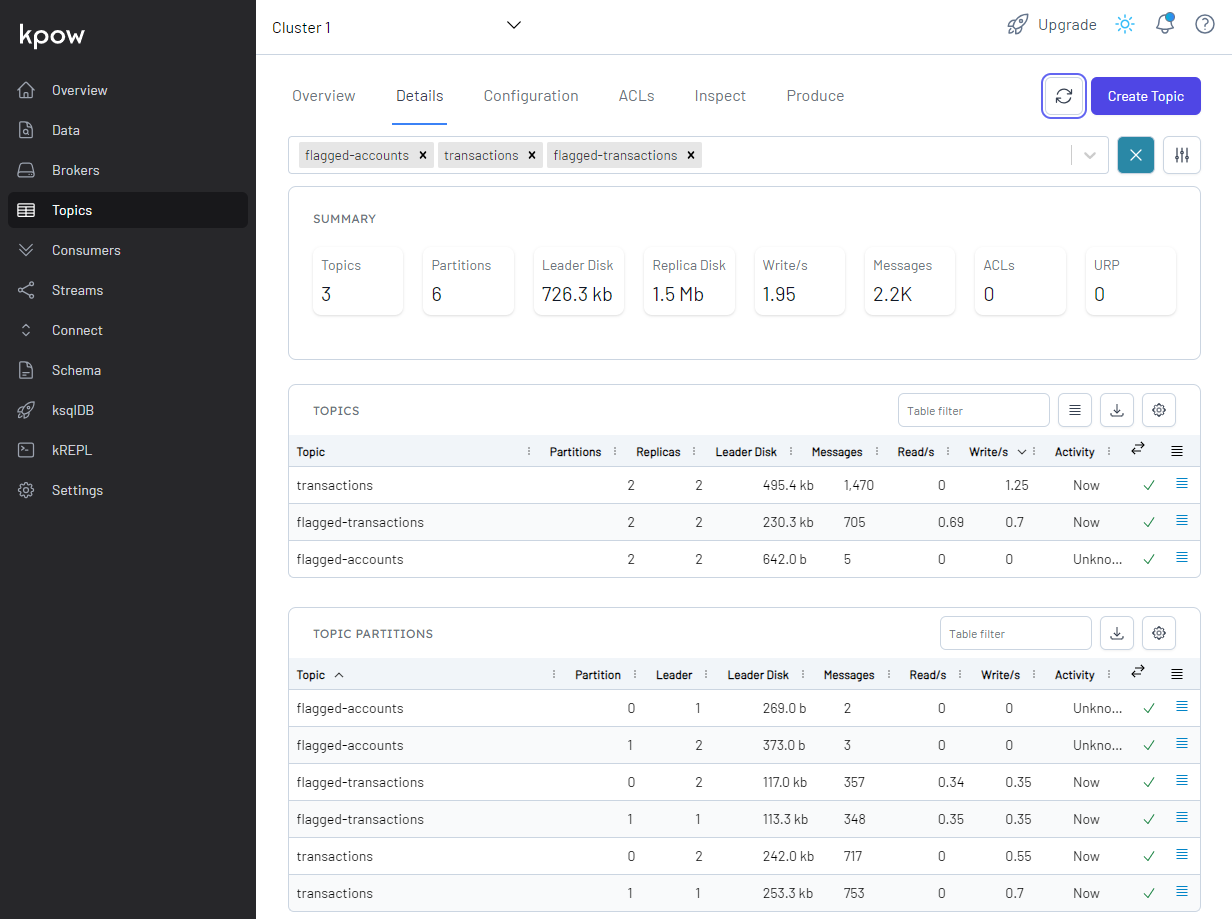
We can see details of all the topics in Kpow. The output topic (flagged-transactions) is created by the Flink application, and fraudulent transaction records are created in it.
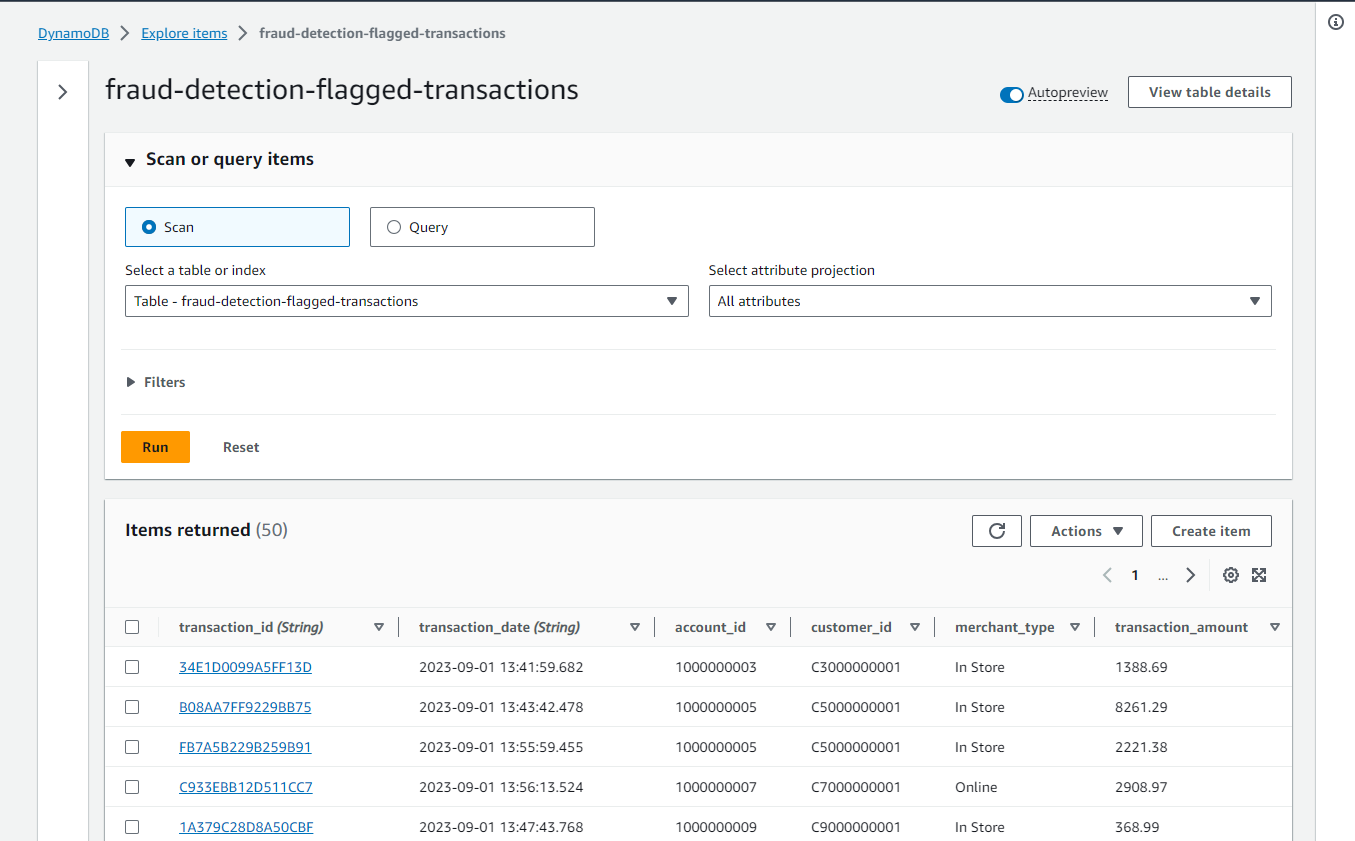
Finally, we can check the output records on the DynamoDB table items view. All account IDs end with odd numbers, and it indicates they are from flagged accounts.
Summary
This series aims to help those who are new to Apache Flink and Amazon Managed Service for Apache Flink by re-implementing a simple fraud detection application that is discussed in an AWS workshop titled AWS Kafka and DynamoDB for real time fraud detection. In part 1, I demonstrated how to develop the application locally, and the app was deployed via Amazon Managed Service for Apache Flink in this post.


Comments