
Kafka Connect is a tool for scalably and reliably streaming data between Apache Kafka and other systems. It makes it simple to quickly define connectors that move large collections of data into and out of Kafka. In this post, we discuss how to set up a data ingestion pipeline using Kafka connectors. Fake customer and order data is ingested into Kafka topics using the MSK Data Generator. Also, we use the Confluent S3 sink connector to save the messages of the topics into a S3 bucket. The Kafka Connect servers and individual connectors are deployed using the custom resources of Strimzi on Kubernetes.
Kafka Connect
We create a Kafka Connect server using the Strimzi custom resource named KafkaConnect. The source can be found in the GitHub repository of this post.
Create Secrets
As discussed further below, a custom Docker image is built and pushed into an external Docker registry when we create a Kafka Connect server using Strimzi. Therefore, we need the registry secret to push the image. Also, as the sink connector needs permission to write files into a S3 bucket, AWS credentials should be added to the Connect server. Both the secret and credentials will be made available via Kubernetes Secrets and those are created as shown below.
1# Log in to DockerHub if not done - docker login
2kubectl create secret generic regcred \
3  --from-file=.dockerconfigjson=$HOME/.docker/config.json \
4  --type=kubernetes.io/dockerconfigjson
1kubectl create -f - <<EOF
2apiVersion: v1
3kind: Secret
4metadata:
5  name: awscred
6stringData:
7  AWS_ACCESS_KEY_ID: $AWS_ACCESS_KEY_ID
8  AWS_SECRET_ACCESS_KEY: $AWS_SECRET_ACCESS_KEY
9EOF
Deploy Connect Server
The Kafka Connect server is created using the Strimzi custom resource named KafkaConnect. When we create the custom resource, a Docker image is built, the image is pushed into an external Docker registry (output.type: docker), and it is pulled to deploy the Kafka Connect server instances. Therefore, in the build configuration, we need to indicate the location of an external Docker registry and registry secret (pushSecret). Note that the registry secret is referred from the Kubernetes Secret that is created earlier. Also, we can build connector sources together by specifying their types and URLs in build.plugins.
When it comes to the Connect server configuration, two server instances are configured to run (replicas: 2) and the same Kafka version (2.8.1) to the associating Kafka cluster is used. Also, the name and port of the service that exposes the Kafka internal listeners are used to specify the Kafka bootstrap server address. Moreover, AWS credentials are added to environment variables because the sink connector needs permission to write files to a S3 bucket.
 1# manifests/kafka-connect.yaml
 2apiVersion: kafka.strimzi.io/v1beta2
 3kind: KafkaConnect
 4metadata:
 5  name: demo-connect
 6  annotations:
 7    strimzi.io/use-connector-resources: "true"
 8spec:
 9  version: 2.8.1
10  replicas: 2
11  bootstrapServers: demo-cluster-kafka-bootstrap:9092
12  config:
13    group.id: demo-connect
14    offset.storage.topic: demo-connect-offsets
15    config.storage.topic: demo-connect-configs
16    status.storage.topic: demo-connect-status
17    # -1 means it will use the default replication factor configured in the broker
18    config.storage.replication.factor: -1
19    offset.storage.replication.factor: -1
20    status.storage.replication.factor: -1
21    key.converter: org.apache.kafka.connect.json.JsonConverter
22    value.converter: org.apache.kafka.connect.json.JsonConverter
23    key.converter.schemas.enable: false
24    value.converter.schemas.enable: false
25  externalConfiguration:
26    env:
27      - name: AWS_ACCESS_KEY_ID
28        valueFrom:
29          secretKeyRef:
30            name: awscred
31            key: AWS_ACCESS_KEY_ID
32      - name: AWS_SECRET_ACCESS_KEY
33        valueFrom:
34          secretKeyRef:
35            name: awscred
36            key: AWS_SECRET_ACCESS_KEY
37  build:
38    output:
39      type: docker
40      image: jaehyeon/demo-connect:latest
41      pushSecret: regcred
42    # https://strimzi.io/docs/operators/0.27.1/using#plugins
43    plugins:
44      - name: confluentinc-kafka-connect-s3
45        artifacts:
46          - type: zip
47            url: https://d1i4a15mxbxib1.cloudfront.net/api/plugins/confluentinc/kafka-connect-s3/versions/10.4.3/confluentinc-kafka-connect-s3-10.4.3.zip
48      - name: msk-data-generator
49        artifacts:
50          - type: jar
51            url: https://github.com/awslabs/amazon-msk-data-generator/releases/download/v0.4.0/msk-data-generator-0.4-jar-with-dependencies.jar
We assume that a Kafka cluster and management app are deployed on Minikube as discussed in Part 1. The Kafka Connect server can be created using the kubernetes create command as shown below.
1kubectl create -f manifests/kafka-connect.yaml
Once the Connect image is built successfully, we can see that the image is pushed into the external Docker registry.

Then the Connect server instances run by two Pods, and they are exposed by a service named demo-connect-connect-api on port 8083.
 1kubectl get all -l strimzi.io/cluster=demo-connect
 2# NAME                                        READY   STATUS    RESTARTS   AGE
 3# pod/demo-connect-connect-559cd588b4-48lhd   1/1     Running   0          2m4s
 4# pod/demo-connect-connect-559cd588b4-wzqgs   1/1     Running   0          2m4s
 5
 6# NAME                               TYPE        CLUSTER-IP       EXTERNAL-IP   PORT(S)    AGE
 7# service/demo-connect-connect-api   ClusterIP   10.111.148.128   <none>        8083/TCP   2m4s
 8
 9# NAME                                   READY   UP-TO-DATE   AVAILABLE   AGE
10# deployment.apps/demo-connect-connect   2/2     2            2           2m4s
11
12# NAME                                              DESIRED   CURRENT   READY   AGE
13# replicaset.apps/demo-connect-connect-559cd588b4   2         2         2       2m4s
Kafka Connectors
Both the source and sink connectors are created using the Strimzi custom resource named KafkaConnector.
Source Connector
The connector class (spec.class) is set for the MSK Data Generator, and a single worker is allocated to it (tasks.max). Also, the key converter is set to the string converter as the keys of both topics are set to be primitive values (genkp) while the value converter is configured as the json converter. Finally, schemas are not enabled for both the key and value.
The remaining properties are specific to the source connector. Basically it sends messages to two topics (customer and order). They are linked by the customer_id attribute of the order topic where the value is from the key of the customer topic. This is useful for practicing stream processing e.g. for joining two streams.
 1# manifests/kafka-connectors.yaml
 2apiVersion: kafka.strimzi.io/v1beta2
 3kind: KafkaConnector
 4metadata:
 5  name: order-source
 6  labels:
 7    strimzi.io/cluster: demo-connect
 8spec:
 9  class: com.amazonaws.mskdatagen.GeneratorSourceConnector
10  tasksMax: 1
11  config:
12    ##
13    key.converter: org.apache.kafka.connect.storage.StringConverter
14    key.converter.schemas.enable: false
15    value.converter: org.apache.kafka.connect.json.JsonConverter
16    value.converter.schemas.enable: false
17    ##
18    genkp.customer.with: "#{Code.isbn10}"
19    genv.customer.name.with: "#{Name.full_name}"
20    genkp.order.with: "#{Internet.uuid}"
21    genv.order.product_id.with: "#{number.number_between '101''109'}"
22    genv.order.quantity.with: "#{number.number_between '1''5'}"
23    genv.order.customer_id.matching: customer.key
24    global.throttle.ms: 500
25    global.history.records.max: 1000
26
27...
Sink Connector
The connector is configured to write files from both the topics (order and customer) into a S3 bucket (s3.bucket.name) where the file names are prefixed by the partition number (DefaultPartitioner). Also, it invokes file commits every 60 seconds (rotate.schedule.interval.ms) or the number of messages reach 100 (flush.size). Like the source connector, it overrides the converter-related properties.
 1# manifests/kafka-connectors.yaml
 2
 3...
 4
 5apiVersion: kafka.strimzi.io/v1beta2
 6kind: KafkaConnector
 7metadata:
 8  name: order-sink
 9  labels:
10    strimzi.io/cluster: demo-connect
11spec:
12  class: io.confluent.connect.s3.S3SinkConnector
13  tasksMax: 1
14  config:
15    ##
16    key.converter: org.apache.kafka.connect.storage.StringConverter
17    key.converter.schemas.enable: false
18    value.converter: org.apache.kafka.connect.json.JsonConverter
19    value.converter.schemas.enable: false
20    ##
21    storage.class: io.confluent.connect.s3.storage.S3Storage
22    format.class: io.confluent.connect.s3.format.json.JsonFormat
23    topics: order,customer
24    s3.bucket.name: kafka-dev-on-k8s-ap-southeast-2
25    s3.region: ap-southeast-2
26    flush.size: 100
27    rotate.schedule.interval.ms: 60000
28    timezone: Australia/Sydney
29    partitioner.class: io.confluent.connect.storage.partitioner.DefaultPartitioner
30    errors.log.enable: true
Deploy Connectors
The Kafka source and sink connectors can be created using the kubernetes create command as shown below. Once created, we can check their details by listing (or describing) the Strimzi custom resource (KafkaConnector). Below shows both the source and sink connectors are in ready status, which indicates they are running.
1kubectl create -f manifests/kafka-connectors.yaml
2
3kubectl get kafkaconnectors
4# NAME           CLUSTER        CONNECTOR CLASS                                     MAX TASKS   READY
5# order-sink     demo-connect   io.confluent.connect.s3.S3SinkConnector             1           True
6# order-source   demo-connect   com.amazonaws.mskdatagen.GeneratorSourceConnector   1           True
We can also see the connector status on the Kafka management app (kafka-ui) as shown below.
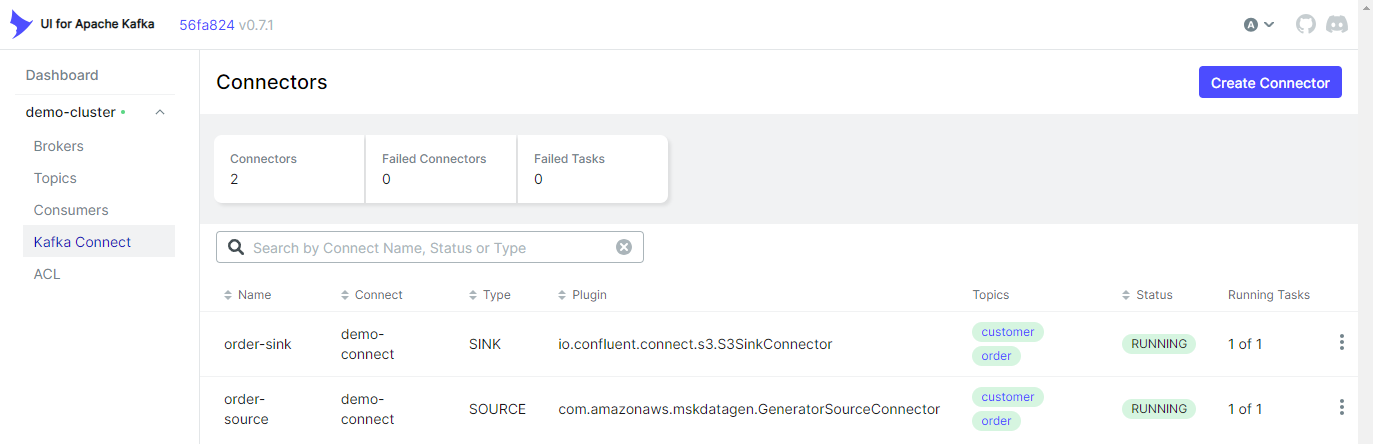
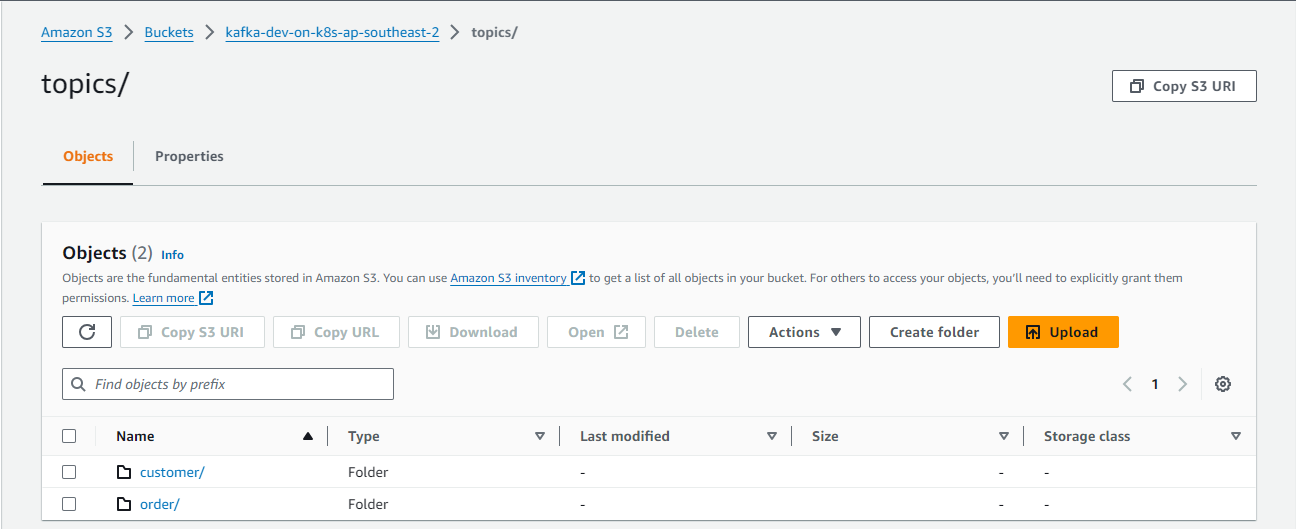
The sink connector writes messages of the two topics (customer and order), and topic names are used as S3 prefixes.
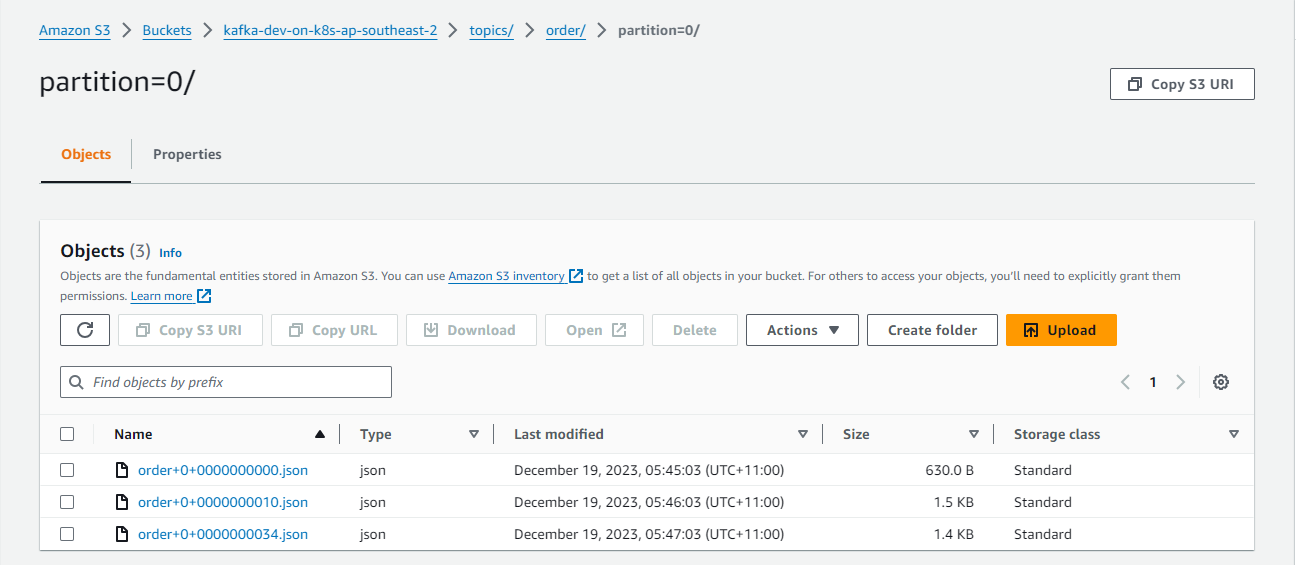
The files are generated by <topic>+<partiton>+<start-offset>.json. The sink connector’s format class is set to io.confluent.connect.s3.format.json.JsonFormat so that it writes to Json files.
Delete Resources
The Kubernetes resources and Minikube cluster can be removed by the kubectl delete and minikube delete commands respectively.
 1## delete resources
 2kubectl delete -f manifests/kafka-connectors.yaml
 3kubectl delete -f manifests/kafka-connect.yaml
 4kubectl delete secret awscred
 5kubectl delete secret regcred
 6kubectl delete -f manifests/kafka-cluster.yaml
 7kubectl delete -f manifests/kafka-ui.yaml
 8kubectl delete -f manifests/strimzi-cluster-operator-$STRIMZI_VERSION.yaml
 9
10## delete minikube
11minikube delete
Summary
Kafka Connect is a tool for scalably and reliably streaming data between Apache Kafka and other systems. In this post, we discussed how to set up a data ingestion pipeline using Kafka connectors. Fake customer and order data was ingested into Kafka topics using the MSK Data Generator. Also, we used the Confluent S3 sink connector to save the messages of the topics into a S3 bucket. The Kafka Connect servers and individual connectors were deployed using the custom resources of Strimzi on Kubernetes.


Comments